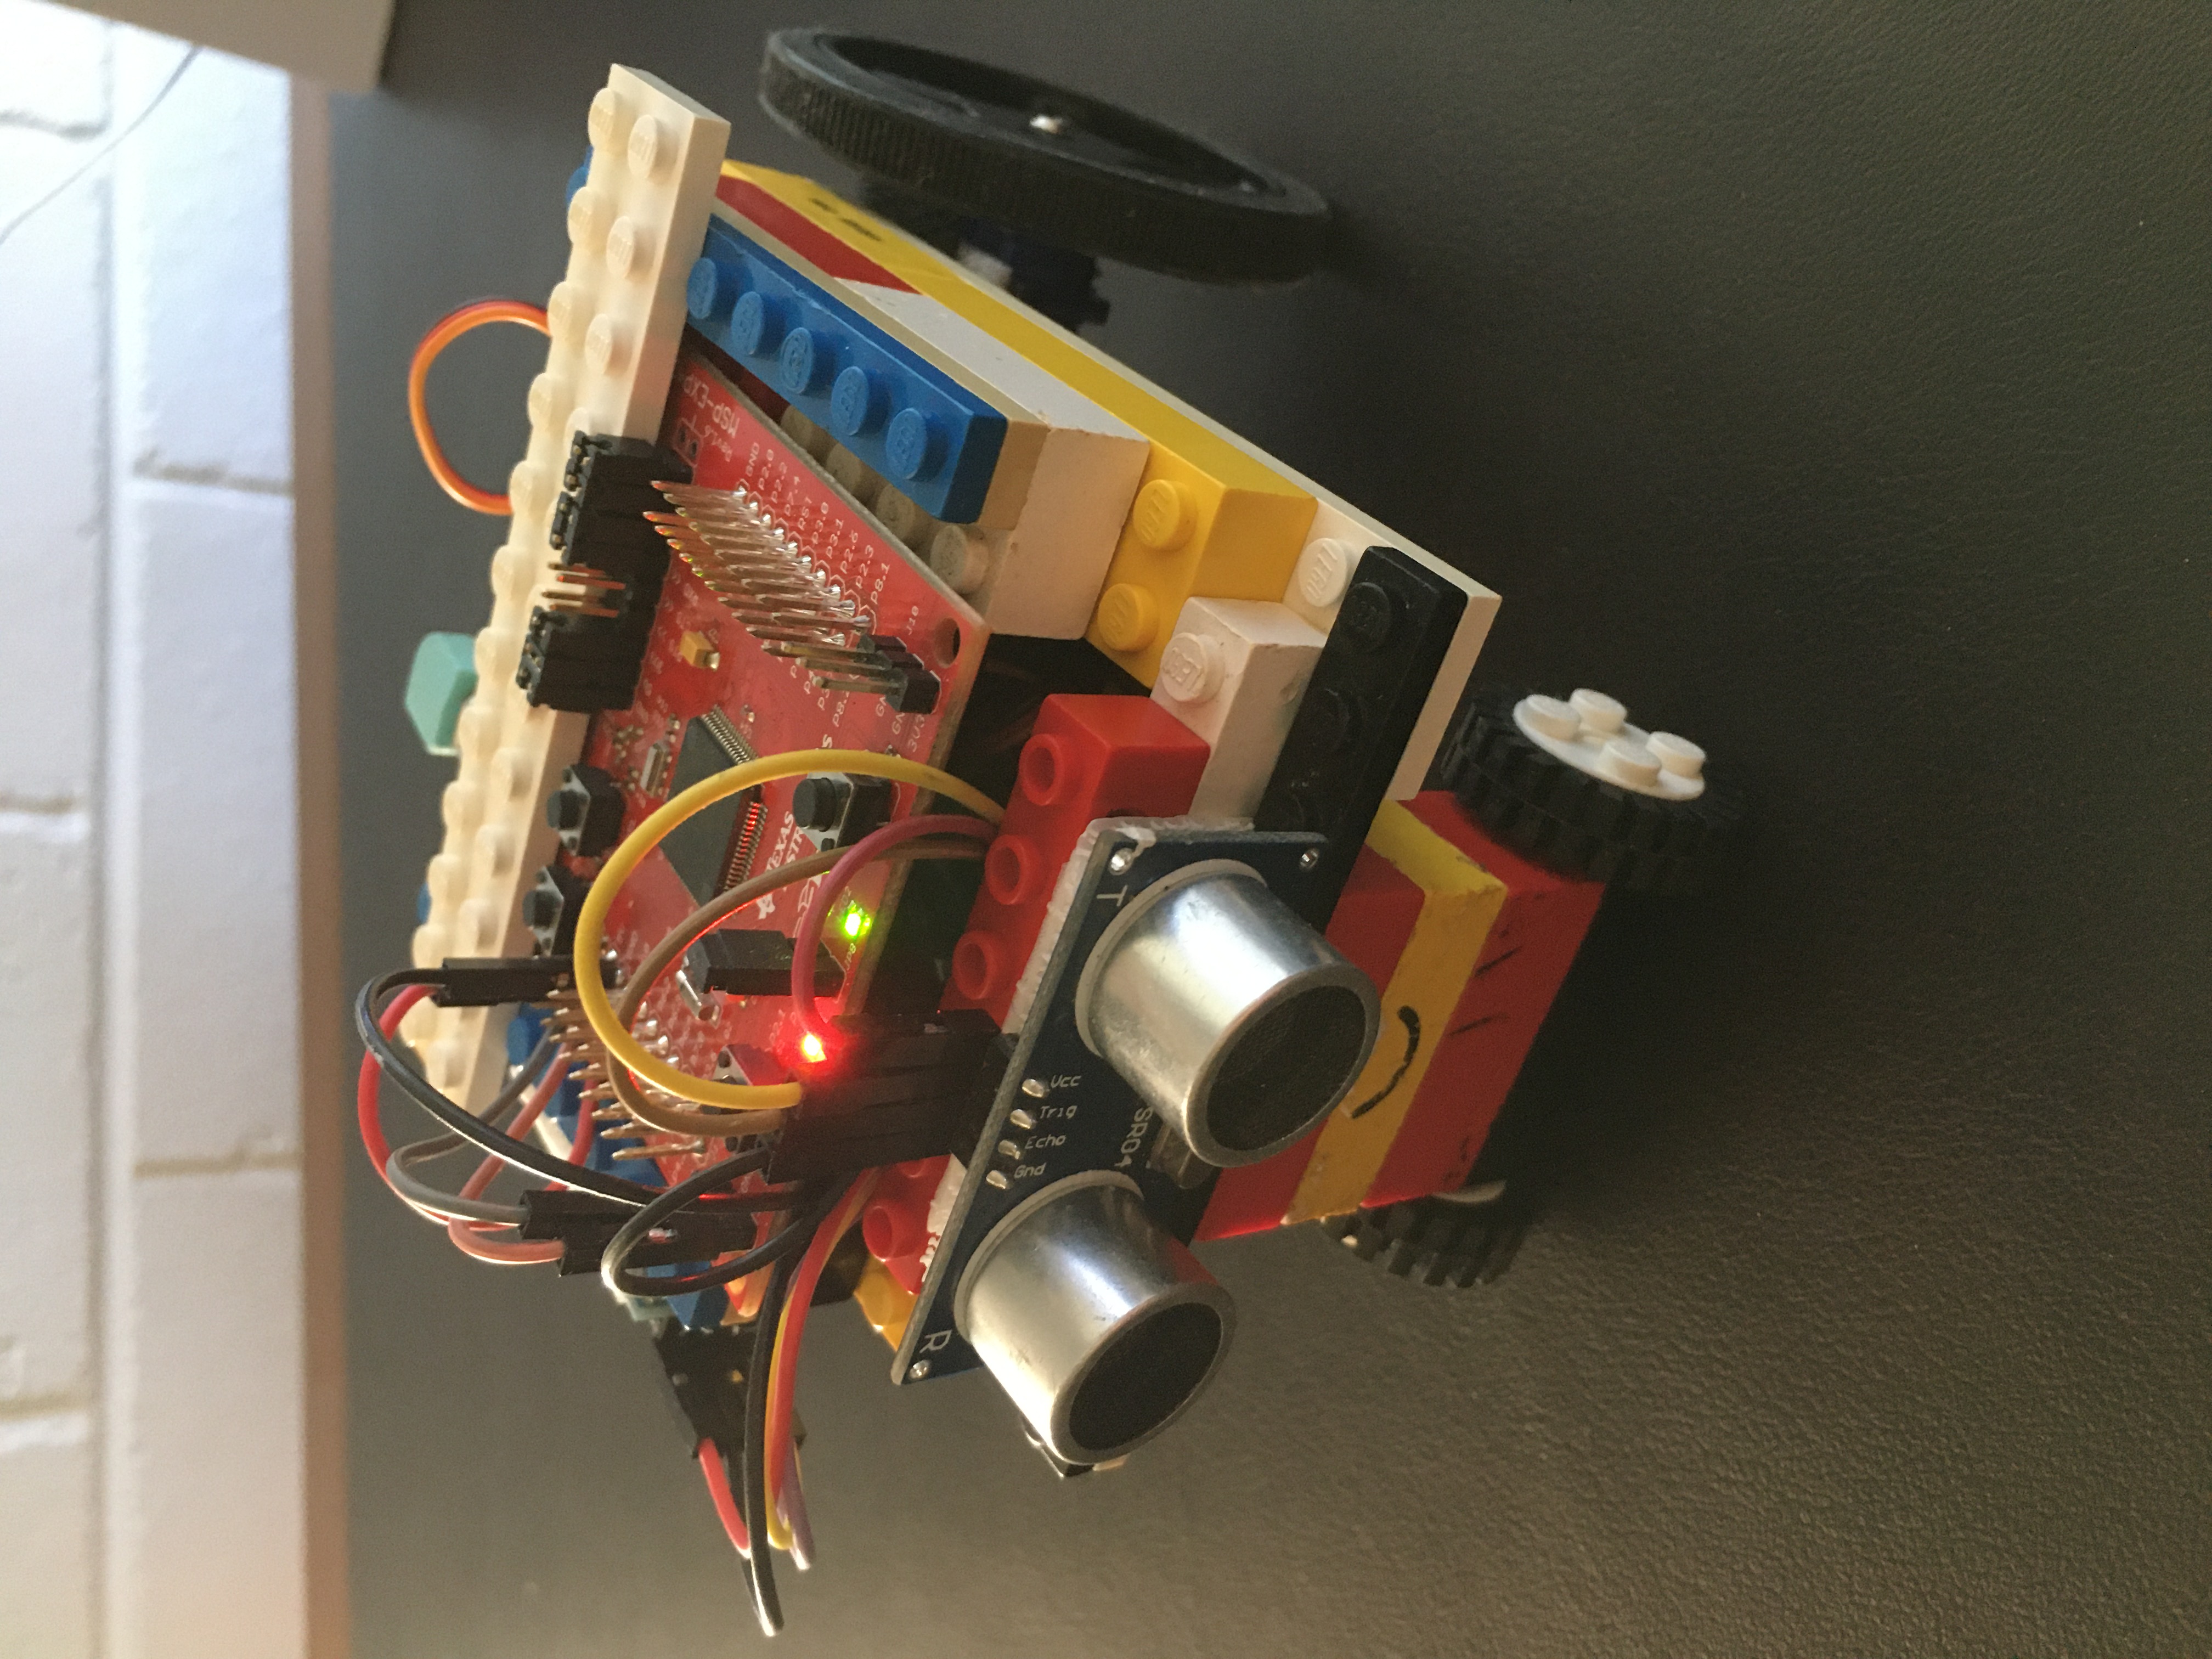
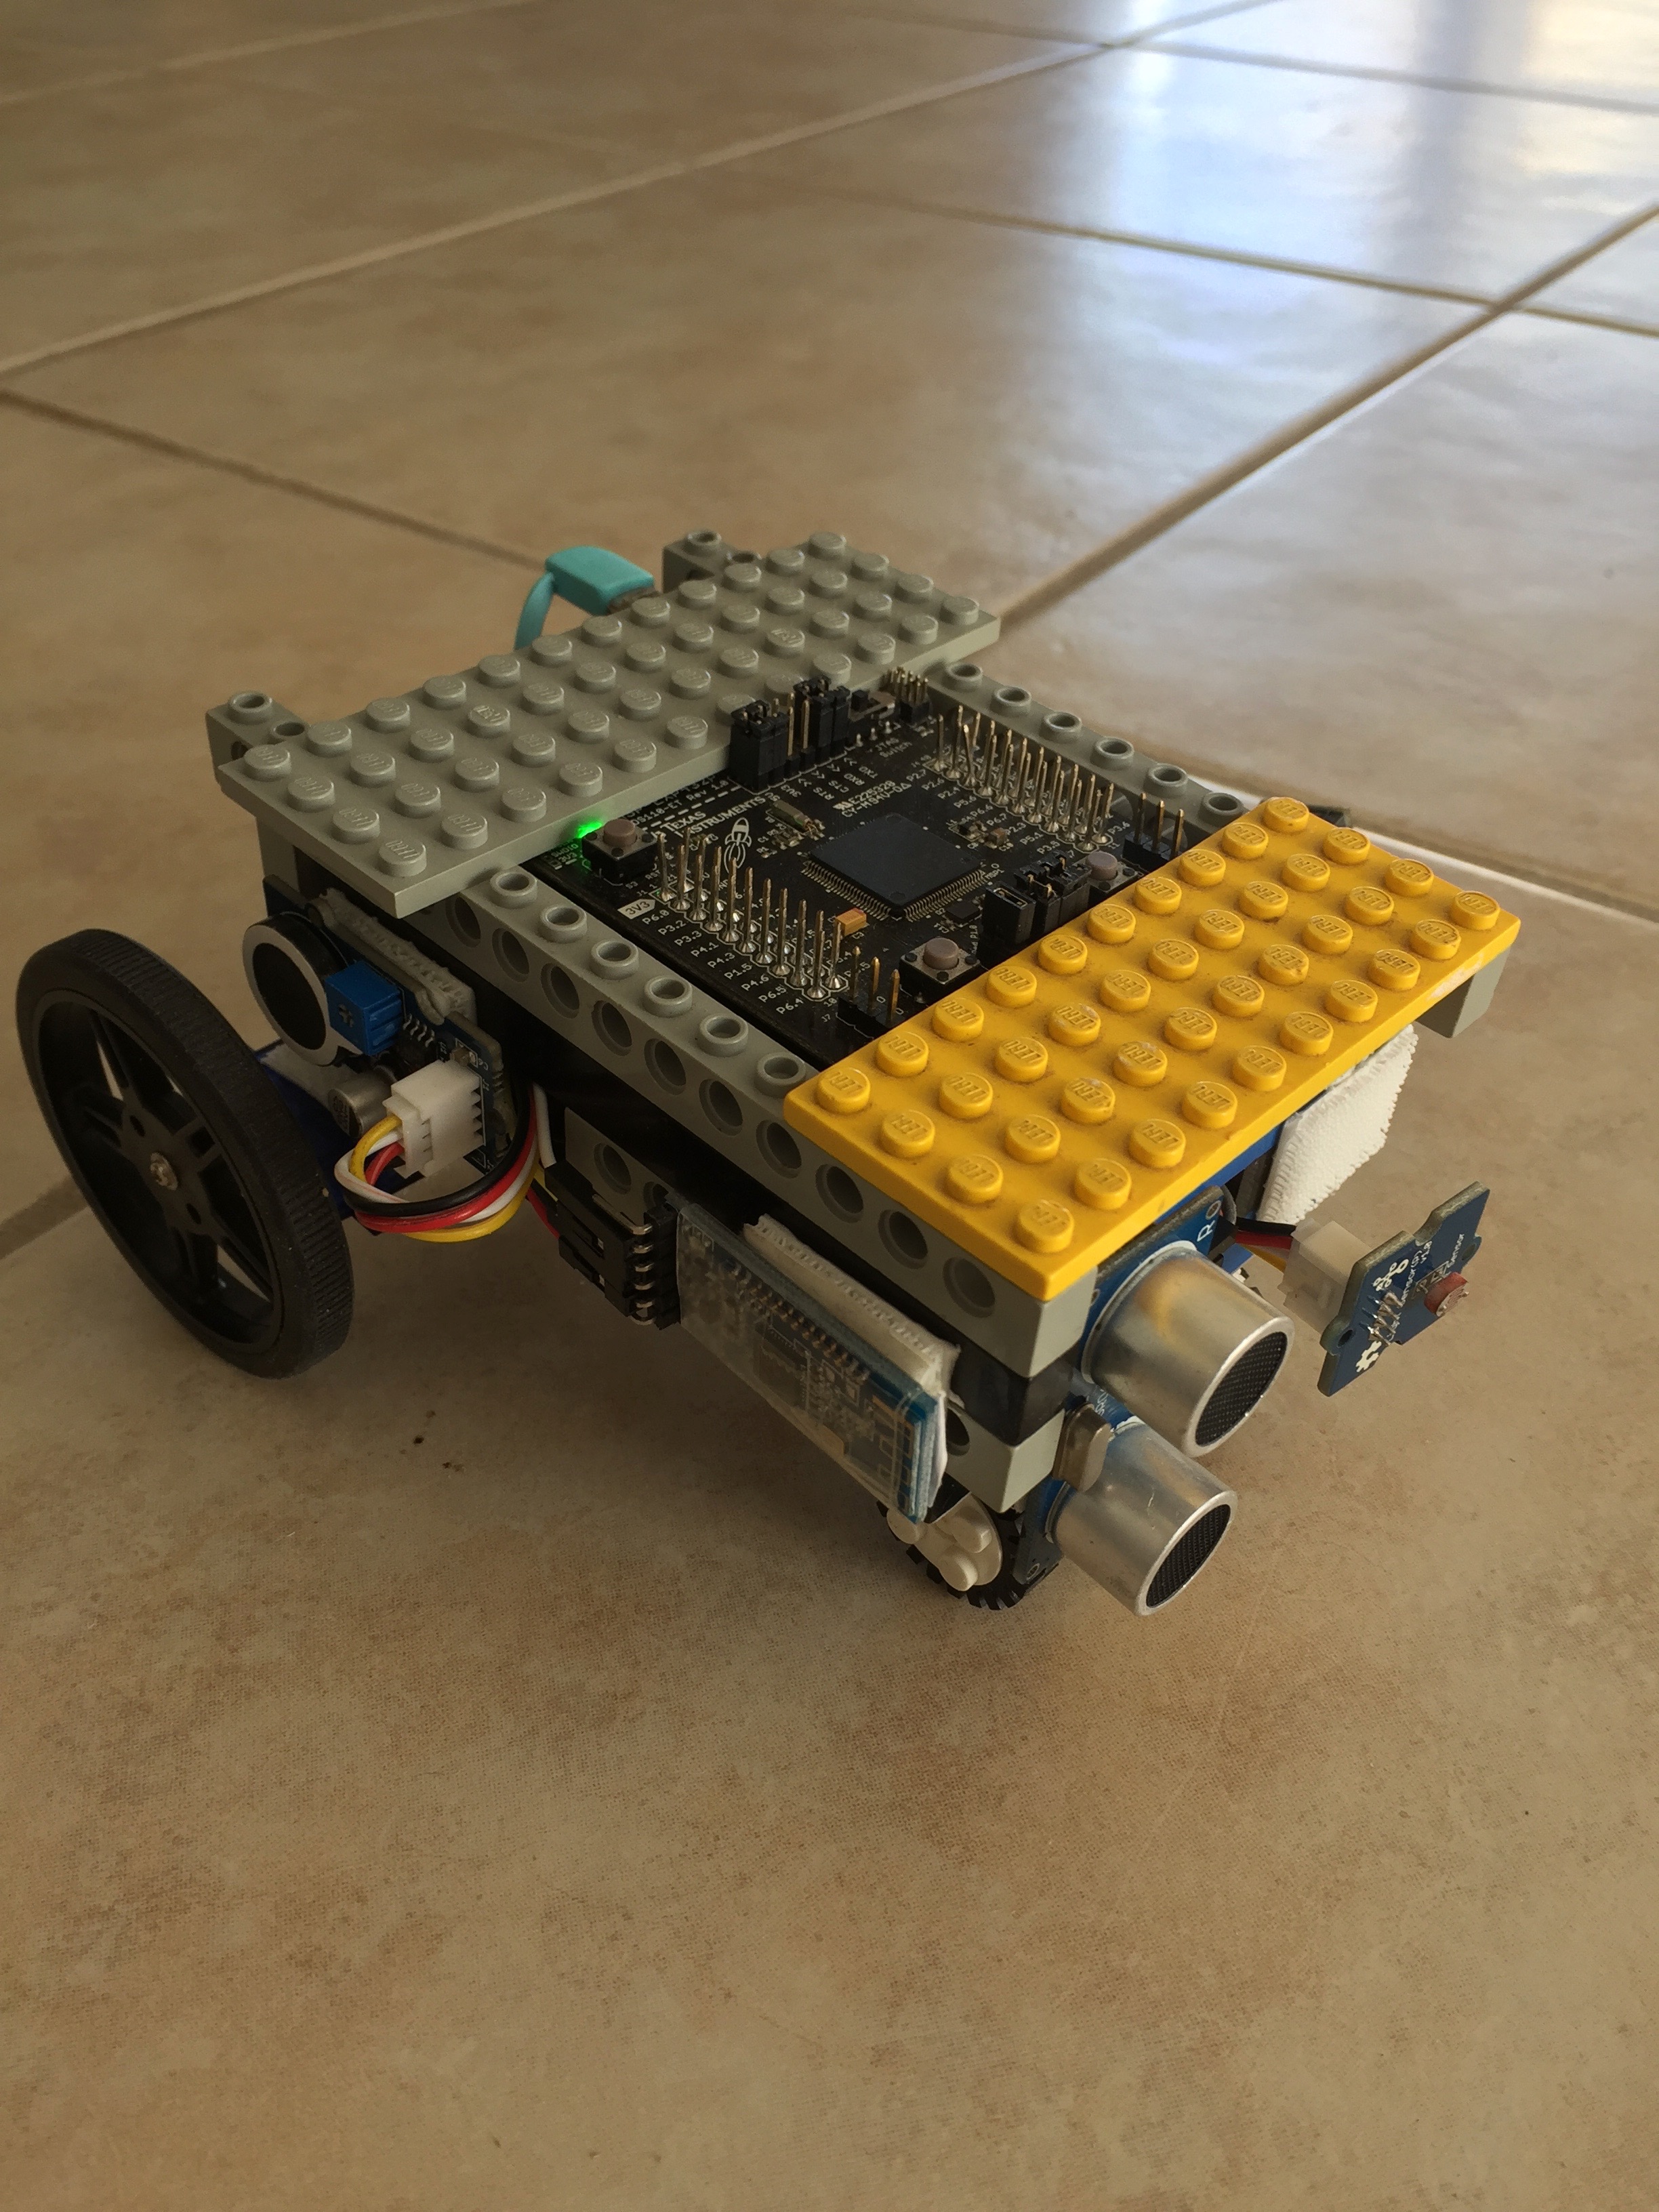
How would you like to build upon the last lesson: if we can build a functional BLE motion detector, why not add a couple of servo motors and some LEGO and build a remote-controlled robot?
Of course, you COULD go and spend hundreds of dollars and buy one of the shiny, cool pre-made ones, but that would not be nearly as much fun as designing, coding and building your own.
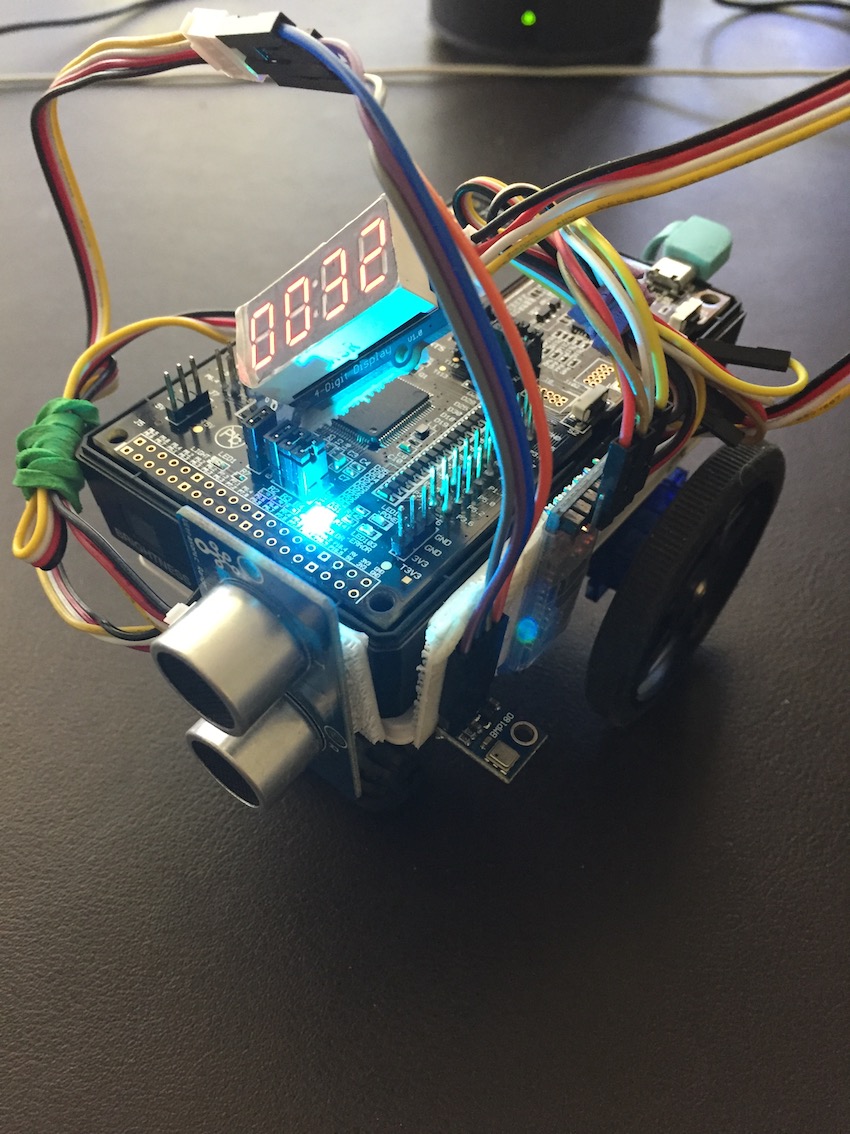
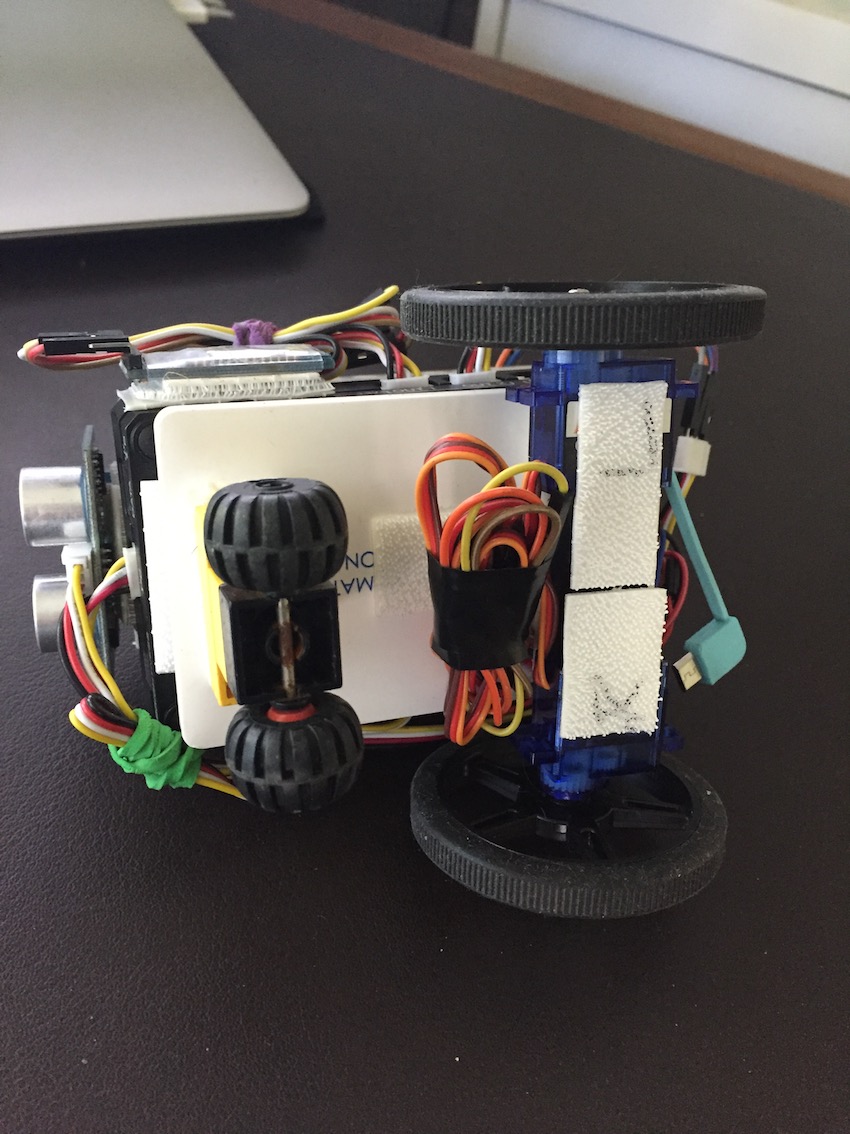
The model shown below is fully kitted out - it has on-board speaker and ultrasonic distance module, as well as the essentials: LaunchPad board, power source, BLE module and two small servo motors.
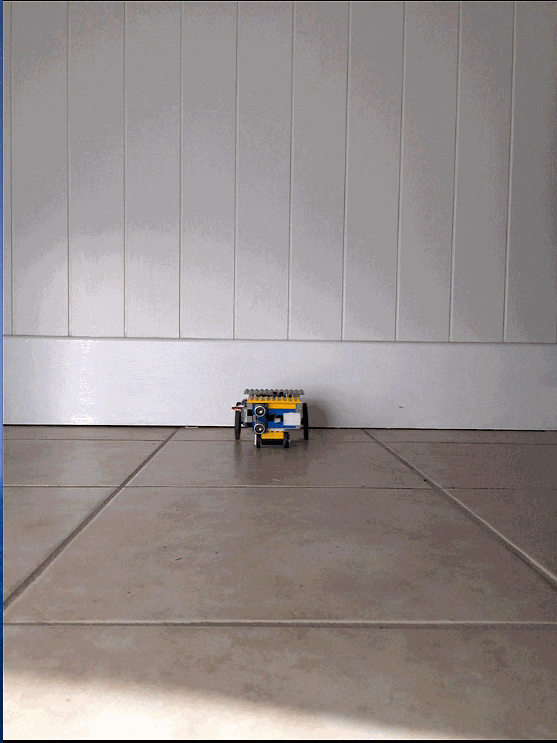
To build the case and wheels, I used pieces of LEGO that my children had built with many years ago - and that the grand-children are now having great fun with! Fortunately, we had plenty to spare, so the grand-babies will not miss out.
If you don't have LEGO, then look for small boxes, or other creative design solutions. Note that the servos come with small discs and other attachments to which bottle caps can be glued or screwed to make functional wheels!
The single most useful resource that I have discovered are small inexpensive velcro picture hangers, available from the local supermarket: the glued side, once set, is very strong, and you can easily then attach and detach the various components to your casing (including my LEGO wheels!).
I also recently discovered a wonderful Australian resource in Robot Gear, where I was able to purchase some great wheels designed for the FS90R servo - and for just $AUD6.95, these make another nice-to-have for our project!
Two servo motors - I used Feetech FS90R micro continuous rotation servo from eBay and paid around $AUD6 each (total around $USD10) - NOTE: NOT the identical-looking Feetech FS90 which will NOT work for our purposes!
Generic HM-10 BLE module (under $USD5)
You will also need a light-weight power source.
I found a great 2500 mAh power bank on eBay for $AUD15! (around $USD10)
The form factor is ideal for our robot -it actually sits neatly beneath the LaunchPad board.
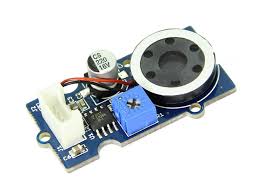
I used a Grove speaker but any small speaker will be fine (and much less expensive: under $USD5)
Pololu wheels are designed specifically for the FeeTech FS90R servo motor.
Refer to the previous lessons for connection instructions for the BLE module and the ultrasonic distance module. The speaker can be run from any spare pin, along with a ground (GND) and a voltage (VCC) pin.
The LaunchPad board comes with several voltage pins, both 3.3V and 5V. The only module here which really insisted on 5V was the HCSR04 ultrasonic. The servos expect 5V but will run (a little more slowly) on 3.3V.
WARNING: My first servo purchase from eBay delivered some lovely black heavy-duty motors that actually drew too much current for the board to handle when connected to 5V - I started to smell burning and quickly disconnected. After some cautious experimentation, I found that these actually did work just fine from 3.3V instead of 5V. My recommendation, though, is for the lighter less hungry FS90R servos shown above.
If using the blue Feetech FS90R servos, then feel free to connect to one (but not both!) of the 5V pins; if trying another servo, be careful - but my experience has been that 3.3V is probably a safer choice.
The best option (if not the simplest) is to run the servos from an external battery. Use either a 9 volt "transistor" (D-type) battery or a 4-pack battery case. Either way, you will have a positive (red) and a negative (ground, black) lead. Using a breadboard (or even part of a breadboard), connect the red (positive) lead on the same line as the red (voltage) leads from your servos. The black ground lead needs to be connected to a ground pin on your board, along with the black/ground leads from the servos, connected to other ground pins. Connect the other (signal) leads from the servos to the appropriate pins on your board, and you now have a circuit which runs through your board but with no risk of frying it!
The FS90R comes with three leads - brown, red and orange. Brown is ground (normally black), red (as usual) is voltage, and orange goes to the pin assigned to that servo in your sketch. There are numerous servo types available, and they can behave quite differently - some, for example, take inputs for speed, others for angle of turn. The simple form we use here are just responding to forward and reverse speed instructions.
Note, too, that the design I have used here allows me to connect jumpers both above and below the board. Above is easiest, but if you are running short of voltage and ground pins, then you may end up connecting some underneath.
Remember: You can always reflash your Innovator Hub to return it to its original state, using the tools that TI has made available (just follow the Resources tab, and then "Keep your Innovator up to date").
So it is possible to explore coding the Hub in new ways!
LaunchPad Sketch: Simple Two Servo controls (Copy and paste into Energia)
Have a look through the sketch. There are several features thast you should note.
First, you will see that we include two standard Arduino/LaunchPad libraries - wire and servo.
We define two servos, calling them servoLeft and servoRight. I have chosen to use pins 38 and 39 for these servos, but you are free to use others.
As usual, we define Serial and Serial1 (our BLE port), and use recvChar to control our robot - a single character sent from our Lua script to move forward, back, left or right.
NOTE that I have defined four separate functions (leftForward, leftBack, etc) which are outside the loop and setup functions. This is something new, and allows us to moake our sketch much simpler and easier to follow.
You should also note the line in setup that can be used to rename your BLE module: so instead of BT05 or CC41-A, or HMSoft, for example, your robot can be identified by name! You will need to switch the power to the board off and on again, and give it a minute or so to reset itself, but this will make your life much easier if, like me, you have several BLE devices broadcasting.
In the sketch below, note that pins 38 and 39 correspond to BB9 and BB10 on the Innovator Hub!
#include <Wire.h>
#include <Servo.h>
Servo servoLeft; // create servo object to control a servo
Servo servoRight; // a maximum of eight servo objects can be created
int servoLeftPin = 38; //Innovator Hub port BB9
int servoRightPin = 39; //Innovator Hub port BB10
int pos = 0;
void setup() {
Serial.begin(9600);
Serial1.begin(9600);
// delay(1000);
// Serial1.println("AT"); // just a check
// delay(2000);
// Serial1.println("AT+ROLE0"); // set up as Slave
// delay(2000); //wait a couple of seconds
// Serial1.println("AT+NAMEMyRobot"); // Uncomment these lines to rename your BLE module!
}
screen = platform.window
w = screen:width()
h = screen:height()
local hh = platform:isDeviceModeRendering()
local ipad = platform:isTabletModeRendering()
pcall(function ()
require 'bleCentral' end)
require "color"
local myColor = color.lightgray
local alert = ''
local myChar = nil
local startX,startY,width
local bleState = ''
local bleStatus = 'Tap here to scan'
local peripheralList = {}
local myUUID = 'FFE1'
local nameList = {'myRobot'}
function on.construction()
w = screen:width() or 841
h = screen:height() or 567
pcall(function()
ble.addStateListener(listenerCallback) end)
refreshMenu()
screen:invalidate()
end
-- Layout Functions (resize and paint)
function checkFont(fontSize)
if hh then
fontSize = fontSize < 25 and fontSize or 24
fontSize = fontSize > 6 and fontSize or 7
end
return fontSize
end
function on.resize()
w = screen:width() or 841
h = screen:height() or 567
startX, startY, width = 0.5*w, 0.5*h, 0.2*h
screen:invalidate()
end
function on.paint(gc)
local fontSize = math.floor(h/36 + 0.5)
checkFont(fontSize)
gc:setFont("sansserif", "b", fontSize)
local radius = 0.05*h
if bleStatus:find("Connect") then
myColor = color.dodgerblue
end
gc:setColorRGB(myColor)
if #peripheralList > 0 then
for p = 1, #peripheralList do
local sw = gc:getStringWidth(peripheralList[p]:getName())
if peripheralList[p]:getName() then gc:setColorRGB(myColor) else gc:setColorRGB(color.gray) end
gc:drawString(peripheralList[p]:getName(), 0.95*w - sw, 0.95*h - (p-1)*0.1*h, 'middle')
end
end
if peripheralList[1] and (peripheralList[1]:getName()):find("Robot") then
if ch == "F" then
alert = "F" if myChar then myChar:write(alert, true) end
elseif ch == "B" then alert = "B"
if myChar then myChar:write(alert, true) end
elseif ch == "L" then alert = "L"
if myChar then myChar:write(alert, true) end
elseif ch == "R" then alert = "R"
if myChar then myChar:write(alert, true) end
elseif ch == "n" then alert = "n"
if myChar then myChar:write(alert, true) end
end
end
screen:invalidate()
end
function on.mouseUp(x, y)
w = screen:width() or 841
h = screen:height() or 567
if x > startX - width/2 and x < startX + width/2 and y > startY - 3*width/2 and y < startY - width/2 then on.charIn("F")
elseif x > startX - width/2 and x < startX + width/2 and y < startY + 3*width/2 and y > startY + width/2 then
on.charIn("B")
elseif x > startX - 3*width/2 and x < startX - width/2 and y > startY - width/2 and y < startY + width/2 then
on.charIn("L")
elseif x > startX + width/2 and x < startX + 3*width/2 and y > startY - width/2 and y < startY + width/2 then
on.charIn("R")
elseif x > startX - width/2 and x < startX + width/2 and y > startY - width/2 and y < startY + width/2 then
on.charIn("n")
end
if x < 0.5*w and y < 0.1*h then
if not bleStatus:find("Connect") then peripheralOn()
else peripheralOff() end
end
screen:invalidate()
end
-- BLE General Functions -----------
function listenerCallback(state, scriptError)
if state == ble.ON then
bleState = 'BLE ON'
elseif state == ble.OFF then
bleState = 'BLE OFF'
elseif state == ble.RESETTING then
bleState = 'BLE RESET'
elseif state == ble.UNSUPPORTED then
bleState = 'UNSUPPORTED'
if scriptError then
print('Error message: BLE not supported')
end
end
if #peripheralList > 0 then
for p = #peripheralList, 1, -1 do
peripheralList[p]:disconnect()
end
myColor = color.lightgray
end
bleStatus = 'Tap here to scan'
peripheralList = {}
screen:invalidate()
end
function callbackScan(peripheral)
if peripheral ~= nil then
peripheralName = peripheral:getName()
for n =1, #nameList do
if peripheral:getName() and peripheral:getName() == nameList[n] then
if peripheral ~= nil and peripheral:getState() and peripheral:getState() == bleCentral.CONNECTED then
local services = peripheral:getServices()
for _,service in ipairs(services) do
service:discoverCharacteristics(callbackCharacteristics)
end
end
screen:invalidate()
end
-- BLE Specific Functions ---------
function callbackCharacteristics(service)
local characteristicsList = service:getCharacteristics()
for _,characteristic in ipairs(characteristicsList) do
if characteristic:getUUID() == myUUID then
myChar = characteristic
on.charIn(alert)
end
end
end
Interactive Script Exploration
This page has been enhanced using JavaScript so that we can focus easily upon the various elements of our script.
Click the 'init' button to see the initial variable definitions in the script window below for our robot.
NOTE: the name of the BLE module you are using is entered in the variable 'nameList'. Feel free to change this as required.
Included here is on.construction, with elements that are called just once. Note the use of 'pcall' (protected call - just in case you are on a platform that does not support this function). Note also that refreshMenu is called just once in a script.
To see on.resize and on.paint functions, click 'Layout'.
NOTE: I have also added a small utility function to check the size of the font - this script will not work on the handheld (BLE requires the iPad app) but this is a handy thing to include in any script).
For menu, keyboard and mouse controls, click 'Menu'.
For BLE functions common to many scripts, click 'BLE General'.
For BLE functions specific to this script, click 'BLE Specific'. This section is much shorter than usual, since we are not looking for any feedback from the bLE connection - we are simply writing commands to it and letting the sketch do the hard work.
To see the entire script (and copy to paste into the TI-Nspire Script Editor), click 'Full Script'.
platform.apilevel = '2.5'
screen = platform.window
w = screen:width()
h = screen:height()
local hh = platform:isDeviceModeRendering()
local ipad = platform:isTabletModeRendering()
pcall(function ()
require 'bleCentral' end)
require "color"
local myColor = color.lightgray
local alert = ''
local myChar = nil
local startX,startY,width
local bleState = ''
local bleStatus = 'Tap here to scan'
local peripheralList = {}
local myUUID = 'FFE1'
local nameList = {'myRobot'}
function on.construction()
w = screen:width() or 841
h = screen:height() or 567
pcall(function()
ble.addStateListener(listenerCallback) end)
refreshMenu()
screen:invalidate()
end
-- Layout Functions (resize and paint)
function checkFont(fontSize)
if hh then
fontSize = fontSize < 25 and fontSize or 24
fontSize = fontSize > 6 and fontSize or 7
end
return fontSize
end
function on.resize()
w = screen:width() or 841
h = screen:height() or 567
startX, startY, width = 0.5*w, 0.5*h, 0.2*h
screen:invalidate()
end
function on.paint(gc)
local fontSize = math.floor(h/36 + 0.5)
checkFont(fontSize)
gc:setFont("sansserif", "b", fontSize)
local radius = 0.05*h
if bleStatus:find("Connect") then
myColor = color.dodgerblue
end
gc:setColorRGB(myColor)
if #peripheralList > 0 then
for p = 1, #peripheralList do
local sw = gc:getStringWidth(peripheralList[p]:getName())
if peripheralList[p]:getName() then gc:setColorRGB(myColor) else gc:setColorRGB(color.gray) end
gc:drawString(peripheralList[p]:getName(), 0.95*w - sw, 0.95*h - (p-1)*0.1*h, 'middle')
end
end
if peripheralList[1] and (peripheralList[1]:getName()):find("Robot") then
if ch == "F" then
alert = "F" if myChar then myChar:write(alert, true) end
elseif ch == "B" then alert = "B"
if myChar then myChar:write(alert, true) end
elseif ch == "L" then alert = "L"
if myChar then myChar:write(alert, true) end
elseif ch == "R" then alert = "R"
if myChar then myChar:write(alert, true) end
elseif ch == "n" then alert = "n"
if myChar then myChar:write(alert, true) end
end
end
screen:invalidate()
end
function on.mouseUp(x, y)
w = screen:width() or 841
h = screen:height() or 567
if x > startX - width/2 and x < startX + width/2 and y > startY - 3*width/2 and y < startY - width/2 then on.charIn("F")
elseif x > startX - width/2 and x < startX + width/2 and y < startY + 3*width/2 and y > startY + width/2 then
on.charIn("B")
elseif x > startX - 3*width/2 and x < startX - width/2 and y > startY - width/2 and y < startY + width/2 then
on.charIn("L")
elseif x > startX + width/2 and x < startX + 3*width/2 and y > startY - width/2 and y < startY + width/2 then
on.charIn("R")
elseif x > startX - width/2 and x < startX + width/2 and y > startY - width/2 and y < startY + width/2 then
on.charIn("n")
end
if x < 0.5*w and y < 0.1*h then
if not bleStatus:find("Connect") then peripheralOn()
else peripheralOff() end
end
screen:invalidate()
end
-- BLE General Functions -----------
function listenerCallback(state, scriptError)
if state == ble.ON then
bleState = 'BLE ON'
elseif state == ble.OFF then
bleState = 'BLE OFF'
elseif state == ble.RESETTING then
bleState = 'BLE RESET'
elseif state == ble.UNSUPPORTED then
bleState = 'UNSUPPORTED'
if scriptError then
print('Error message: BLE not supported')
end
end
if #peripheralList > 0 then
for p = #peripheralList, 1, -1 do
peripheralList[p]:disconnect()
end
myColor = color.lightgray
end
bleStatus = 'Tap here to scan'
peripheralList = {}
screen:invalidate()
end
function callbackScan(peripheral)
if peripheral ~= nil then
peripheralName = peripheral:getName()
for n =1, #nameList do
if peripheral:getName() and peripheral:getName() == nameList[n] then
if peripheral ~= nil and peripheral:getState() and peripheral:getState() == bleCentral.CONNECTED then
local services = peripheral:getServices()
for _,service in ipairs(services) do
service:discoverCharacteristics(callbackCharacteristics)
end
end
screen:invalidate()
end
-- BLE Specific Functions ---------
function callbackCharacteristics(service)
local characteristicsList = service:getCharacteristics()
for _,characteristic in ipairs(characteristicsList) do
if characteristic:getUUID() == myUUID then
myChar = characteristic
on.charIn(alert)
end
end
end
Congratulations! You now have a functional and cool BLE robot.
Based upon previous lessons, you might like to go ahead and add extra functionality to your robot - ultrasonic distance is a great way to monitor and control your device, and you have all that you need from the previous lessons to enhance your sketch to include this and other sensors, if desired.
The download for this page includes several sketches - the simple one shown above and an extensive one that includes a range of different applications. As well as the SimpleRobot.tns document, you will also find Robot_BLE.tns which adds the capability of linking to other BLE devices - control your robot using the accelerometer on your SensorTag, or your Vernier Go Wireless Link!! There is also the generic BLExplorer.tns document for taking it all to the next level.
Probably most useful is the general Lua_HubBLE.tns document, which will work with most functions of the Innovator Hub, handheld or BLE applications.
The Robot_BLE.tns document or Lua_HubBLE.tns - when used in conjunction with the LP_Robot_Grove.ino or LP_Robot_HCSR04.ino sketches - even offer the facility to make your robot self-driving!! It measures the distance to near objects and, when getting too close, will actually reverse and turn to avoid obstacles! Explore how this can be easily achieved in the Lua script.
If you run into problems, or you try new things, please feel free to drop me a line and I will happily do what I can to help you to get started.
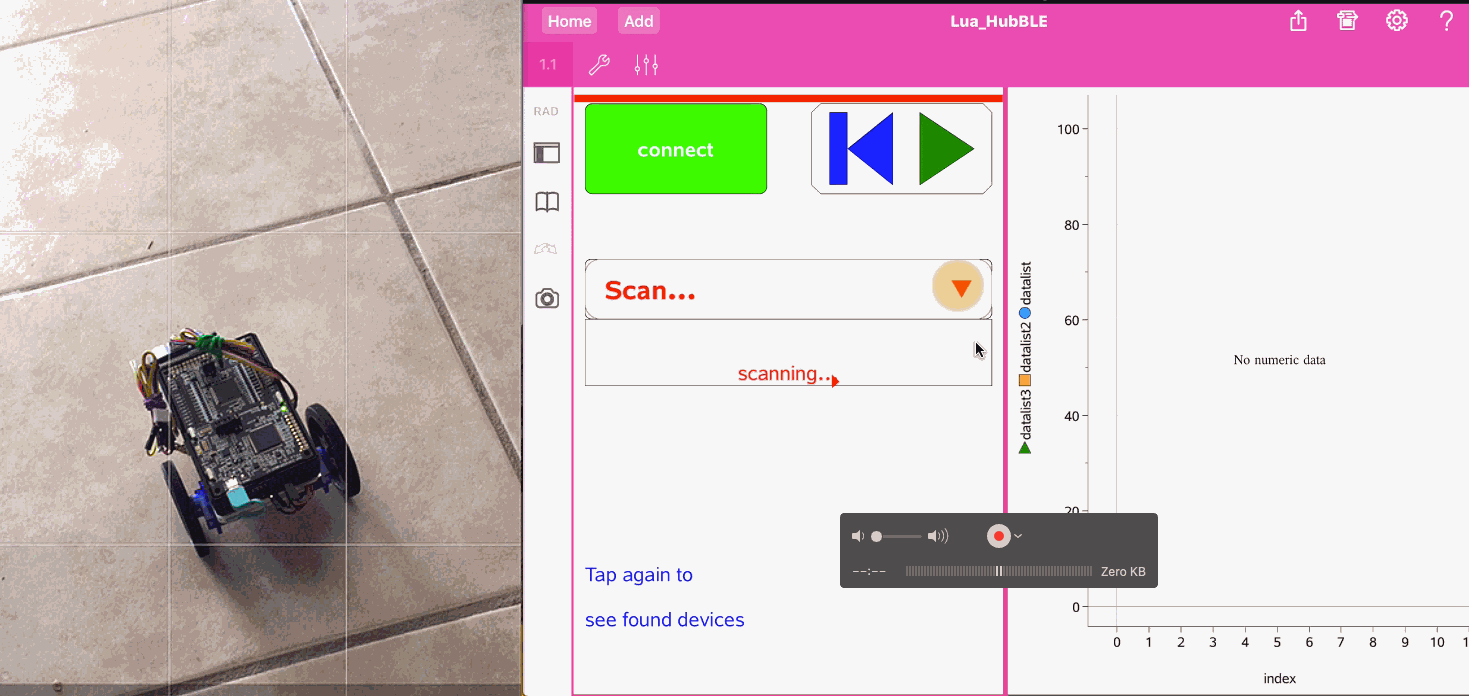
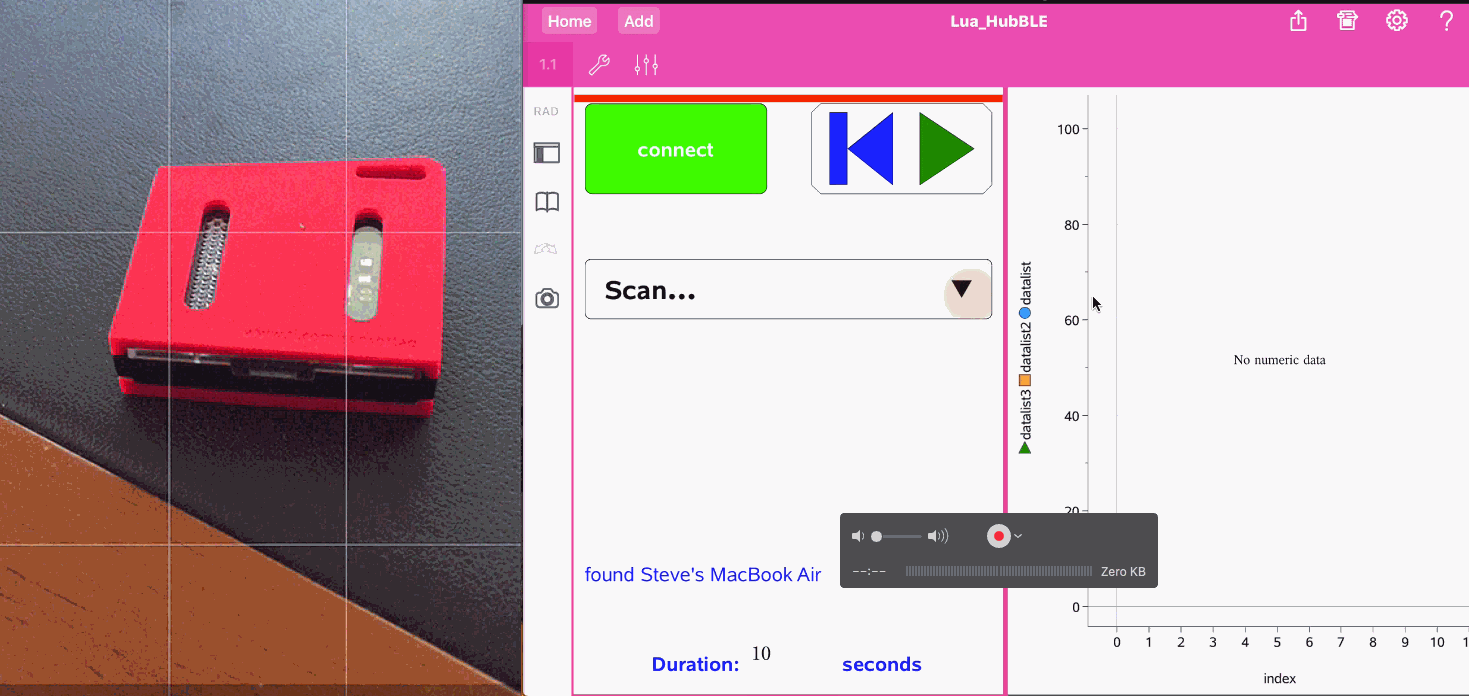
Make sure your LaunchPad with BLE module and suitable sketch is powered and close by, and tap on the button above to connect. Then try the following either by typing the given commands into the input box below, or scroll down to use the buttons which will automate this process. A log of the session will be stored on the text box opposite.
LED controls: r (red), g (green), b (blue)
Numbers such as 110 and 220 will play these tones if a speaker is attached.
If an HC-SR04 ultrasonic ranger is connected, then h will display the distance. If Grove Rangers are connected, then use d and/or D.
Use l for Light Intensity and s for Sound Intensity.
[I2C] Use p for Barometric Pressure ("p") and Temperature ("t"). and use x for 3-axis Accelerometer.
[Robot] F (Forward), B (Back), L (Left) and R (Right). You might also use A (Auto drive).
Use n to RESET.
No SensorTag? No problem!
On a mobile device, just tap the button at the top of the page to turn on the internal accelerometer, connect your LaunchPad robot, and tap the Drive Using Accelerometer button.
Just connect your LaunchPad, tap the "Drive Using Accelerometer" button and use the acc_x and acc_y GeoGebra accelerometer sliders to control your Robot!
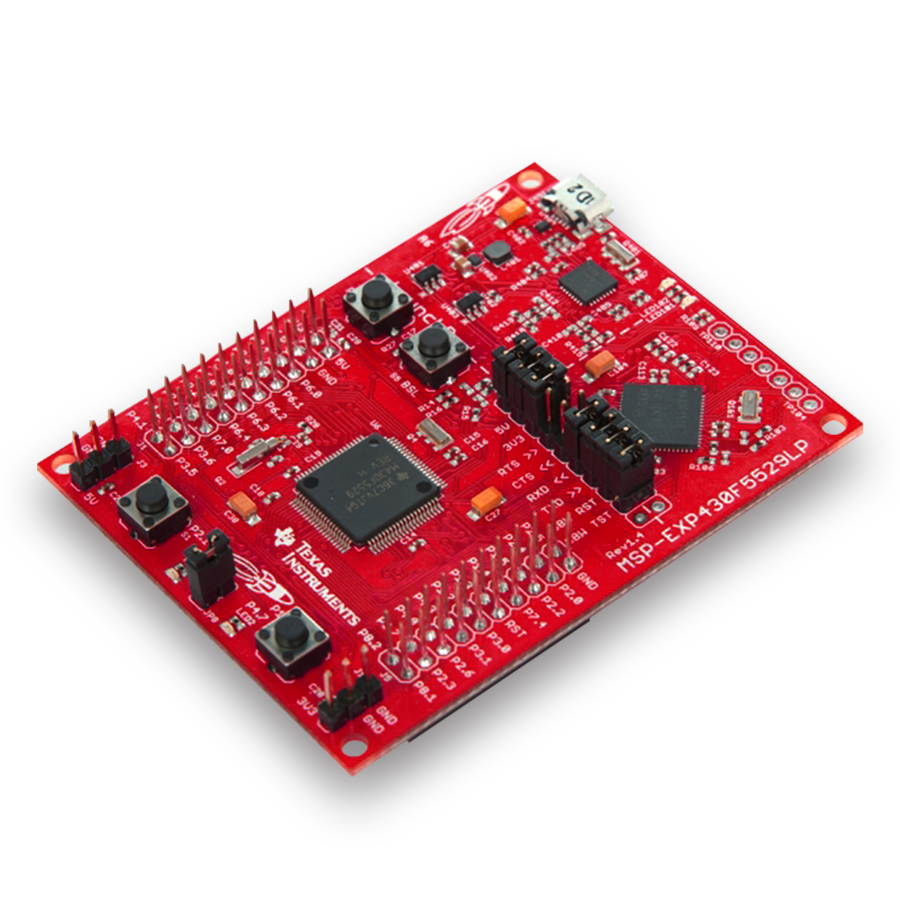 Texas Instruments MSP430 LaunchPad ($USD12.99 or ~$AUD21)
 Texas Instruments MSP432 LaunchPad ($USD19.99 or ~$AUD31)
 Two servo motors - I used Feetech FS90R micro continuous rotation servo from eBay and paid around $AUD6 each (total around $USD10) - NOTE: NOT the identical-looking Feetech FS90 which will NOT work for our purposes!
 Generic HM-10 BLE module (under $USD5)


./* Breadboard header connector */ BB1 14 BB2 15 BB3 7 BB4 18 BB5 13 BB6 12 BB7 33 BB8 40 BB9 38 BB10 39
 Have a look through the sketch. There are several features thast you should note.