Lesson 5: From Serial to BLE
Use your Chrome browser on Mac, Android or ChromeBook or the LightBlue App for iOS or Android to test this sketch.
Lesson 5: From Serial to BLE
Lesson 7 - Real world data at your fingertips: Light, Ultrasonic Motion and more...
Lesson 8 - Build your own BLE ultrasonic motion detector for under $USD30
Connecting to the World Beyond - Wirelessly!
Now that we know how to use the serial port on our LaunchPad, the great news is that we also know how to work with BLE - simple BLE modules, such as the Grove BLE used here actually function as an additional serial port. While the main Serial port transfers data via the USB port, the LaunchPad is able to define additional serial ports, and so we define "Serial1" to be our BLE port.
So connect your BLE module as described below and just change all "Serial" references in previous sketches to "Serial1" and you should be good to go! Of course, you will need a way to read and write these BLE communications. For that we can use the TI-Nspire iPad App(s) with a Lua document described below. For free options, we can use the LightBlue App for iOS or Android, or your Chrome browser on Mac, Android or ChromeBooks.
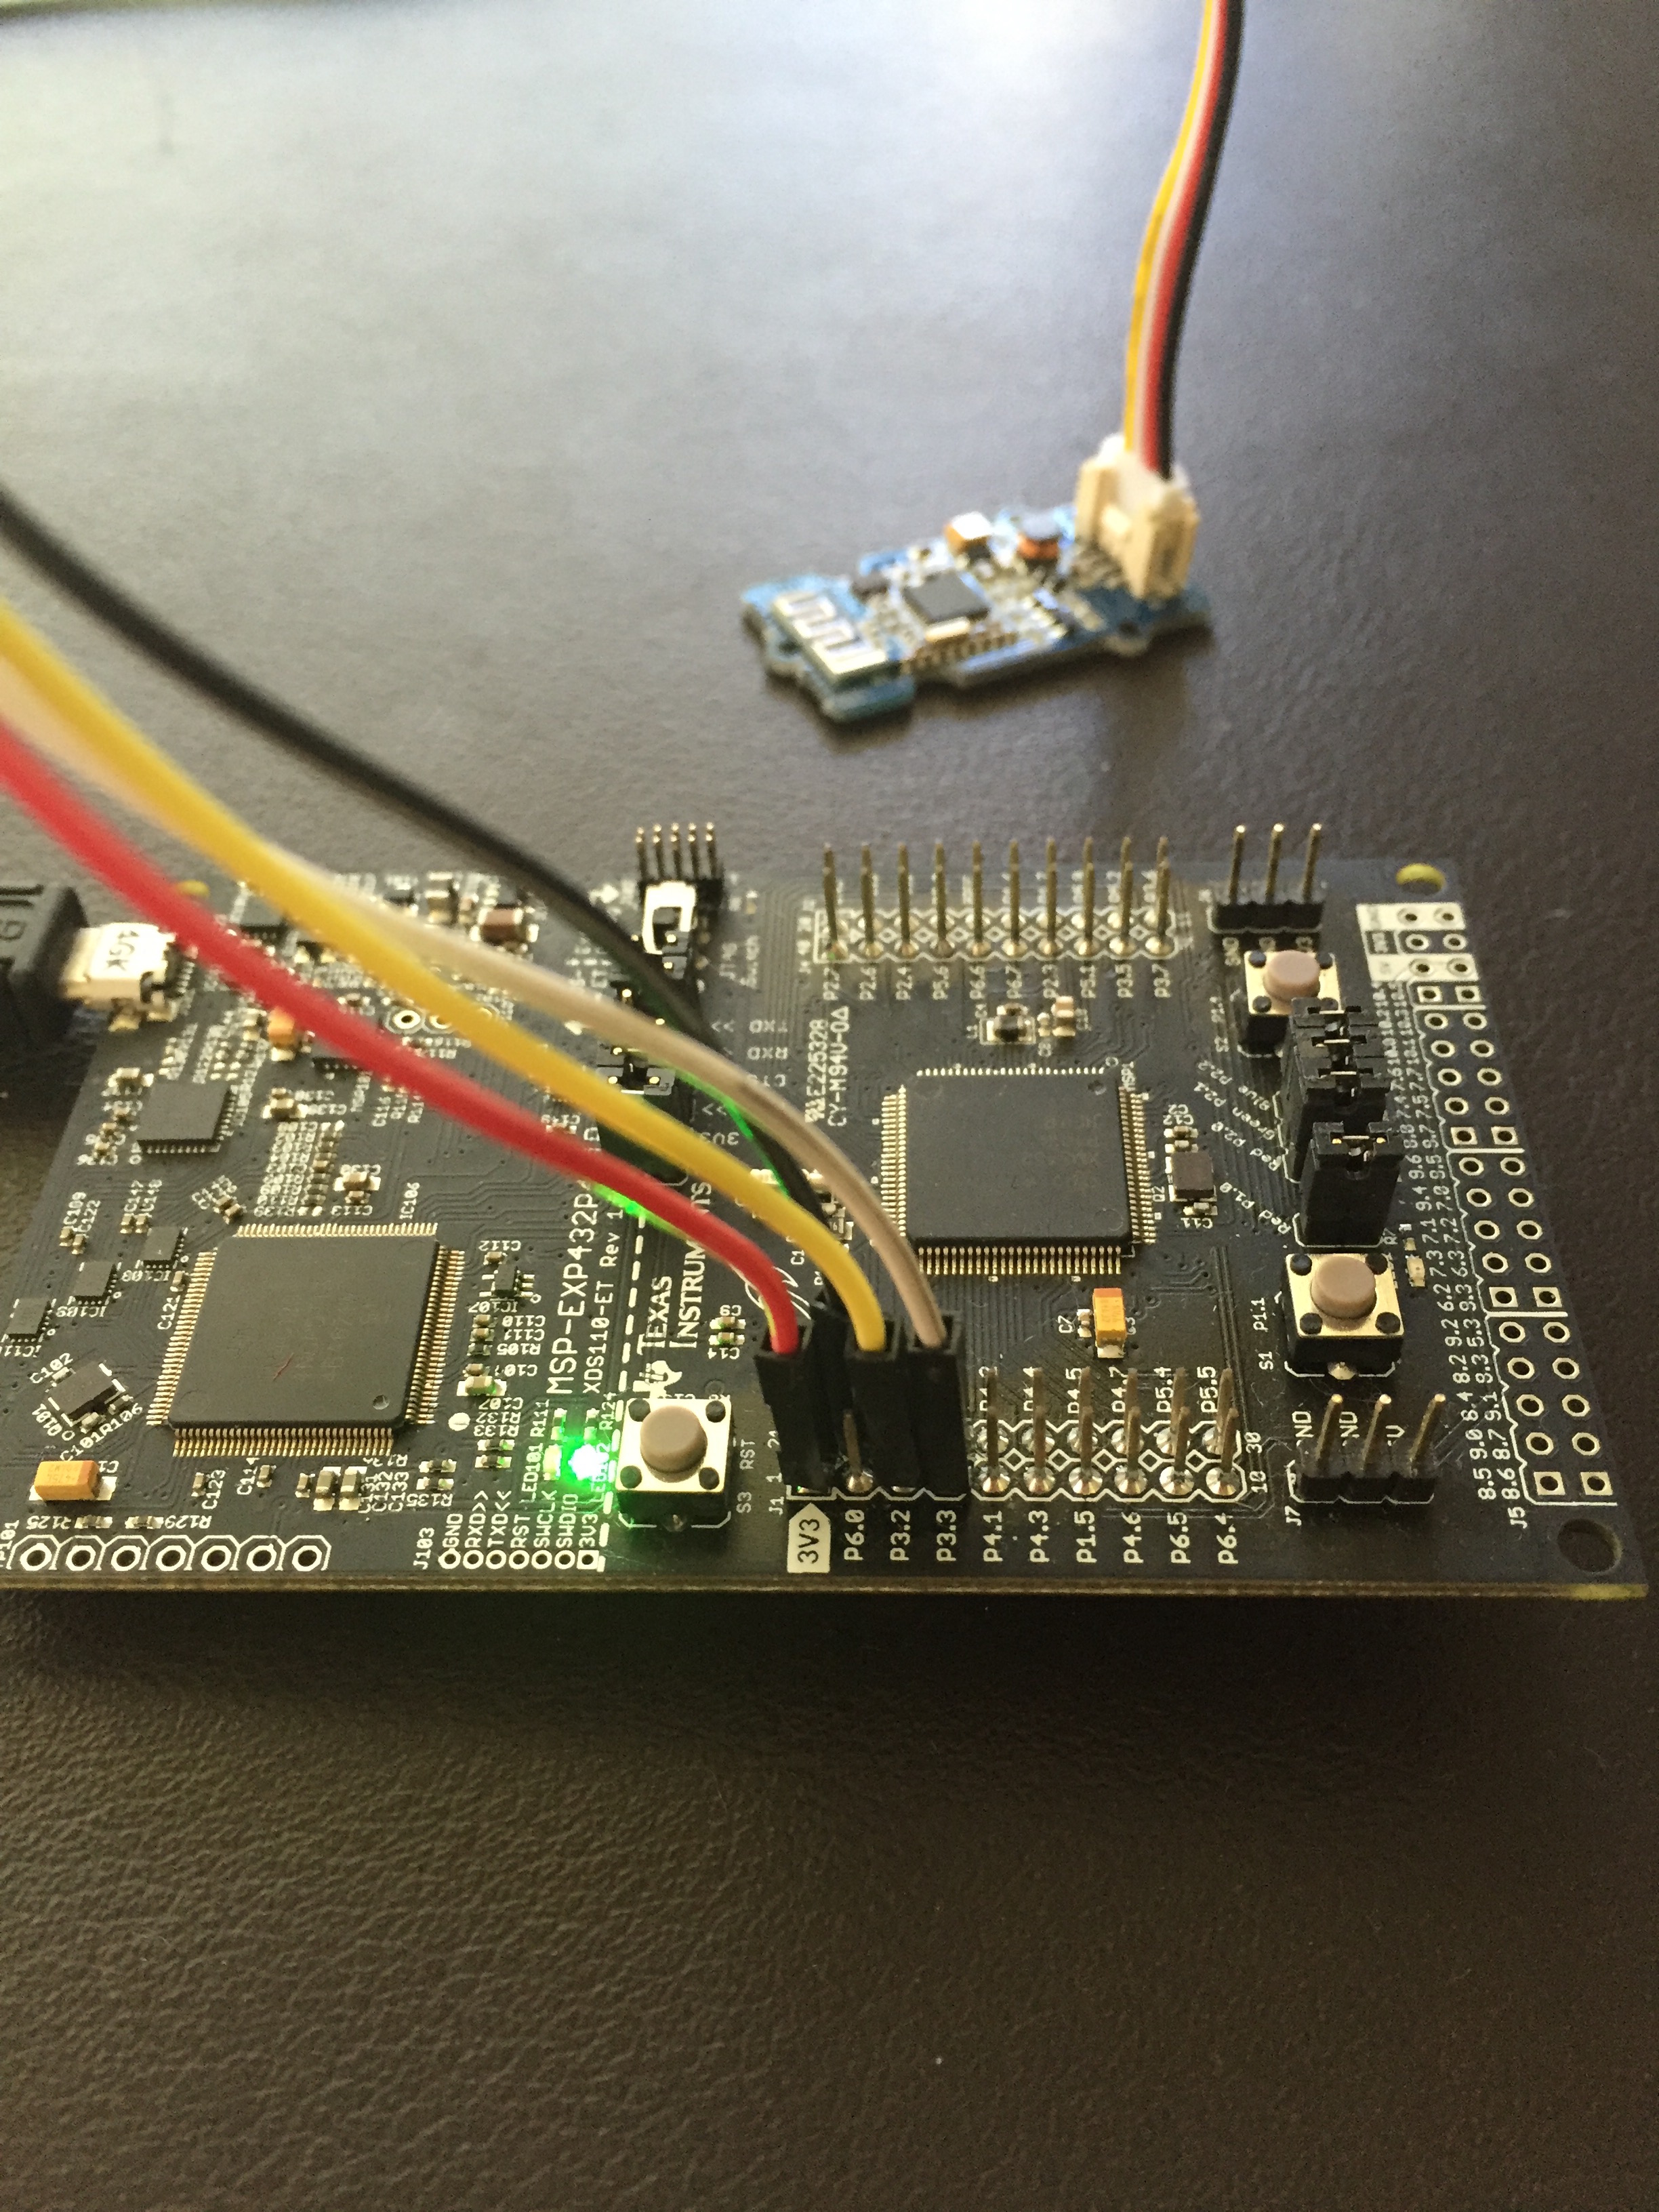
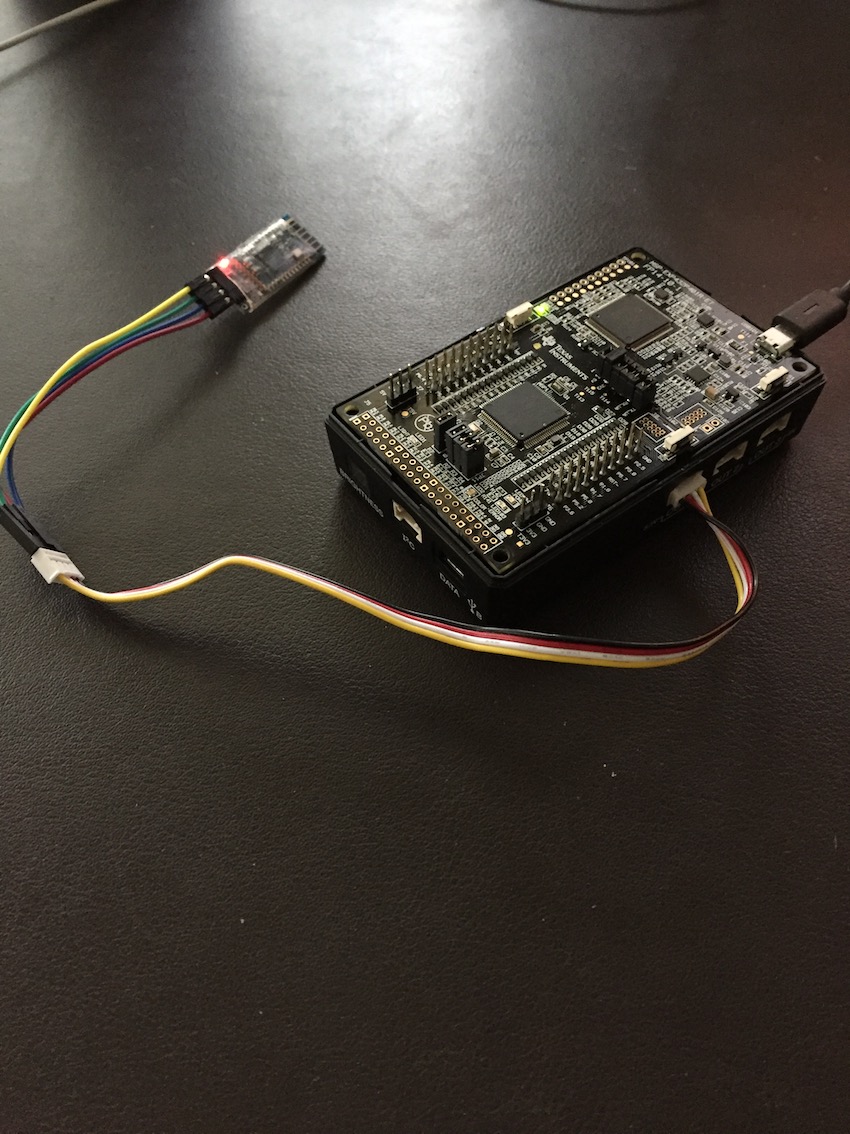
Connecting your BLE ModuleYou may want to go back to the previous lesson and review the pin layout of the MSP432 board. Of interest here are the pins labelled RX (receive) and TX (transfer). For our Serial1 port, these will be pins 3 (P3_2) and 4 (P3_3).
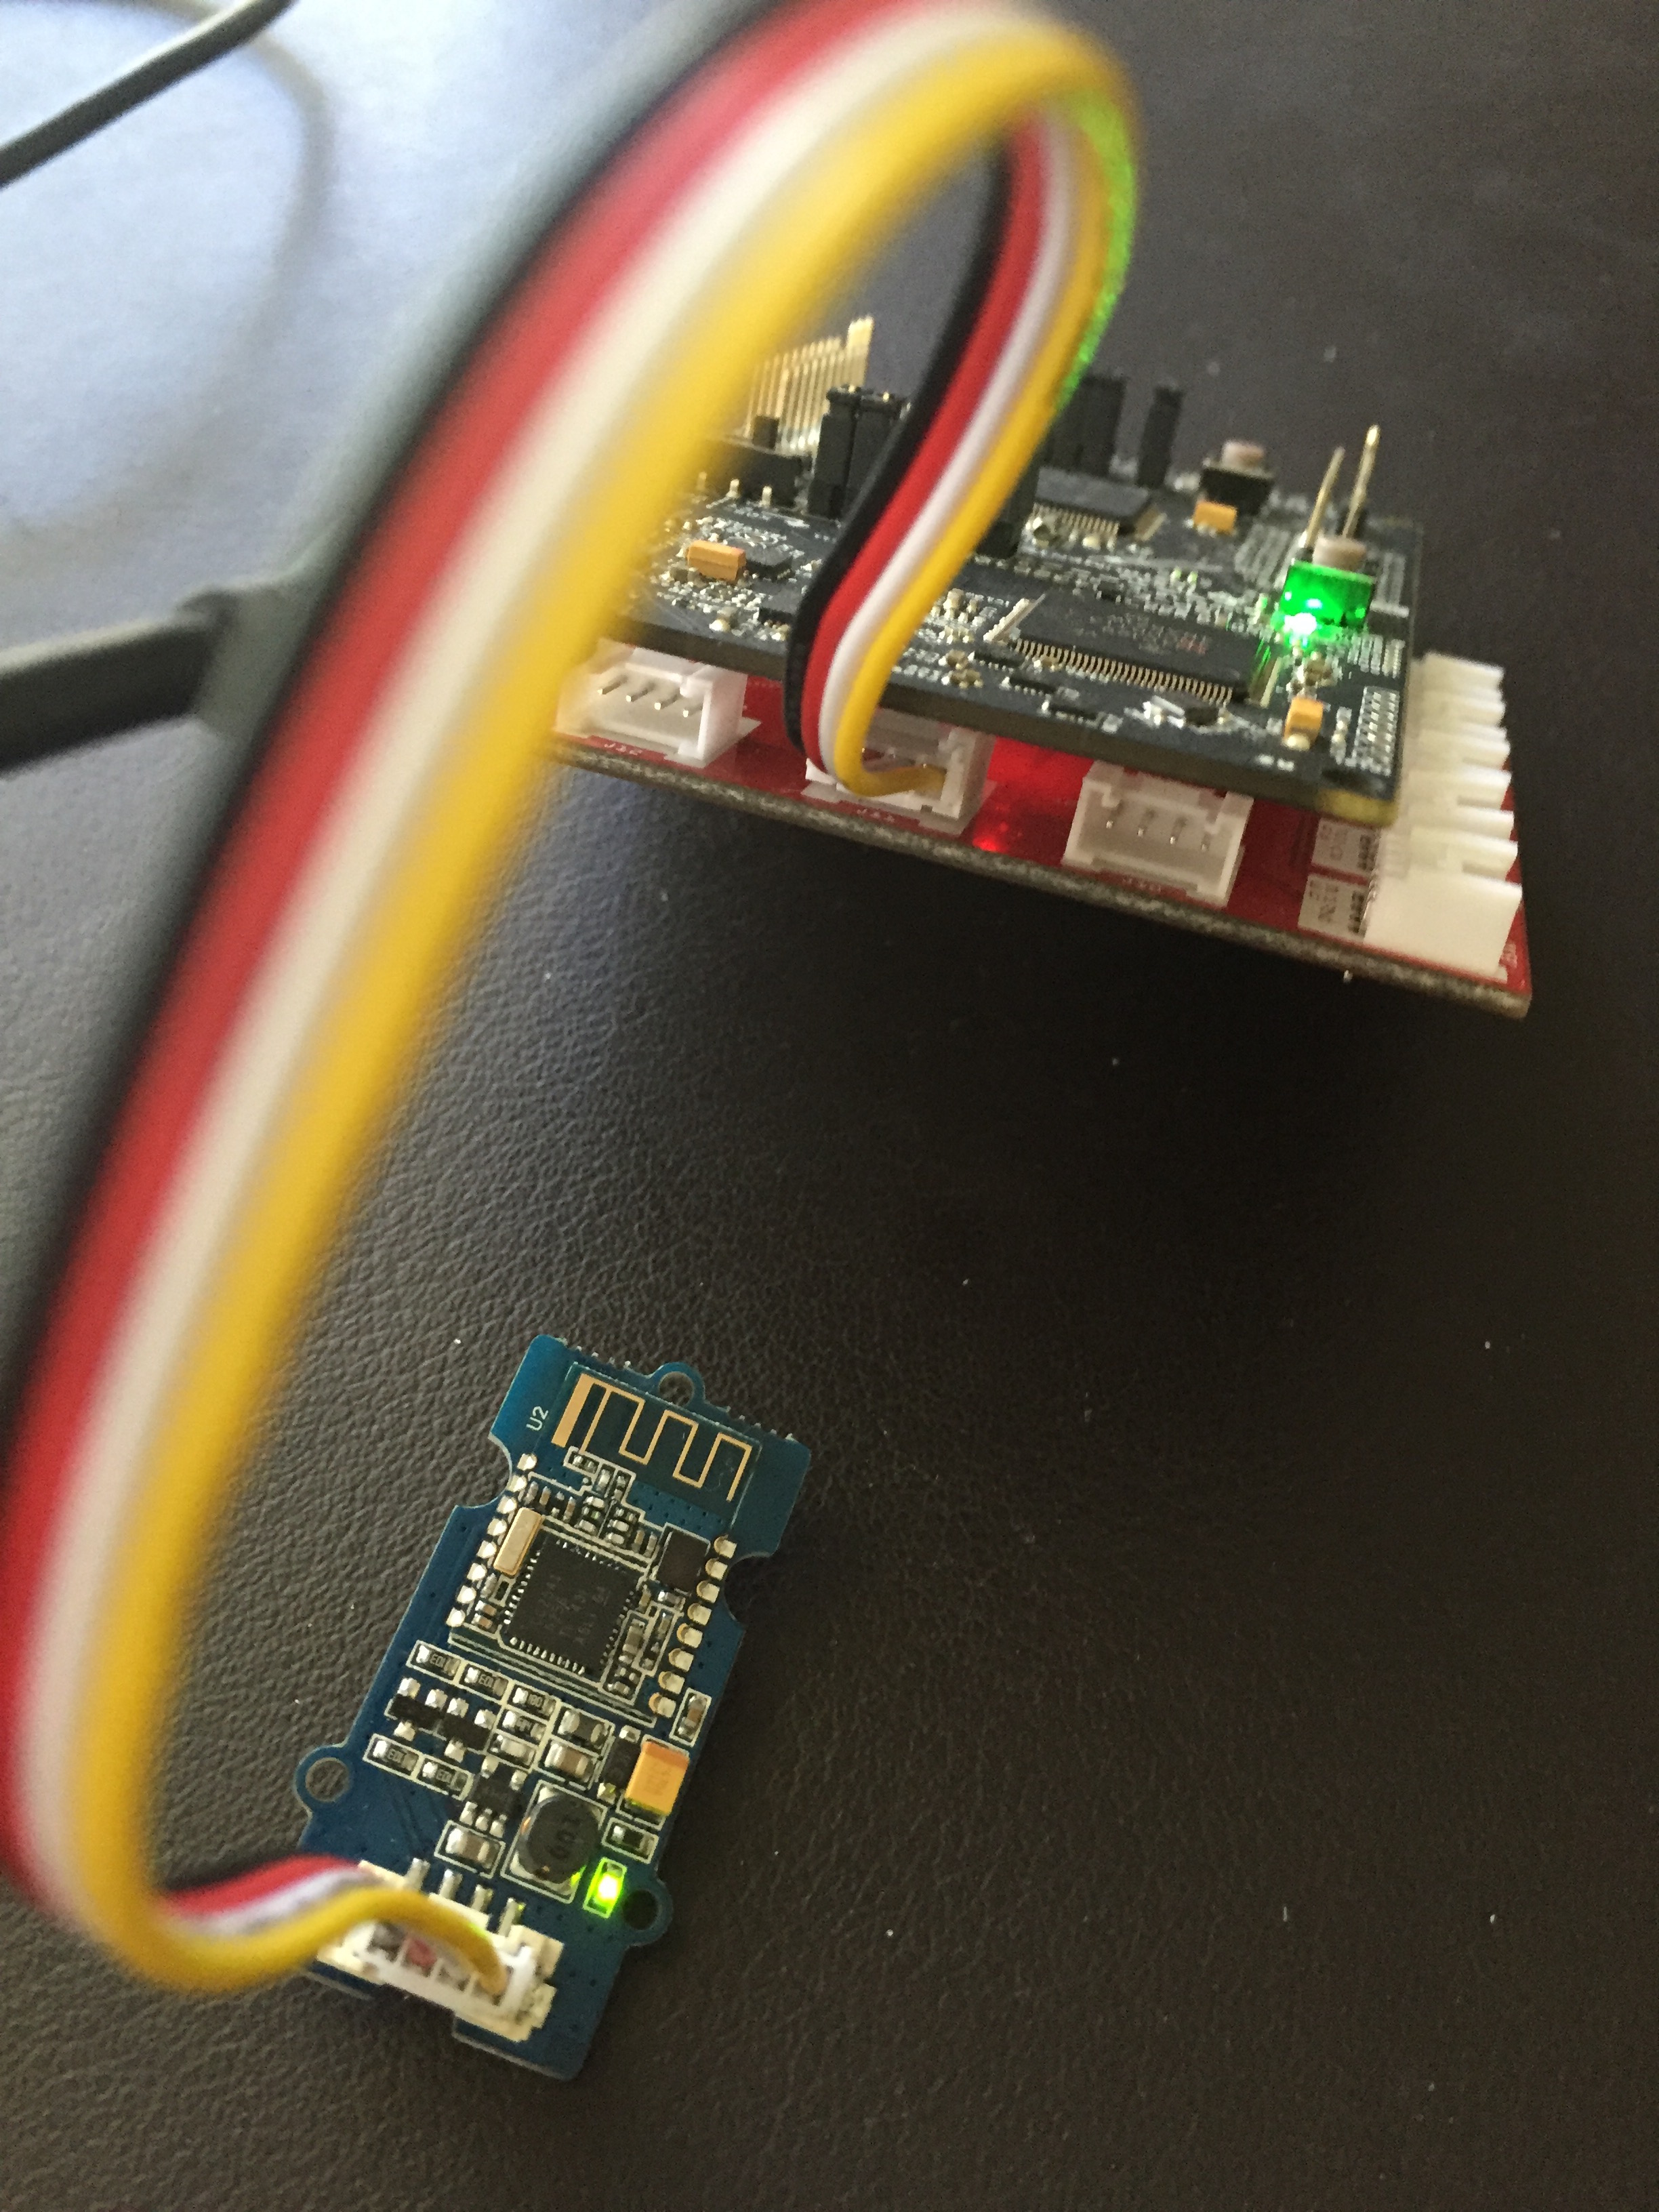
The Grove BLE modules (and similar units) use 4 wires - GND, voltage, RX and TX. For the MSP432 (and several other LaunchPads) this will mean connecting to pins 1 and 22 (or any of the equivalent 3V3 and GND pins on the board), and pins 3 and 4 for RX and TX - note that RX on the module connects to TX on the board, and vice-versa).
If you have the Grove Base BoosterPack then things are even easier. At the top of the BoosterPack board there are three connectors - the middle one of these serves as the Serial2 port (it is wired directly to pins 3 and 4 as we described manually above).
Hacking the Hub™
We can use Innovator port OUT1 to connect our BLE module - it connects to pins 3 and 4. However, the pins are connected in the "wrong" order for RX and TX, and so need to be rewired slightly. Obviously, the voltage and GND pins will be the same, but TX and RX need to be swapped over. Hence, it is a little trickier to connect the Grove HMSoft BLE module than one of the less expensive varieties that don't come with their own Grove port.
This opens the door to using the Hub with the TI-Nspire iPad Apps (or even with free iOS and Android apps like LightBlue).
For help with any of this, please feel free to drop me an email!
Remember: You can always reflash your Innovator Hub to return it to its original state, using the tools that TI has made available (just follow the Resources tab, and then "Keep your Innovator up to date"). So it is possible to explore coding the Hub in new ways!
TI Innovator™ Hub (with MSP432 LaunchPad)
MSP430 LaunchPad Sketch (Copy and paste into Energia)
int buttonState1 = 0; int buttonState2 = 0;
void setup() {
pinMode(RED_LED, OUTPUT); pinMode(GREEN_LED, OUTPUT); pinMode(PUSH1, INPUT_PULLUP); pinMode(PUSH2, INPUT_PULLUP); Serial1.begin(9600); }
void loop() { buttonState1 = digitalRead(PUSH1); buttonState2 = digitalRead(PUSH2); while(Serial1.available()){
}char recvChar = Serial1.read();
switch(recvChar) {
case 'r':
digitalWrite(RED_LED, HIGH); digitalWrite(GREEN_LED, LOW); break;case 'g':
digitalWrite(RED_LED, LOW); digitalWrite(GREEN_LED, HIGH); break;case '1':
buttonState1 = LOW; break;case '2':
buttonState2 = LOW; break;case '0':
digitalWrite(RED_LED, LOW); digitalWrite(GREEN_LED, LOW); break;}if (buttonState1 == LOW) {}digitalWrite(RED_LED, HIGH); digitalWrite(GREEN_LED, LOW); Serial1.println("P1");} if (buttonState2 == LOW) {digitalWrite(RED_LED, LOW); digitalWrite(GREEN_LED, HIGH); Serial1.println("P2");}Lua Script (copy and paste full script into TI-Nspire Script Editor)
platform.apilevel = '2.5'
screen = platform.window w = screen:width() h = screen:height() local date = "110216"
pcall(function ()
require 'bleCentral' end)require "color" local nameList = {'HMSoft'} local bleState = '' local bleStatus = 'Stand by' local peripheralName = '' local myPeripheral = nil
local groveBLE = 'FFE1' local keyPress = 0 local alert = nil local myChar = nil
local textBox = D2Editor.newRichText() local boxX, boxY, boxWidth, boxHeight local fontSize = 12 local button1 = "Scan for BLE" local button2 = "Reset"
-- Layout Functions (resize and paint)
function on.resize()
w = screen:width() or 841 h = screen:height() or 567pcall(function() ble.addStateListener(listenerCallback) end) refreshMenu()
alert = nil keyPress = 0
fontSize = math.floor(h/24 + 0.5) fontSize = fontSize < 25 and fontSize or 24 fontSize = fontSize > 6 and fontSize or 7 local width, height = 0.4*w, 0.075*h local spacer = 0.025*w boxX, boxY, boxWidth, boxHeight = 0.35*w, 0.3*h, 0.3*w, 0.3*h
textBox:move(boxX + spacer, boxY + spacer) textBox:resize(boxWidth - 2*spacer, boxHeight - 2*spacer) textBox:setFontSize(fontSize) textBox:setText("") textBox:setFocus(true)
textBox:setTextChangeListener(
function()end) screen:invalidate() endif textBox:getText() thenend if myChar and alert then myChar:write(alert) endlocal tmp = textBox:getText() if tmp and tmp:find(string.char(10)) then alert = tmp local alert1 = tmp:gsub(string.char(10), '') or '' textBox:setText(alert1)elsealert = nilendfunction on.paint(gc)
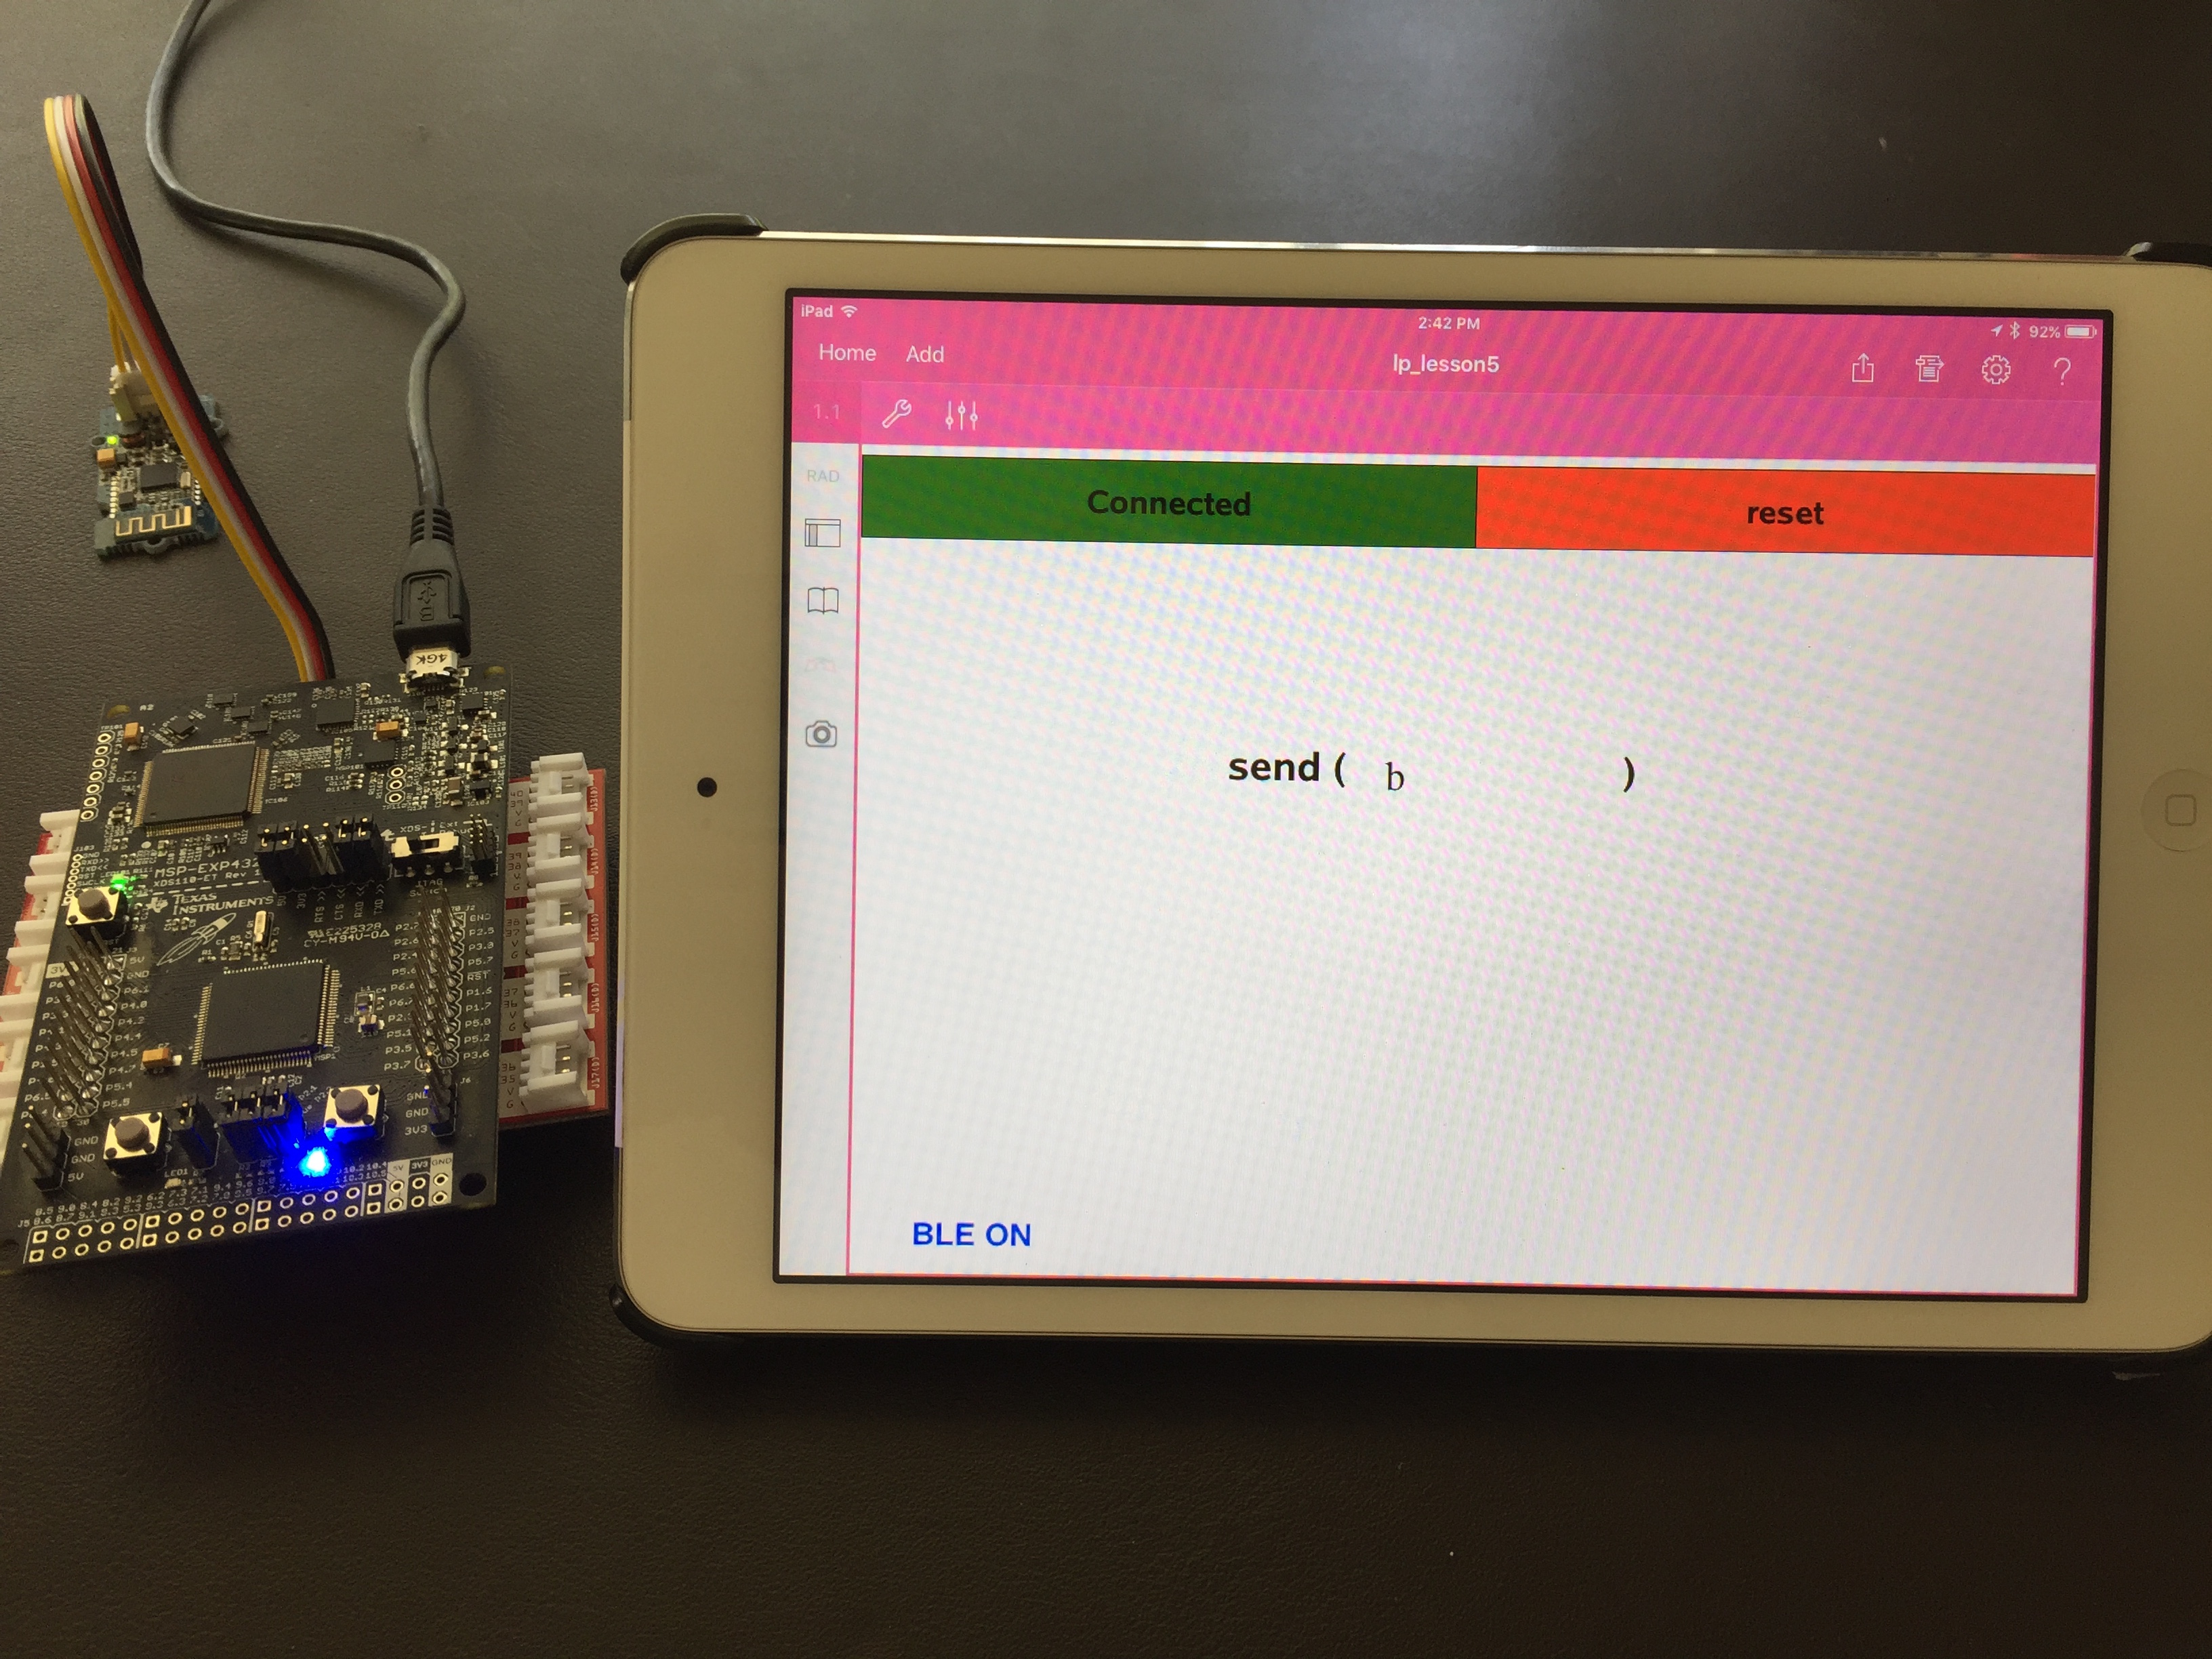
w = screen:width() or 841 h = screen:height() or 567endgc:setFont("sansserif", "b", fontSize) local sw = gc:getStringWidth("send(") gc:drawString("send (", boxX - 0.01*w - sw, boxY + boxHeight*0.35, "middle") gc:drawString(")", boxX + boxWidth + 0.025*w, boxY + boxHeight*0.35, "middle")
if bleState:find("ON") then gc:setColorRGB(color.blue) else gc:setColorRGB(color.red) end
gc:setFont("sansserif", "b", fontSize-5) local sw = gc:getStringWidth(bleState) gc:drawString(bleState, 0.05*w, 0.925*h)
if bleStatus == 'Connected' then
gc:setColorRGB(color.blue)elsegc:setColorRGB(color.gray)endfor n = 1, #nameList do
local sw = gc:getStringWidth(nameList[n]) if peripheralName:find(nameList[n]) then gc:setColorRGB(color.green) end gc:drawString(nameList[n], 0.95*w - sw, 0.95*h - (n-1)*0.1*h, 'middle')endif keyPress ~= 0 and tonumber(alert) and tonumber(alert) ~= 0 then
local str = "PUSH Button: "..keyPress local sw = gc:getStringWidth(str) gc:drawString(str, 0.5*w - sw/2, 0.25*h, 'middle')endgc:setColorRGB(color.green) gc:fillRect(0, 0, 0.5*w, 0.1*h) gc:setColorRGB(color.black) gc:drawRect(0, 0, 0.5*w, 0.1*h) local sw = gc:getStringWidth(button1) gc:drawString(button1, 0.25*w - sw/2, 0.05*h, "middle")
gc:setColorRGB(color.red) gc:fillRect(0.5*w, 0, 0.5*w, 0.1*h) gc:setColorRGB(color.black) gc:drawRect(0.5*w, 0, 0.5*w, 0.1*h) local sw = gc:getStringWidth(button2) gc:drawString(button2, 0.75*w - sw/2, 0.05*h, "middle")
--Menu, Keyboard and Mouse Functions--------------
function refreshMenu()
Menu={
end{"About",
{" ©2016 Texas Instruments", function() end}, {" Version "..date, function() end}, {" Contact: steve@compasstech.com.au", function() end},},{"Controls",
{"Scan and Connect", function() peripheralOn() end}, {"Disconnect", function() peripheralOff() end}, {"Reset", function() reset() end},},{"Select action",
{"Green LED", function() alert = "g" if myChar then myChar:write(alert) end end}, {"No LED", function() alert = "0" if myChar then myChar:write(alert) end end}, {"Button 1", function() alert = "1" if myChar then myChar:write(alert) end end}, {"Button 2", function() alert = "2" if myChar then myChar:write(alert) end end},}, } toolpalette.register(Menu)function on.enterKey()
if not bleStatus:find("Connect") thenendperipheralOn()elseperipheralOff()endfunction on.escapeKey()
reset()endfunction reset()
on.resize() if myChar then myChar:write(0) end screen:invalidate()endfunction on.mouseUp(x, y)
if x < 0.5*w and y < 0.1*h thenendon.enterKey()end if x > 0.5*w and y < 0.1*h thenreset()end screen:invalidate()
-- BLE General Functions -----------
function listenerCallback(state, scriptError)
if state == ble.ON thenendbleState = 'BLE ON'elseif state == ble.OFF thenbleState = 'BLE OFF'elseif state == ble.RESETTING thenbleState = 'BLE RESET'elseif state == ble.UNSUPPORTED thenbleState = 'UNSUPPORTED' if scriptError thenend screen:invalidate()print('Error message: BLE not supported')endfunction peripheralOn()
bleCentral.startScanning(callbackScan) bleStatus = 'Scanning' screen:invalidate()
end
function peripheralOff()
bleCentral.stopScanning() if myPeripheral thenmyPeripheral:disconnect()end bleStatus = 'Stand by' peripheralName = '' reset() screen:invalidate()endfunction callbackScan(peripheral)
if peripheral ~= nil thenendperipheralName = peripheral:getName() for n =1, #nameList doend screen:invalidate()if peripheralName and peripheralName:find(nameList[n]) thenendperipheral:connect(callbackConnect)endfunction callbackConnect(peripheral, event)
endif event == bleCentral.CONNECTED then
bleCentral.stopScanning() bleStatus = 'Connected' myPeripheral = peripheral button1 = bleStatus peripheral:discoverServices(callbackServices)
elseif event == bleCentral.DISCONNECTED then
bleStatus = 'Disconnected' peripheralName = '' button1 = "Scan for BLE"end screen:invalidate()function callbackServices(peripheral)
endif peripheral ~= nil and peripheral:getState() and peripheral:getState() == bleCentral.CONNECTED then
end screen:invalidate()local services = peripheral:getServices() for _,service in ipairs(services) do service:discoverCharacteristics(callbackCharacteristics) end
-- BLE Specific Functions ---------
function callbackCharacteristics(service)
endlocal characteristicsList = service:getCharacteristics() for _,characteristic in ipairs(characteristicsList) do
if characteristic:getUUID() == groveBLE thenendmyChar = characteristic characteristic:setValueUpdateListener(callbackCharacteristic) characteristic:setNotify(true)endfunction callbackCharacteristic(characteristic)
endif characteristic:getUUID() == groveBLE then
end screen:invalidate()local value = characteristic:getValue() if value then
local groveList = value:split(string.char(10)) or {} if groveList and #groveList > 0 thenendfor g = 1, #groveList doendif groveList[g]:find("P") thenendalert = groveList[g]:gsub("P", "") keyPress = alert breakelseif groveList[g] ~= '' thenalert = groveList[g] breakelsealert = 0endplatform.apilevel = '2.5'
screen = platform.window w = screen:width() h = screen:height() local date = "110216"
pcall(function ()
require 'bleCentral' end)require "color" local nameList = {'HMSoft'} local bleState = '' local bleStatus = 'Stand by' local peripheralName = '' local myPeripheral = nil
local groveBLE = 'FFE1' local keyPress = 0 local alert = nil local myChar = nil
local textBox = D2Editor.newRichText() local boxX, boxY, boxWidth, boxHeight local fontSize = 12 local button1 = "Scan for BLE" local button2 = "Reset"
-- Layout Functions (resize and paint)screen:invalidate() endble.addStateListener(listenerCallback) end) refreshMenu()function on.resize()
w = screen:width() or 841 h = screen:height() or 567
pcall(function()
alert = nil keyPress = 0
fontSize = math.floor(h/24 + 0.5) fontSize = fontSize < 25 and fontSize or 24 fontSize = fontSize > 6 and fontSize or 7 local width, height = 0.4*w, 0.075*h local spacer = 0.025*w boxX, boxY, boxWidth, boxHeight = 0.35*w, 0.3*h, 0.3*w, 0.3*h
textBox:move(boxX + spacer, boxY + spacer) textBox:resize(boxWidth - 2*spacer, boxHeight - 2*spacer) textBox:setFontSize(fontSize) textBox:setText("") textBox:setFocus(true)
textBox:setTextChangeListener(
function()end)if textBox:getText() thenend if myChar and alert then myChar:write(alert) endlocal tmp = textBox:getText() if tmp and tmp:find(string.char(10)) then alert = tmp local alert1 = tmp:gsub(string.char(10), '') or '' textBox:setText(alert1)elsealert = nilendfunction on.paint(gc)
w = screen:width() or 841 h = screen:height() or 567
gc:setFont("sansserif", "b", fontSize) local sw = gc:getStringWidth("send(") gc:drawString("send (", boxX - 0.01*w - sw, boxY + boxHeight*0.35, "middle") gc:drawString(")", boxX + boxWidth + 0.025*w, boxY + boxHeight*0.35, "middle")
if bleState:find("ON") then gc:setColorRGB(color.blue) else gc:setColorRGB(color.red) end
gc:setFont("sansserif", "b", fontSize-5) local sw = gc:getStringWidth(bleState) gc:drawString(bleState, 0.05*w, 0.925*h)
if bleStatus == 'Connected' then
gc:setColorRGB(color.blue)elsegc:setColorRGB(color.gray)endfor n = 1, #nameList do
local sw = gc:getStringWidth(nameList[n]) if peripheralName:find(nameList[n]) then gc:setColorRGB(color.green) end gc:drawString(nameList[n], 0.95*w - sw, 0.95*h - (n-1)*0.1*h, 'middle')
end
if keyPress ~= 0 and tonumber(alert) and tonumber(alert) ~= 0 then
local str = "PUSH Button: "..keyPress local sw = gc:getStringWidth(str) gc:drawString(str, 0.5*w - sw/2, 0.25*h, 'middle')endgc:setColorRGB(color.green) gc:fillRect(0, 0, 0.5*w, 0.1*h) gc:setColorRGB(color.black) gc:drawRect(0, 0, 0.5*w, 0.1*h) local sw = gc:getStringWidth(button1) gc:drawString(button1, 0.25*w - sw/2, 0.05*h, "middle")
gc:setColorRGB(color.red) gc:fillRect(0.5*w, 0, 0.5*w, 0.1*h) gc:setColorRGB(color.black) gc:drawRect(0.5*w, 0, 0.5*w, 0.1*h) local sw = gc:getStringWidth(button2) gc:drawString(button2, 0.75*w - sw/2, 0.05*h, "middle")
end
--Menu, Keyboard and Mouse Functions--------------
function refreshMenu()
Menu={
{"About",
{" ©2016 Texas Instruments", function() end}, {" Version "..date, function() end}, {" Contact: steve@compasstech.com.au", function() end},},{"Controls",
{"Scan and Connect", function() peripheralOn() end}, {"Disconnect", function() peripheralOff() end}, {"Reset", function() reset() end},},{"Select action",
{"Green LED", function() alert = "g" if myChar then myChar:write(alert) end end}, {"No LED", function() alert = "0" if myChar then myChar:write(alert) end end}, {"Button 1", function() alert = "1" if myChar then myChar:write(alert) end end}, {"Button 2", function() alert = "2" if myChar then myChar:write(alert) end end},}, }toolpalette.register(Menu)
end
function on.enterKey()
if not bleStatus:find("Connect") then
peripheralOn()elseperipheralOff()endend
function on.escapeKey()
reset()
end
function reset()
on.resize() if myChar then myChar:write(0) end screen:invalidate()
end
function on.mouseUp(x, y)
if x < 0.5*w and y < 0.1*h then
on.enterKey()endif x > 0.5*w and y < 0.1*h then
reset()endscreen:invalidate()
end
-- BLE General Functions -----------
function listenerCallback(state, scriptError)
if state == ble.ON then
bleState = 'BLE ON'elseif state == ble.OFF thenbleState = 'BLE OFF'elseif state == ble.RESETTING thenbleState = 'BLE RESET'elseif state == ble.UNSUPPORTED thenbleState = 'UNSUPPORTED' if scriptError thenendprint('Error message: BLE not supported')endscreen:invalidate()
end
function peripheralOn()
bleCentral.startScanning(callbackScan) bleStatus = 'Scanning' screen:invalidate()
end
function peripheralOff()
bleCentral.stopScanning()
if myPeripheral thenmyPeripheral:disconnect()endbleStatus = 'Stand by' peripheralName = '' reset() screen:invalidate()
end
function callbackScan(peripheral)
if peripheral ~= nil thenendperipheralName = peripheral:getName() for n =1, #nameList doend screen:invalidate()if peripheralName and peripheralName:find(nameList[n]) thenendperipheral:connect(callbackConnect)endfunction callbackConnect(peripheral, event)
if event == bleCentral.CONNECTED then
bleCentral.stopScanning() bleStatus = 'Connected' myPeripheral = peripheral button1 = bleStatus peripheral:discoverServices(callbackServices)
elseif event == bleCentral.DISCONNECTED then
bleStatus = 'Disconnected' peripheralName = '' button1 = "Scan for BLE"end screen:invalidate()end
function callbackServices(peripheral)
if peripheral ~= nil and peripheral:getState() and peripheral:getState() == bleCentral.CONNECTED then
end screen:invalidate()local services = peripheral:getServices() for _,service in ipairs(services) do service:discoverCharacteristics(callbackCharacteristics) end
end
end end end-- BLE Specific Functions ---------
characteristic:setValueUpdateListener(callbackCharacteristic) characteristic:setNotify(true)function callbackCharacteristics(service)
local characteristicsList = service:getCharacteristics() for _,characteristic in ipairs(characteristicsList) do
if characteristic:getUUID() == groveBLE thenmyChar = characteristicfunction callbackCharacteristic(characteristic)
endif characteristic:getUUID() == groveBLE then
end screen:invalidate()local value = characteristic:getValue() if value then
local groveList = value:split(string.char(10)) or {} if groveList and #groveList > 0 thenendfor g = 1, #groveList doendif groveList[g]:find("P") thenendalert = groveList[g]:gsub("P", "") keyPress = alert breakelseif groveList[g] ~= '' thenalert = groveList[g] breakelsealert = 0end
Understanding the LaunchPad Sketch
Study the LaunchPad sketch first. It should, by now, be starting to look familiar and understandable. Nothing new has been introduced here - other than swapping all "Serial" references for "Serial1". Note that you could still include Serial references as well, and have comments appear in the Serial Monitor in Energia, but this is probably not necessary since the joy of BLE is that you are now free from the wired link to the computer, and able to work with a power source and an iPad, anywhere!
This sketch, then, enables two types of interaction with the board. Writing particular letters and numbers to the board will activate LEDs, and simulate pressing the two buttons (in the same way that we previously wrote from the Serial Monitor to the board to cause such reactions).
Of perhaps greater interest is the power to write from the board to the iPad: pressing PUSH1 or PUSH2 will send a message to the Lua script, which then registers this with a simple screen message. This will form the basis, shortly, for important interactions such as connecting the LaunchPad to a sensor, reading the data from that device - and sending this data to the iPad ready for visualisation and analysis!
Understanding the Lua Script
The Lua script builds upon the basics covered in the BLE Lua tutorials - refer to Build your own BLE Remote as a starting point. In fact, the two buttons of the LaunchPad can be readily used in the same way as the SensorTag buttons to control TI-Nspire documents are variables. If you have been using a SensorTag in this way, then you should definitely try the same things with your LaunchPad! This will be covered in a lesson or two.
In fact, the LaunchPad is a much simpler introduction to BLE than the SensorTag. The Tag has an enormous amount of data to transmit and to be interpreted, and so is necessarily more complex. The LaunchPad is quite capable of doing the same, but for our purposes we will be starting with simple examples, as you have seen, initially just sending and receiving single characters.
Focus for a moment on the section of the Lua script. The UUID for the Grove BLE module ("HMSoft") is 'FFE1' - coincidentally exactly the same as the simple keys UUID for the SensorTag. Potentially, this makes it even easier to write scripts that can accommodate both LaunchPad and SensorTag. However, this UUID controls only the keypresses on the SensorTag; the red and green LEDs and buzzer are controlled by another UUID. A sample page that will work with both LaunchPad/Grove BLE and SensorTag 2.0 (CC2650) is included in Problem 2.
For an even simpler example, what if we only wanted to write to the LaunchPad, and did not need the ability to read from it?
Then our final section of the script (BLE Specific Functions) could be very simple indeed: as shown here, it could consist of just the function shown - no need for the "callbackCharacteristic(characteristic)" function at all, since all that is needed is the characteristic (myChar) for the connected device.
-- BLE Specific Functions (2) --------- function callbackCharacteristics(service)
local characteristicsList = service:getCharacteristics() for _,characteristic in ipairs(characteristicsList) do
if characteristic:getUUID() == groveBLE thenendmyChar = characteristicendend
Or (if you are using Chrome browser on Mac, Android or Chromebook, or the WebBLE app on iPad) you might just try this for yourself!
Home ← TI-Nspire Scripting HQ ← STEM HQ ← Getting Started with TI LaunchPads ← TI LaunchPad Lesson 5