Home ← TI-Nspire Authoring ← TI-Nspire Scripting HQ ← Scripting Tutorial - Lesson 30
Scripting Tutorial - Lesson 30: Welcome to Bluetooth (BLE)
Supplement: Working with Scripts on the iPad
Lesson 31: BLE - BLE - Create your own TI-Nspire Remote
Lesson 33: BLE - Measuring Heart Rate
Lesson 34: BLE - Measuring Temperature with the TI Sensor Tag
Lesson 35: BLE - Build Your Own Weather Station with the TI Sensor Tag
Lesson 36: BLE - Exploring Movement and Position with the TI Sensor Tag
Lesson 37: Lua, LaunchPads and BLE: Making Music via BLE
Lesson 39: Lua, LaunchPads and BLE: Build your own BLE Robot for under $USD40
Download supporting files for this tutorial
Download this page in PDF format
Texas Instruments TI-Nspire Scripting Support Page
BLE (Bluetooth Low Energy or Bluetooth Smart) has been available on computers and personal devices for some years now, and TI-Nspire Lua for iPad (version 3.11.x) is now BLE-capable. We can now create scripts that will recognise and collect data from a range of BLE devices - from temperature to heart rate, and many more. This can provide a bountiful source of real world data for students at all levels, for many STEM applications.
Scripts can also be written to send commands to BLE devices, making possible a wide range of robotics and physics activities.
The tutorials in this series will take you step-by-step through the process of building BLE-active documents. Obviously, you will need two key pieces of equipment - a BLE-capable iPad (any iPads except the original iPad and the iPad 2) and a BLE probe or device.
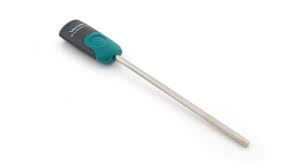
The main device used here will be the TI Sensor Tag, an inexpensive ($USD25) robust tool which packs SIX probes - temperature (both ambient and target), humidity, barometer, accelerometer, magnetometer and gyroscope! We will also feature the Vernier Go Wireless Temp probe, and the RHYTHM+ heart rate monitor.
But for a quick and easy start and a wealth of BLE-based opportunities, it is hard to go past the TI Sensor Tag, which can be ordered online from Texas Instruments, wherever you are in the world.
Click anywhere on this image for a video demonstration


Getting Started with BLE
The process of writing Lua code to work with BLE involves several steps. The required source is obtained by calling bleCentral: in the same way that we use require 'color', for BLE use:
pcall(function () require 'bleCentral' end)
Since most devices do not have BLE capabilities, note the use of 'pcall' here - this is a 'protected call' that will try that command and ignore any errors that might arise.
-- Check that the current device is BLE capable and BLE ready
-- Scan for detectable BLE sources (peripherals)
-- If a peripheral (or more than one peripheral) is found, try to establish a connection
-- If a connection is established, take and use data from that link
Sounds simple enough, doesn't it?
1. Checking that BLE is available
At this time (early 2015) BLE capabilities for the TI-Nspire platform are limited to the iPad Apps, and an iPad may have bluetooth turned off, so it is important to verify that the environment is BLE-ready. BLE requires at least APIlevel 2.5, so this needs to be specified up front.
To begin, we establish APIlevel and some initial variables, and check our platform. Note the call to bleCentral as described above. Subsequent commands prefaced by 'ble.' and 'bleCentral.' are drawn from this source.
You will probably have noticed by now that I tend to use 'on.resize' as my 'init' function, so this is where we "add the state listener" - a bleCentral function which listens for BLE signals. Note the argument for ble.addStateListener is called listenerCallback. This idea of a callback is important in this context. Many BLE functions establish two-way communication between host and peripheral.
The listener function takes two arguments - the current BLE state (provided by the system via bleCentral) and any errors that might occur. These may be used or ignored. The system provides the various states - ble.ON, ble.OFF, ble.RESETTING and ble.UNSUPPORTED. Did you notice the 'ble.' prefix? This indicates that these are drawn from bleCentral, and so are not user defined.
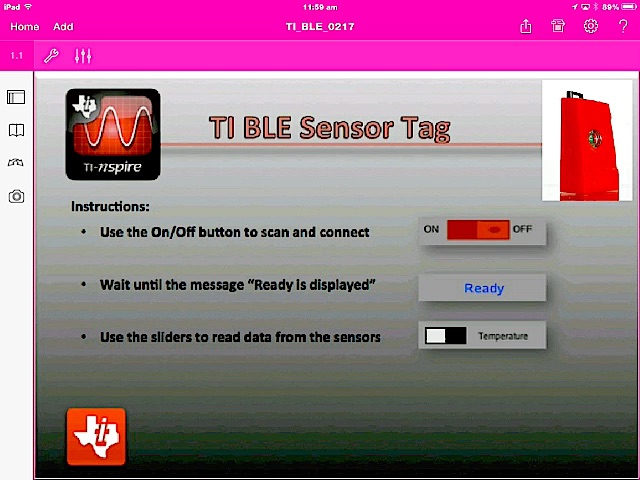
As seen in the screenshot below, not the most exciting script, but an essential first step.

You will notice, too, a function called refreshMenu(). I have used this to create a menu of some basic BLE script actions - scan and connect, disconnect and a general reset.
Obviously, in your scripts, you will want to provide a more obvious user interface for such actions, but in the interests of simplicity here, these save the trouble of scripting buttons, etc. You may also wish to add the specific action of connecting which I have chosen here to occur automatically on finding a peripheral.
Quite simpliy, then, use the menu to select 'Scan and Connect'. This calls a function peripheralOn(), while 'Disconnect' calls peripheralOff().
2. Scanning for BLE Peripherals
Study the functions below the line BLE Peripherals.
You will see some bleCentral commands: bleCentral.startScanning(callbackScan) and bleCentral.stopScanning().
The first of these calls a function called callbackScan which takes as its argument any peripheral found in the scan. If such a thing exists, then the command peripheral:getName() is invoked - and we have ourselves some action!

At this point, we will stop for now and give you time to process and, hopefully, to play. In the next tutorial, we will see how to interact with these peripherals once they have been found!
The script shown here is ready to copy and paste into the TI-Nspire Script Editor, and then sent to your iPad for testing. Remember, it will not work on computer software or handheld at this time.
In our next lesson, we use the Vernier Go Temp probe to study the simplest ways in which we might communicate with BLE devices and then generalise to the TI Sensor Tag.
At this point, you may also like to refer to a Supplement: Working with Scripts on the iPad, which should make it much easier testing and debugging your scripts while running on the iPad platform.
platform.apilevel = '2.5'
screen = platform.window
w = screen:width()
h = screen:height()pcall(function () require 'bleCentral' end)
require "color"
local bleState = ''
local bleStatus = 'Stand by'
local peripheralName = ''
local myPeripheral = nilfunction on.resize()
w = screen:width() or 841
h = screen:height() or 567pcall(function() ble.addStateListener(listenerCallback) end)
refreshMenu()screen:invalidate()
end
function on.paint(gc)
w = screen:width() or 841
h = screen:height() or 567if bleState:find("ON") then gc:setColorRGB(color.blue) else gc:setColorRGB(color.red) end
gc:setFont("sansserif", "b", 12)
gc:drawString(bleState, 0.1*w, 0.1*h)
gc:drawString(bleStatus, 0.1*w, 0.2*h)
gc:drawString(peripheralName, 0.1*w, 0.3*h)end
--BLE STATE LISTENER -----------
function listenerCallback(state, scriptError)
if state == ble.ON then
bleState = 'BLE ON'
elseif state == ble.OFF then
bleState = 'BLE OFF'
elseif state == ble.RESETTING then
bleState = 'BLE RESET'
elseif state == ble.UNSUPPORTED then
bleState = 'UNSUPPORTED'
if scriptError then
print('Error message: BLE not supported')
end
endscreen:invalidate()
end
-- BLE PERIPHERALS -----------------------
function peripheralOn()
bleCentral.startScanning(callbackScan)
bleStatus = 'Scanning'
screen:invalidate()end
function peripheralOff()
bleCentral.stopScanning()
if myPeripheral then
myPeripheral:disconnect()
endbleStatus = 'Stand by'
screen:invalidate()end
function callbackScan(peripheral)
if peripheral ~= nil then
peripheralName = peripheral:getName()
endperipheral:connect(callbackConnect)
screen:invalidate()end
function callbackConnect(peripheral, event)
if event == bleCentral.CONNECTED then
bleCentral.stopScanning()
bleStatus = 'Connected'
myPeripheral = peripheralelseif event == bleCentral.DISCONNECTED then
bleStatus = 'Disconnected'
peripheralName = ''end
screen:invalidate()end
--Menu-----------------------------------
function refreshMenu()
Menu={
}{"Controls",
},{"Scan and Connect", function() peripheralOn() end},
{"Disconnect", function() peripheralOff() end},
{"Reset", function()
bleState = ''
bleStatus = 'Stand by'
on.resize() end},toolpalette.register(Menu)
end
Home ← TI-Nspire Authoring ← TI-Nspire Scripting HQ ← Scripting Tutorial - Lesson 30