Home ← TI-Nspire Authoring ← TI-Nspire Scripting HQ ← Scripting Tutorial - Lesson 20
Scripting Tutorial - Lesson 20: Guidelines for Lua Nspired Authoring II
Download supporting files for this tutorial
Download this page in PDF format
Texas Instruments TI-Nspire Scripting Support Page
WORKING ACROSS PLATFORMS (Create Once Play Everywhere)
2. Control Considerations: Working Well Everywhere!
Our digital content needs to not only LOOK great, but it must also be an intuitive and satisfying experience for the user, no matter what platform it is running on.
For most computer users, the mouse is the most natural medium with which to interact with digital content. Clicking and dragging is fast and smooth and needs little or no instruction.
On the handheld, however, even with the vastly improved mouse/cursor experience, it is nowhere near as fast and satisfying as it is on the computer. Grabbing and dragging remain key points of user challenge. Making effective use of the handheld keyboard can offer significant advantages in raising the usability of our documents.
And this is just the tip of the iceberg. Practical and significant design considerations are required to ensure that created content will run effectively, not just on handheld and computer software, but on the Player, in PublishVew and elsewhere. Certain clear principles can help to guarantee a high degree of confidence in this regard.
Essentially, the key to success in this regard is duplication of all necessary functionality for mouse and keyboard, so that the user may readily choose either control method, depending upon the platform or even personal preference.
2.1 Mouse Control and Classes
Regardless of the relatively minor obstacles to effective use of the mouse on the handheld, the point, click and drag interface remains common to all platforms, and so should be the first priority in designing and planning for user interactions.
While they may appear a little challenging to set up, the most effective way to ensure a good mouse experience is to define all clickable objects using classes, leveraging the advantage this offers in terms of the powerful "contains" element, as well as the many parameters that can be controlled with ease once a class has been defined.
An issue that has accompanied use of the mouse/cursor on TI-Nspire handhelds in the past has been a tendency to "submarine" - the mouse tends to disappear automatically and can take some seconds to reappear. This has been possibly even more noticeable in Lua documents. It is now recommended that authors should include the cursor.show() command in their script, initially within this function:
function
cursor.show()end
It may be useful to include this command again (for example, in a mouseMove function) to ensure that the cursor remains visible throughout the interactions with the script.
2.2 Buttons and KeyPads
If the Player is to be a possible platform for content, then it is critical that all necessary actions can be performed using mouse controls, and that clickable buttons provide access to all necessary features and functionality. Keyboard entry and even menu options are not an option for the Player.
Templates, such as the KeyPad template included for download with this Lesson, offer relatively easy ways to include such features in created documents.
2.3 KeyBoard Object Selection and Control
At the heart of this usability issue lies the handheld environment, where the mouse, while available, may not always be the fastest method for selecting and dragging objects. Keyboard methods can offer a more effective user experience, by-passing in many cases the need to move to and grab particular points. The mouse_dragging_v1.2.tns document included illustrates a simple example of the principles recommended here.
While objects may be easily selected (and cloned) by clicking with the mouse and then dragged, these key actions may also be achieved using keyboard controls:
|
Click anywhere on this image for a video demonstration |
NOTE: Possibly the most efficient means of controlling objects is to use a combination of keyboard and mouse controls! Select quickly and easily using the tabKey, and then move the mouse slightly to have the object immediately take that position.
What happens when we have more than just two or three objects to select and control? Tabbing through many objects is not a profitable user experience.
|
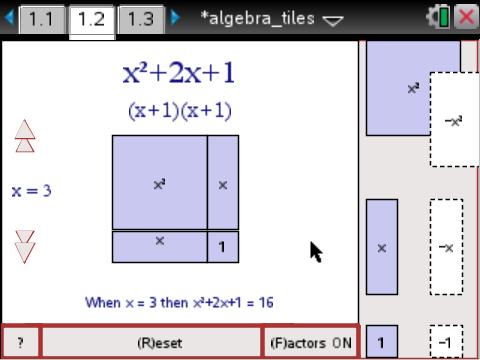
The Algebra Tiles example included offers a fairly high level exemplar of all of the principles we have discussed here. The solution adopted for the six different object types was to use the keyboard to select an object by typing a letter: type "x" and and x-tile is selected, ready to jump to wherever the mouse is. Press "s" for x-squared and "u" for a unit tile. For negatives, press "n" and then the required letter. This approach proves to be at least as efficient as using the mouse in general, and certainly more effective on the handheld. Study other features of this document. Press "?" or "a" to bring up a multi-page "About" screen with detailed instructions. Press numbers to change the value of x, or press "+" and "-" to change the values in increments of 0.1. |
Click anywhere on this image for a video demonstration |
This document serves to embody the key principles established in these guidelines. Feel free to copy and paste the code that you require from any of the attached files, and to adapt to better suit your needs.
2.4 Arrow Key Control
We have already noted that grabbing and dragging objects on the handheld can be a source of some frustration. One of the opportunities that first drew me to Lua was the ability to easily assign control of object movement to the arrow keys - whether those objects existed within the Lua window, or "outside" in TI-Nspire "world". While this has been implied in the preceding sections, it is important enough to rate its own guiding principle:
|
Whenever possible, documents should be designed so that the movement of points can be controlled using the arrow keys, in addition to grabbing and dragging with the mouse. This is easily achieved using the arrowKey functions, especially when there is just a single "driver" point. If there are multiple points, then consideration needs to be given to effective techniques for selecting these. Again, relatively easily achieved using classes, but equally possible without. In the example shown (again, from Math Nspired with thanks this time to Daniel Ilaria), there are three "driver" points, a, b and c, and these exist within a native Graph window, so classes are not an option. The tabKey is used to jump from one to the next (the coordinates are stored in a Lua table/list and tab simply steps through this table). In order to visually indicate the currently selected point, a small red segment was attached to another point, similarly controlled. |
Click anywhere on this image for a video demonstration |
Documents designed in this way are ready for students to begin controlling the action as soon as they enter the page. No need to move across the page to a particular point location, no need to try and grab and drag the point. This may seem trivial to a computer user, but it is far from trivial on the handheld. This approach offers significant performance and ease-of-use advantages which should be utilized as a matter of course when designing documents.
The lessons which follow take advantage of the 2012 OS3.2 release and do actually promise to be the final ones planned for these tutorials. They begin with a new way to do something very simple but very important - to accept text input from the user, and then on to the exciting possibilities of the TI-Nspire Lua Chipmunk Physics Engine.
Home ← TI-Nspire Authoring ← TI-Nspire Scripting HQ ← Scripting Tutorial - Lesson 20