Home ← TI-Nspire Authoring ← TI-Nspire Scripting HQ ← Scripting Tutorial - Lesson 21
Scripting Tutorial - Lesson 21: (3.2) Text Boxes and Rich Text Input
Download supporting files for this tutorial
Download this page in PDF format
Texas Instruments TI-Nspire Scripting Support Page
Text Boxes and Rich Text Input (3.2)
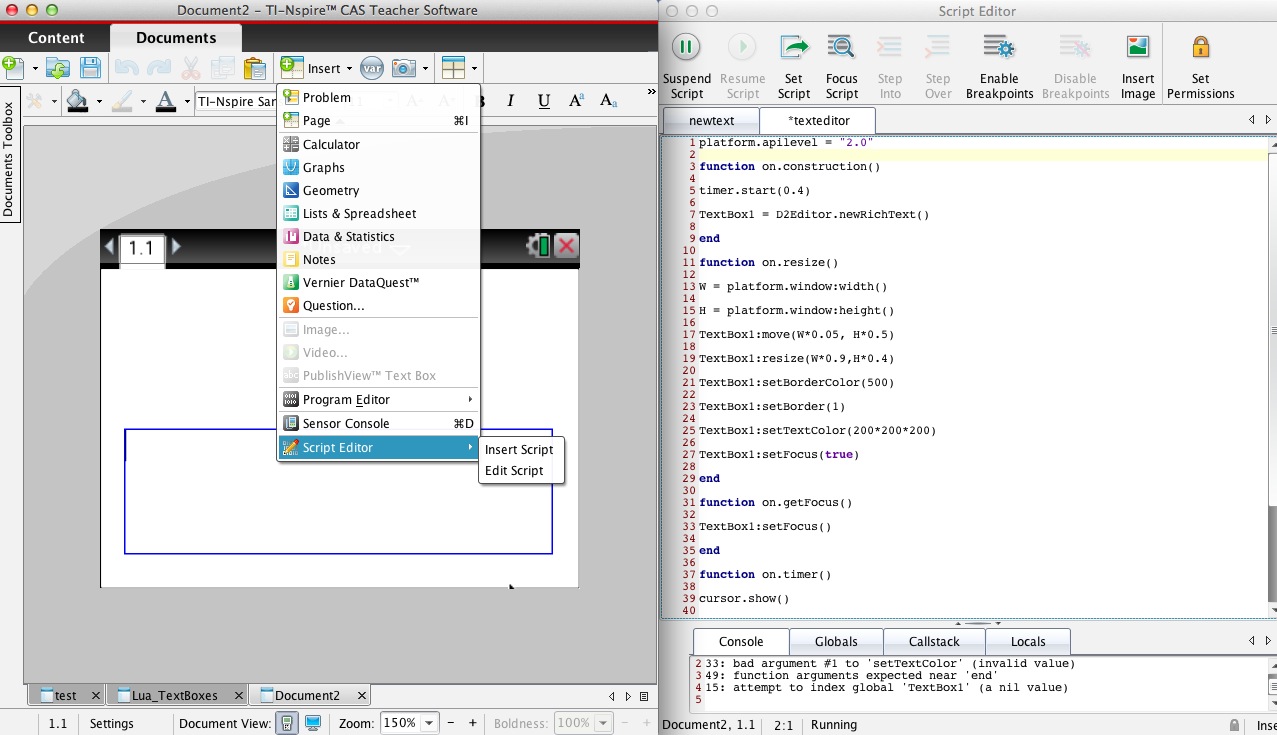
With the release of TI-Nspire Operating System 3.2 comes a selection of very powerful and highly useful tools. Most importantly, we now have an in-built Lua script editor - look at the bottom of the Insert menu. This finally makes Lua scripting accessible to everyone with an interest to pursue it. Use the Insert menu to Insert a script into an Nspire window, and also to edit an existing script. The Script Editor is available on every TI-Nspire software platform except the handheld - so students will be unable to access scripts on their handhelds. But they sure can on their Student software at home! You will experience this editor in action as we learn about some of the great 3.2 features now available.
With the first of these (a functional 2D Editor) we return to the basics of Lua scripting: the first few lessons seem so very long ago, and so you might struggle to recall much about them. The main theme in the first five lessons was text. Putting it onto a page, controlling how and where it appeared, and learning how to accept keyboard input so that students could type responses into your documents. Remember?
While our Lua environment has actually always possessed a RichText 2D Editor, until 3.2, it was really not very functional. It has now come into its own, and presents us with a perfect way for users to enter, not just text, but mathematical and chemical notation, as well as a few geometry symbols!
Instead of painting everything onto the screen using the on.paint function (and being responsible for every detail of appearance and layout - which made things like fractions challenging!) we can now create a text box anywhere on the page which functions just like a text box should: it lets you type in and edit text, and change size and other features. In fact, just like a Notes page, you can create a Math Box (or a Chem Box) and have it sort out layout and formatting for you.
Most importantly, we can grab whatever text is entered and do things with it.
Those things include deciding if the response is the correct answer to your question, or turning the input into a mathematical output, or even searching the text and changing parts of it as desired.
Quick Start
Let's see how few lines it takes to get a functioning text box on your page. Nothing fancy - that will come a little later. One thing you will notice which seems quite strange at this point is that we can actually get stuff onto our page - and functional - without any sign of an "on.paint" function! Amazing!
At the top of our script - and of all our scripts from now on! - is the APIlevel. If the script uses OS 3.2 functionality (like on.construction) then it is defined as platform.apilevel = "2.0". Previous scripts were level "1.0". Documents which include such new functionality will not open in versions prior to 3.2. Note this well: if your script is level 2.0 then students with an earlier OS will not even be able to open the document!
Begin by setting up the window variables for easy access when we need them - notice the simple technique of swapping the bulky "platform.window" for (to me) the nice "screen". Always good practise to define our variables as "local" whenever possible - much faster and more efficient.
Now the magic: we define a text box called "TBox". This needs only be done once, and so can occur outside a function, if desired.
The remaining commands lie within an "on.resize" function so that they get called on opening the page, and also when changing size (if supported). The "move" command initially places the top left corner of the box, "resize" sets the dimensions. We could stop here and we would have a functioning text box. Notice that I make it indented and slightly smaller than the page so that we have a little "white space" to aid readability?
The last two lines set the flashing cursor and place some text in the box. Easy.
platform.apilevel = "2.0"
local screen = platform.window
local w = screen:width()
local h = screen:height()
local TBox = D2Editor.newRichText()
function on.resize()
w = screen:width()
h = screen:height()
TBox:move(0.05*w, 0.05*h)
TBox:resize(0.9*w, 0.9*h)
TBox:setFocus(true)
TBox:setText("Welcome to Text Boxes!")
end
1. Setting Up Your TextBox
Now we do a more complete job. No easy way around this, so I am just going to spill the code onto the page and work from there.
This time I use "on.construction" and the old "on.resize" function. The former is new to 3.2 and replaces "on.create" which we never used much because it tended to be a little unreliable about when it was actually called. No such problems with on.construction. It is the first thing that happens. Period. So don't go putting any page size references in there, because there really is not a page to measure at this point! But we can set up the stuff that only needs doing once. In this case, that is just to create a new rich text box (which I am calling "TextBox1") and to start the timer, which will be used to continually refresh the screen.
The usual on.resize function then takes care of laying out the page stuff - and managing things if and when we change the size of that page. As always, even if we don't resize the page, this gets called once, before anything is painted to the screen. So this is a good place to put those things that need to get refreshed if the page changes.
I have also discovered a new favourite - "on.getFocus". This does pretty much what it claims - so when you return to this page, it will do whatever we ask of it - in this case, to put the focus back into the text box so that the user can begin typing straight away.
So...
Copy the code at right, create a new document, insert a script page, paste and then Set Script (or just ctrl-S as if you were "saving") to see what is happening here. You should get a page with an active text box in the lower half. Type something in, then insert a new Notes page. In a MathBox, type "input" and press enter - you should see your text!
In other words, we have created a live text box which knows what it being typed into it! And all without an on.paint function!
The various commands are fairly self-explanatory - at least if you have worked through the previous 20 lessons! The text box is created by the D2Editor.newRichText() command, it is positioned using TextBox1:move(W*0.05, H*0.5) and it is sized by TextBox1:resize(W*0.9,H*0.4).
Play around with the various commands and values to see their effects. You will see that the real magic is happening here in the on.timer function where whatever is typed into the box is grabbed and assigned a variable name. This is the powerful part. I have added an escapeKey function which clears the text box - study it and see how it does that. This is a very important command!
local screen = platform.window
local w = screen:width()
local h = screen:height()
local TextBox1
local fontSize
function
on.construction()timer.start(0.4)
TextBox1 =
D2Editor.newRichText()end
on.resize()function
screen:width()w =
h =
screen:height()TextBox1:
move(w*0.05, h*0.5)TextBox1:
resize(w*0.9,h*0.4)fontSize =
math.floor(w/32)fontSize = fontSize > 6 and fontSize or 7
TextBox1:
setFontSize(fontSize)TextBox1:
setBorderColor(500)TextBox1:
setBorder(1)TextBox1:
setTextColor(200*200*200)TextBox1:
setFocus(true)end
on.getFocus()function
setFocus()TextBox1:
end
on.timer()function
cursor.show()Input = TextBox1:
getExpression()if Input then
var.store("input", Input)end
screen:invalidate()
end
on.escapeKey()function
setExpression(" ")TextBox1:
screen:invalidate()
end
2. Playing with Text
And now for some fun!
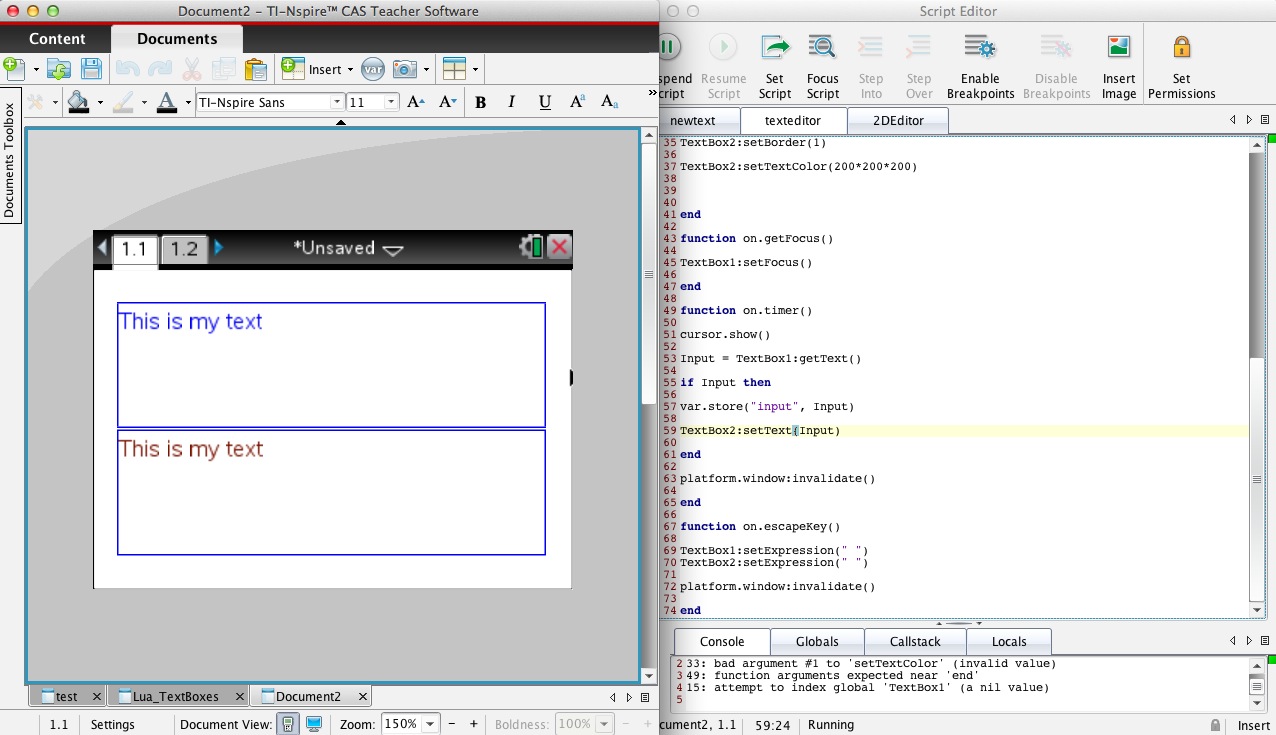
A challenge to begin with. Create a second text box and arrange the two boxes on the page so that one lies above the other, as shown. If you have problems, refer to the file script_tut21.tns in the Downloads for this page.
Now I would like, initially, whatever I type into the top box to appear in the bottom one.
Study the code - especially the on.timer function. Can you see that all we need to do is to add the line TextBox2:setExpression(Input) after we have made sure that Input actually exists? (NOTE that the terms getText and getExpression, and setText and setExpression are considered to be interchangeable)
So now replace this line with: TextBox2:setExpression("\\1keyword "..Input) and see what happens. The command "\\1keyword " is one of a few interesting commands available to play with here - as you see, the effect is to take the next word and to make it bold.
A word of caution when using these text style commands: there is no guarantee that they will not change in future OS updates! So perhaps avoid using them in anything critical since it may not work as expected in the future.
The credit for uncovering these wonderful undocumented commands goes to the team at Inspired-Lua. Many thanks to Jeremy and Adrien for all their efforts to help those of us learning to make the best use of Lua on the TI-Nspire!

The list of these formatting commands includes styles such as bold (keyword) and italic (subhead) as well as some nice Geometry symbols, as available in the Notes application. Such commands could be used in a variety of ways. For example, you could search for occurrences of the word "circle" and replace them automatically with the symbol!
In the example I have created, I have borrowed from HTML scripting, so that such special commands are defined in a particular way (in this case, followed by a colon). When found they carry out their defined function, either inserting a symbol (circle, triangle) or setting up the special notation for ray, or line, or enhancing the next word. Copy and paste the function into your page, and then simply make one change to the line you previously entered in the timer function: TextBox2:setText(pretty(Input)). Then try out your new talents by copying and pasting the following text into TextBox 1:
u:Underline can be mixed with b:bold, i:italic, and sup:superscript with sub:subscript . b:Geometry symbols include triangle:ABC, circle:P, rtri:ABC, line line:AB, segment segment:AB and ray ray:AB and vector vector:ABC .
You will notice, if you are on the handheld, that you may need to adjust the font size to see all of the text you paste into TextBox 1. This is easily done in OS 3.2. But it is not possible to scroll or to adjust font size in the second box, since it is not a "live" box in the same way that box 1 is. It is dependent upon whatever is typed above, and so care must be taken when setting the page up as to the size of the font for optimal viewing.
function pretty(input)
input = input:
input = input:
gsub("triangle:", "\\1tri ")input = input:
gsub("angle:", "\\1angle ")input = input:
gsub("ray:", "\\1ray ")input = input:
gsub("line:", '\\1line ')input = input:
gsub("segment:", "\\1lineseg ")input = input:
gsub("rtri:", "\\1rtri ")input = input:
gsub("vector:", "\\1vector ")input = input:
gsub("u:", "\\1title ")input = input:
gsub("b:", "\\1keyword ")input = input:
gsub("sup:", "\\1supersc ")input = input:
gsub("sub:", "\\1subscrp ")input = input:
gsub("i:", "\\1subhead ")return input
end
Think about the applications here. Using such a method, an assessment task could easily be created in which key words are searched for and, if identified, may earn credit. In fact, the box could be set up so that when certain key words are typed, they instantly become highlighted in bold or italic style, drawing the learner's eye and attention.
In our next lesson we continue to explore the possibilities for these rich text boxes, and learn how to create our own dynamic math and chem boxes.
Home ← TI-Nspire Authoring ← TI-Nspire Scripting HQ ← Scripting Tutorial - Lesson 21