Home ← TI-Nspire Authoring ← TI-Nspire Scripting HQ ← Scripting Tutorial - Lesson 4
Scripting Tutorial - Lesson 4
Download supporting files for this tutorial
Download this page in PDF format
Texas Instruments TI-Nspire Scripting Support Page
At this point, after three lessons, you should be reasonably comfortable with painting text onto a Lua page, varying the size, style and color of that text, and have some strategies for placing that text where you want it. By storing variables in the names we use for the line numbers, we can easily call and display those variables along with static text.
In this lesson, we go further into Lua by learning how to accept input typed while the page is active. This opens up all sorts of possibilities for creating truly interactive documents.
Lesson 4.1: Inputting text
Lua provides a range of simple and useful ways to capture events of many different types. While the focus here will be on accepting keyboard entry, we can just as easily respond to arrow keys, touchpad and mouse actions. For our purposes here, we will collect the entry of keyboard characters, using on.charIn(char). We will create a variable called answer which will be made up of whatever is typed on the keyboard (at least for letters, numbers and regular characters).
screen = platform.window
answer = ""
function on.charIn(char)
answer = answer..char
-- Refresh the screen after each key is pressed.
screen:invalidate()end
We begin by defining the variable answer as an empty string.
When we run the function, on.charIn, each character input from the keyboard is added to the variable answer. Note the use of the .. to indicate concatenation, or "glueing together" of strings.
As each character is entered, the screen is refreshed using screen:invalidate() (really platform.window:invalidate()). This simply forces the screen to repaint, taking account of any changes that may have just occurred.
function on.backspaceKey()
answer = answer:usub(0,-2)
screen:invalidate()
end
We also want to be able to correct errors, and so enable the backspace key.
This is a little more involved than adding characters. Instead, we use the string command, string.usub which returns the whole of answer less one character.
Using these two commands, any text that is typed will be captured as the variable answer and displayed in line3. Because this is in the standard format that we set up in the last lesson, the input and display of text into line3 needs no further work. It will now happen automatically. Just add the lines above to your script before the on.paint function and you may now display questions and other information in lines 1,2 and 4, and any text entered will be shown in line3.
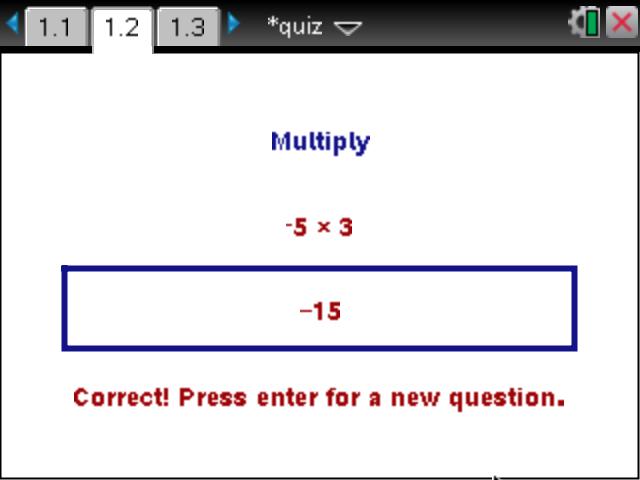
Three questions arise from the example shown here: How and where do you enter the values shown on each line? How do you draw that nice blue box around the answer? And how do you get it to recognise when the correct answer has been entered?
Lesson 4.2: Setting up your Page
The first of these questions leads to a key point in understanding what is happening here. There is an interplay between the variables in TI-Nspire and those in the Lua page.
Download the supporting files for this lesson, and open and study the document called script_tut4.tns. This is a simple quiz document that demonstrates the way in which Lua can be used to capture text as it is typed. (For iPad users, see Lesson 28 for some neat ways to achieve this!)
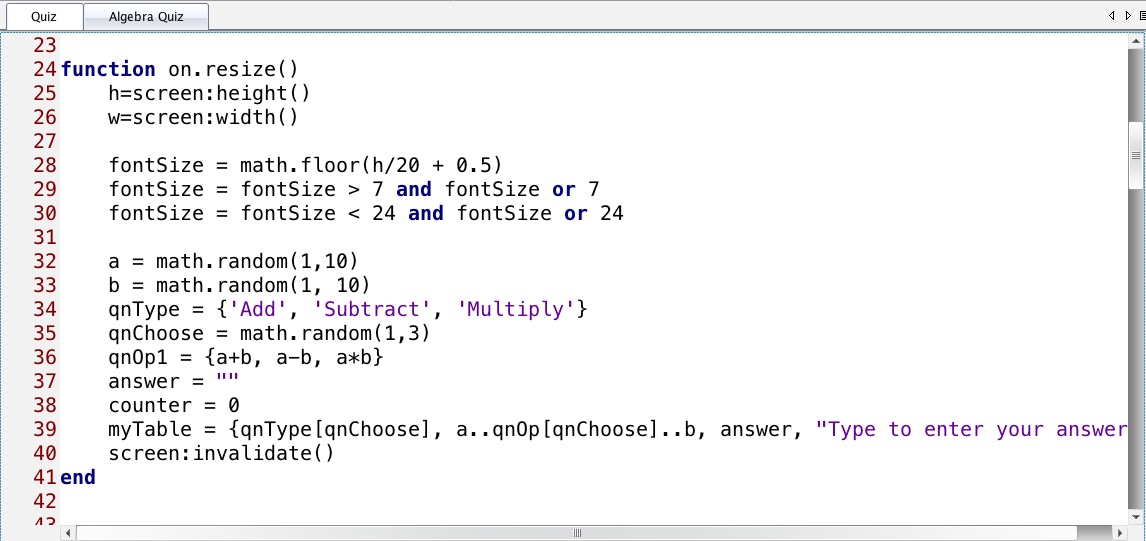
For our multiplication example, we generate two random numbers, a and b. This is achieved using the Lua math.random command and I place it within the on.resize() function so that it may be easily called when desired. When the page is first created, on.construction is called first, and on.resize() not long afterwards, before the page is actually painted to the screen. So we can ensure that the values we want will be defined in this way.
Variables are defined as local when first encountered in the script - this is efficient coding, and ensures that they will be treated as local variables throughout the script. Also important - notice that we define a table to represent each line of our display, and that some of these values will vary depending on the questions and responses.
Lesson 4.3: Some Simple Graphics
The inbuilt graphics capability offered by Lua is quite extensive, and will be dealt with in more detail in later lessons. For now, though, it would be neat to be able to highlight our answer. One way to do that would be to draw a box around line3 as shown on page 1.2 of script_tut4.lua. Study the lines that follow.
gc:setColorRGB(20, 20, 138) gc:setPen("medium", "smooth") gc:drawPolyLine({0.1*w, h*(linecount-1)/(linecount+1) - 20,0.9*w, h*(linecount-1)/(linecount+1) - 20,
0.9*w, h*(linecount-1)/(linecount+1) + 20,
0.1*w, h*(linecount-1)/(linecount+1) + 20,
0.1*w, h*(linecount-1)/(linecount+1) - 20 })
Not surprising to see the graphics context (gc) featured once again, along with setColorRGB, and with two new commands: setPen (that takes as size inputs such as "thin", "medium" or "thick", and for style, "smooth", "dotted" or "dashed").
drawPolyLine takes a list (table) of x- and y-values to create the polygon required. In this case, 5 ordered pairs define a rectangle, with width and height defined as shown. Look closely at these values and see how they work: vary them a little and see the results.
There is another command in Lua that we will meet called drawRect which makes this even easier. It takes four inputs: top left x-coordinate, y-coordinate, length and height of the rectangle. So for this example, we could have defined the box using:
gc:drawRect(0.1*w, h*(linecount-1)/(linecount+1) - 20, 0.8*w, 40)
As Marc pointed out, the height of the rectangle would be much better expressed (like the width) as a multiple of the height of the page (h). This way, if we switch from handheld to computer view, the proportions should remain the same. Your challenge: What would be a suitable multiple of h for the height of our rectangle?
Lesson 4.4: Making Enter Work For Us
Wouldn't it be good if, when you press enter after getting the correct answer, it creates a new question and wipes the answer box clear, all ready for a new entry?
To achieve this the Lua script needs to know something: It needs to know when the answer is correct. It does this by calculating the current value of the two variables, a and b, and the current operation.
It then needs to generate new values for a and b. It can do this by sending a new value to the variable new. Finally, it will wipe line3 and the value for answer cleared and ready for a new entry.
Challenge 1
Suppose we wanted to add something else: What if you were to press enter when the answer is not correct? At the moment, nothing would happen. But one option could be that this would actually reveal the correct answer. This may or may not be something you want to do with your quiz, but can you see how this might be achieved?
Challenge 2
Suppose we add a slider and call it, say type. Minimize it and set it to run from 1 to 4. When type=1, the quiz is for addition, if 2, subtraction, etc. How could this be achieved?
function on.enterKey()
counter = counter + 1local
if answer ~= '' then
if math.abs(answer - qnOp1[qnChoose]) < 0.1 then
if counter > 1 then
on.resize()
else
myTable[4] = "Correct! Press enter to continue..."
end
else
myTable[4] = "Try again..."
counter = 0
answer = ""
myTable[3] = ""
end
end
screen:invalidate()
end

Well that was a big effort! Congratulations on making it to the end of the first section of our Lua tutorials. At this point, there is probably value in reviewing what you have learned so far. Make sure it all makes sense. Play with different commands and try out your own ideas. Then move to lesson 5 in this sequence and try out some useful and cool applications for what we have learned up to this point.
The next sequence of lessons will look at Lua's graphics capabilities, including the use of images. But first, a chance to see a couple of examples of what you might like to do with this stuff!
Home ← TI-Nspire Authoring ← TI-Nspire Scripting HQ ← Scripting Tutorial - Lesson 4