Home ← TI-Nspire Authoring ← TI-Nspire Scripting HQ ← Scripting Tutorial - Lesson 2
Scripting Tutorial - Lesson 2
Download supporting files for this tutorial
Download this page in PDF format
Texas Instruments TI-Nspire Scripting Support Page
In this lesson, we introduce two very important and useful Lua tools: creating a table, and grabbing a variable from TI-Nspire's symbols table to use within your Lua script. We also make use of the key structure of "For" loops. If you are new to programming, it is strongly recommended that, before attempting these Lua tutorials, you should work through the two levels in the OnLine Authoring Classroom. Here you will learn how to write simple programs within TI-Nspire, and what you learn will form the foundation of most of what we will cover in our treatment of Lua.
Once again, you may choose your preferred tool - the in-built Script Editor is the best option if you are using the desktop software, but the downloads for this lesson also offer both TIDE and Oclua options.
And what about the clever browser-based JavaScript/Lua solution that we are using throughout these tutorials? Jim is doing a splendid job in developing this tool, but in addition to the limitations that he may, in time, be able to fix (like support for string sizes and operations, images, physics engine...) there is a critical missing ingredient when you are using your Lua scripts in a browser - TI-Nspire! These lessons make extensive use of the Nspire platform for all sorts of important features. You could learn "just Lua" but using Nspired Lua offers so many benefits that you would quickly find frustrations. So we will make use of the convenience of Lua in a browser for many simple examples throughout these lessons, but to gain the full benefit of what is available, you really need the TI-Nspire software.
Lesson 2.1: Lua Tables
Central to the way that Lua organizes its variables and works with its data is the table. Think of a table as an organized list of entries, which can be indexed. This means that for a table called, say, my_table, which consists of entries 1, "two" and "mine", we can refer to each entry easily: my_table[1] will give us 1. my_table[2] = "two" and my_table[3] will return the string "mine". This is exactly the way that TI-Nspire deals with lists. While there are some very powerful table management features within Lua, at this point, I want to show how similar Lua's treatment of tables can be to that of TI-Nspire programming.
For this example, we wish to set up our display page with multiple lines of text. Clearly this could be done just by using repeated drawString commands, at different height positions. But by being a little more systematic about it, we can gain many benefits - and you can learn a little about using tables along the way!
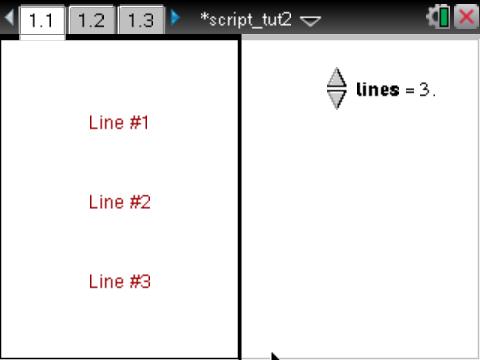
In the last lesson, we introduced the idea of local variables, creating w and h to represent the window width and height respectively. These adjust dynamically, and so if you switch views between handheld and computer view, or simply resize the computer view - or split a window, as in the example shown here - using these rather than static values will mean that your page will look equally effective in either view.

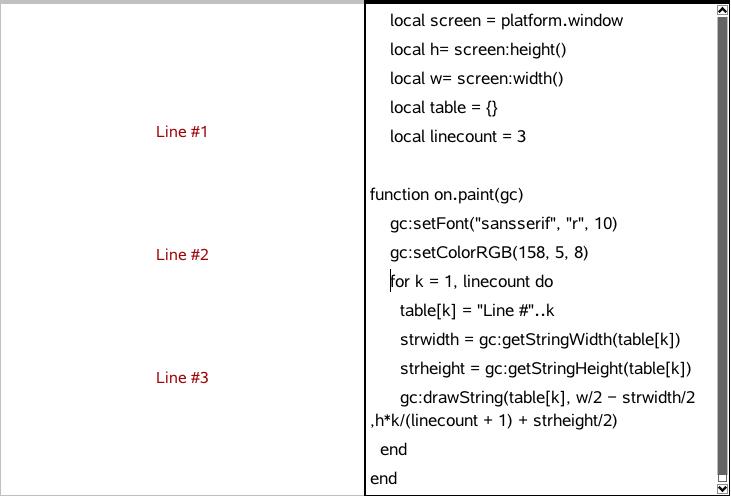
For our example, we will define two new local variables: (1) The table itself, defined with a pair of empty braces (the same way that a list is defined in TI-Nspire). We call it, unimaginatively, "table"; and (2) We also define the value for the number of lines we wish to display - "linecount".
Lesson 2.2: For Loops in Lua
I assume some familiarity with the standard "for..end" structure (in TI-Nspire, this is "For.. EndFor". In Lua, each structure ends, simply, with "end", rather than "EndFor" or "EndIf").
TI-Nspire Loop
For k, 1, 10
temp := k* (k+1)
EndFor
Lua Loop
for k = 1, 10 do
temp = k* (k+1)
end
The result for both is the same: the variable temp, at the end, will be equal to 110. The syntax in Lua, similar to TI-Nspire: Lua uses for k = from, to [,steps] do. TI-Nspire uses For k, from, to [,steps]. Note the differences with TI-Nspire: the equals sign, the word "do" at the end of this definition line, and the requirement that all should be in lowercase. You will note the [optional] step size included for both. Note, again, that lua uses all lowercase commands.
In our scripting example shown in the image above and contained in this lesson's documents, we will run from k = 1 to k = 3, creating and placing each line of our display as we go. The power of this structure should be obvious - we can just as easily display 10 lines, or whatever number we desire (within reason).
You will recognise the few lines from the previous (simpler) example: lines which define the font, the color, string width and height, and draw the string. Here we add a line that creates each line of our "table". Here the syntax, table[k] refers to the k-th element of table. So table[1] is the first "line", or "row" or however you want to visualize this table. This is exactly the same way that TI-Nspire defines elements of a list.
Lesson 2.3: Creating Lines for our Table
Suppose in TI-Nspire, we defined the list table := {"one", "two", 7} and then displayed table[1] (you would get "one"), table[3] would display the value 7. In Lua, exactly the same would happen. In fact, Lua is a little more flexible than TI-Nspire in how it handles variables. In TI-Nspire, we need to be careful to distinguish the string "7" from the number, 7. They have a different data structure. In Lua, it does not matter, as long as they are used appropriately. So if you have defined the string "7" as num, then Lua will quite happily take 2*num and output 14. TI-Nspire would insist that it cannot perform such operations on strings.
So in our example, we are actually creating each line of our table as we go: when k = 1, table[1] is defined as the joining together (concatenation, for which we use the double dots "..") of the string "line #" and the value of k (1). So table[1] = "line #1". Easy!
Lesson 2.4: Placing our Displayed Lines
So creating each of the lines for our table is relatively easy. But to display then correctly requires a little thinking and calculation. As previously, we will place them horizontally in the center of the window. But vertically,we need to place them equally spaced - in other words, we need to divide our window height (h) by one more than the linecount (because we are actually placing the spaces between the lines!). Once this is realized, then the calculation for the vertical position of each line becomes quite simple: h * k/(linecount + 1). So if we are displaying 3 lines, the first will occur at 1*h/4, the next at 2*h/4 (h/2) and the third at 3*h/4. Adding half the string height will adjust for whatever height the string has.
Take a moment now and pause; take a breath, and go back and study the script displayed above. type it in and try it out. make sure you can understand what each part actually does.
Then you are ready for the last part of this lesson: making this process dynamic!
Lesson 2.5: Bringing it all to Life

How cool would it be if we could change the displayed number of lines on the fly? Alright, maybe it is just me that thinks that would be cool, but we will learn something very important in the process, so bear with me!
We are going to add a slider to our TI-Nspire document. First, though, we need to split our page: go to the Page Layout menu (or on the handheld press DOCS and choose Page Layout) and choose the vertical split window. Select Geometry for the new window.
Now, choose menu > Actions > Add slider and, after you drop it somewhere convenient, type to call it "lines". Right click on the slider and choose the following under Slider Settings: Variable: line; Value: 5 (What effect does this have?); Minimum : 1; Maximum: 10; Step size: 1; Style: Vertical.
For an optional better appearance, right click on the slider, choose minimize, and set it to display vertically.
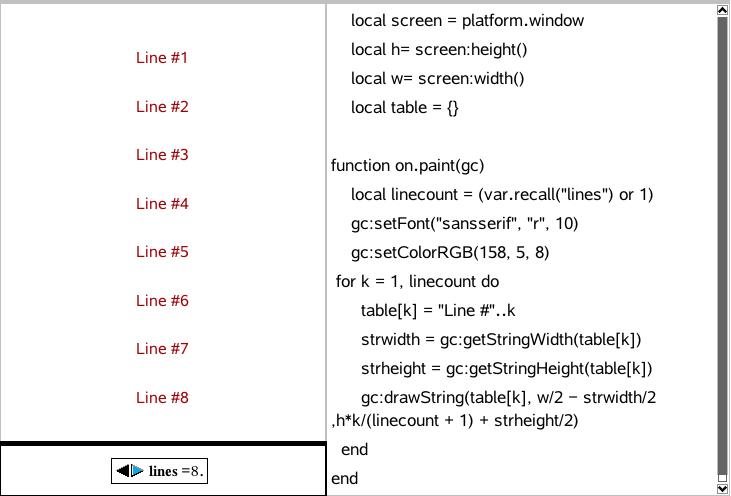
What we need to do is to somehow access the value of that slider within our Lua script. this is achieved very simply using the command var.recall. So instead of defining our local variable, linecount as a fixed value (like 3), we set
local linecount = (var.recall("lines") or 1)
Study the script here. var.recall("lines") looks for an existing variable called "lines" and grabs its value, assigning it to linecount. What if your document does not have the variable lines defined? Look how neatly Lua deals with this: if lines is not found, then the instruction is to assign the value 1 (or anything else you choose). Nice.
Notice too that the definition for linecount has been placed inside the on.paint function, rather than outside as previously. Experiment by cutting and pasting this line outside to see the difference. When linked to the Nspire slider, you will find that, while inside the on.paint function, the script works as expected - it updates with each change in the slider. This does not occur if it is placed outside - since it gets called only once, when the script is first run! The on.paint function is called every time there is some change and so gets updated frequently.

What Now?
Well done! Another lesson complete. Take some time to try this out, varying different parameters so that you can understand the part that each plays. Don't forget to download the goodies for each of these tutorials. These include completed versions of the documents referred to in the lesson, so that you can play and experiment easily.
We can obviously make this document a lot more interesting and useful - and in the next lesson we will learn how to do just that - not a lot of use for a document that just displays "line #1", "line #2", etc, so we will see how to actually put whatever you want into each line on the fly, and using "If" statements how to present the whole display in a more interesting way.
Home ← TI-Nspire Authoring ← TI-Nspire Scripting HQ ← Scripting Tutorial - Lesson 2


