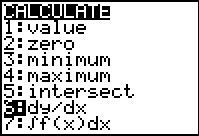
Getting Started with Calculus
Stephen Arnold
(With
thanks to Neville Windsor, Hellyer College, Burnie, Tasmania, Jeanette Saunders and Martine
MacGregor-Reid, St Cuthbert’s College, Auckland)
The calculus capabilities of graphic calculators are quite extensive, from numerical approaches to graphical methods, students are greatly supported in their study of both differential and integral calculus techniques. Of course, adding computer algebra facilities further enhances these powerful tools. This workshop presents some simple but important approaches to introductory calculus, which are made possible using such tools.
Learning Activity
Calculus Application
1. The Sky is the Limit Introducing Limits 2. Off on a Tangent Secants and Tangents 3. The Derived Function Introducing the derivative 4. Areas and Funny Shapes Areas by Approximation 5. Some Useful Things Numerical Methods for Solving Equations
Learning Activity 1: The Sky is the Limit
Top of Page
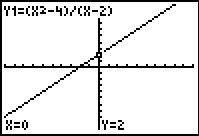
The concept of limit is central to an understanding of the calculus in both its forms, and yet too few opportunities are provided for students to grasp the subtleties involved. Students beginning their studies of calculus should already have encountered and be comfortable with functions which involve asymptotes, such as y = 1/x. Their experience of such functions should be extended to include less obvious examples, such as y = 4/(2 – 3x), y = 1/(2x - 3)2 and even y = 2x/(x2 – 4). Some work on “inversions” (the process of “turning functions upside down”) would be timely before proceeding further.
In particular, students should focus upon domains and ranges of functions and their reciprocals, beginning with simple examples and proceeding to more difficult forms (such as those above). They should be well aware that asymptotes occur not only on the axes, and not even always perpendicular: consider a function such as
y = (2x – 3)2/(x + 1). Ideally, given a function and its graph, students should be able to predict, with reasonable accuracy, the graph of its reciprocal function.
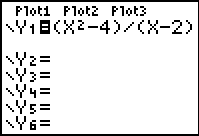
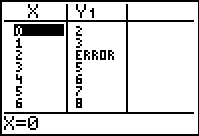
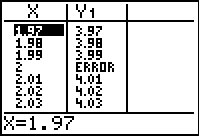
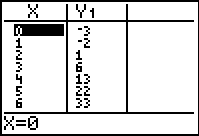
At this point, they are ready to consider the notion of limit. Begin with a function which has a hole, such as y = (x2 – 4)/(x – 2). To all intents and purposes, it looks like the linear function
y = x + 2, until the table of values is consulted.
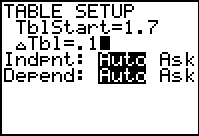
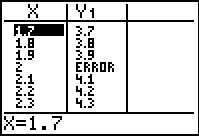
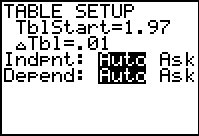
So what is happening at this point, x = 2? Use the table of values to “zoom in” for a closer look.
And again:
By this stage, students should be able to observe that, both above and below the critical value, the function moves towards a fixed value of 4. Welcome to the world of limits!
When introducing the notation, it is important that students realise that, while the function approaches the value of 4 but never reaches it, this value of 4 IS the limit of the function at x = 2. A common misconception for students is that the limiting value is an approximation, rather than an exact real value. While the function may not take this value, it is nonetheless exact and accurate as a limiting value.
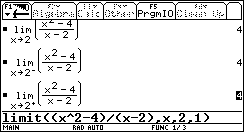
While the numerical approach above is necessary and convincing for students, the use of a computer algebra system (CAS) approach may well consolidate this understanding, especially in the context of approaching limits from above and below. The form for the limit function on the TI-89 and Voyage200 allows for this. As shown, by adding an additional argument to the normal limit command (in this case, a value greater than 0), the limit is computed from above. If the additional argument is negative, then the limit is calculated from below.
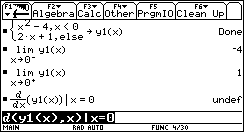
This should lead naturally to discussion of piecewise functions, where the limiting value is not the same from above as below. Subsequently, there should be some recognition of the important definitions of continuity (and, later, differentiability), at least for more capable students.
Learning Activity 2: Off on a Tangent
Top of Page
Traditionally, we introduce our students to the concept of tangent and derivative by building upon the familiar concept of gradient, and the graphic calculator is well-placed to support such an approach. Later, we may use the zoom feature to investigate the notion of gradient at a point, by observing that even the most “curvy” of lines appears straight if you zoom in close enough!
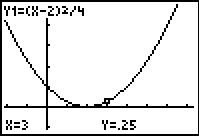
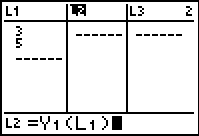
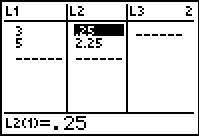
Using both function graphing and lists, it is easy for students to study the behaviour of both gradient and secant lines as they are brought closer and closer to a fixed point. In the example shown, we are interested in the fixed point x = 3 on the parabola shown.
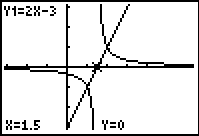
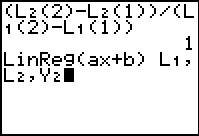
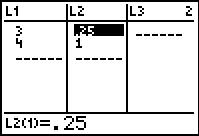
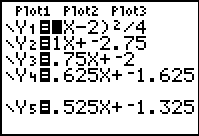
Begin by finding the gradient and the equation of the secant between the points (3, 0.25) and (5, 2.25). While initially this should be done by hand (How far from 0.25 to 2.25? This goes on top. How far from 3 to 5? This goes on the bottom to give a gradient of 2/2 or 1). Entering the two x-values into L1, then L2 may be defined as shown (Y1 may be found in the VARS menu; across to Y-VARS, then 1.Function…). In this way the calculator performs the substitution.
The gradient formula may be entered on the home screen, as shown (and recalled for later use). Further, selecting STAT -> CALC -> 4.LinReg(ax+b)…, then entering L1,L2,Y1 as shown on the home screen, produces the line of best fit for these two points – the secant line between them.
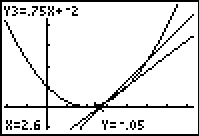
All the ingredients are now in place for students to investigate the effect of bringing the second point closer and closer to the point at x = 3. As shown, change the second x-value to 4, then recalculate L2. Recall the LinReg command at the home screen (and change the Y2 at the end to Y3, retaining the last secant line for comparison).
After carrying out this process several times, students should be referred, not just to the graph-screen, but to the Y= screen, where they may observe the changing gradients as they move closer to x = 3.
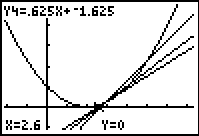
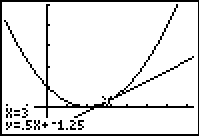
Trying a very close point (such as x = 3.01) should lead students to speculate a limiting value of 0.5 for the gradient at x = 3. How might they test that this is a true limit?
It is no more difficult, using the tools provided, to investigate the behaviour of the secants as they approach from below, and students should explore this approach in order to satisfy themselves that the secants are, in fact, approaching a limiting value in their gradients.
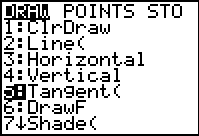
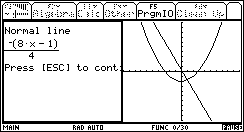
Both sets of values may be used for students to speculate on a possible equation for what may now be referred to as the tangent line, which touches the curve only at the point x = 3. Clearly the gradient of this line should 0.5, but what about the y-intercept? Some further work in pairs or groups should produce an expected value, which may then be tested, using the calculator’s DRAW menu, option 5.Tangent(… If this is activated from the graph screen, then the value of 3 may be entered directly to produce the tangent as required.
This is a worthwhile activity for students, working in pairs or small groups, as they are supported in their concept development, and use the available tools to move steadily towards this important result. Further discussion should center on the nature of this strange line and the idea that a gradient can exist at a single point (try zooming in at this stage to observe the effect of “local straightness” which will help here!)
Learning Activity 3: The Derived Function
Top of Page
After carefully exploring this concept of gradient at a point, using several different functions (notice how easy the graphic calculator makes this process, even for the quite difficult functions your students will wish to try?!) it is time to point out that, if every point on a curve has a different gradient, then surely this is a new function, derived from the original! Hence the name derivative.
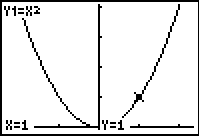
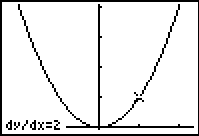
For this investigation, we begin with the simple and familiar parabola, y = x2. Our goal is to investigate the gradient function which we derive from this function: that is, for each x-value of the original function, there is a corresponding gradient value associated with it. The tool we will use here is found in the CALC menu (2nd-TRACE), option 6.dy/dx. Explain this strange notation simply as the gradient value at a given point (they may like to check that this gives the same result as the gradient of the tangent line at that point).
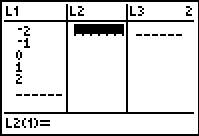
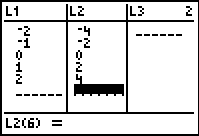
Students may set up the List Editor as shown, and record the gradient (or dy/dx) value for each of the given x-values. It should be apparent to them that the resulting function appears to be the straight line y = 2x. Of course, they may use the LinReg(ax+b) function for subsequent, more difficult patterns.
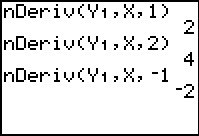
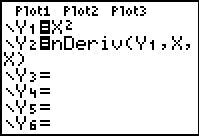
Using these tools, now, invite students to carefully investigate other functions, taking points from their graphs and calculating the gradient values at each point. Once they are familiar with this graphical approach, the process may be streamlined, using the nDeriv() command from the MATH menu (8:nDeriv(). Use this function on the home screen to find particular values as shown. Then define Y2 using this command: nDeriv(Y1, X, X). Explain that this means the (numerical) derivative for the function in Y1, with respect to x, at all points in its domain.
From this point, students may use trial-and-error methods to find the gradient function which is derived from whatever they put into Y1, using both graph and table of values to help them.
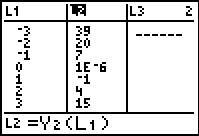
Of course, for more difficult functions, they may still use their STAT menu: enter some x-values into L1, then define L2 as shown. In the example shown, the derivative appears to be quadratic, hence students may use a QuadReg to find the exact function.
This is a powerful investigative activity, which may be used to support students in discovering for themselves the rules for differentiation of polynomials.
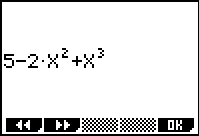
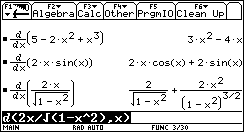
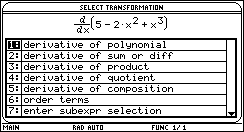
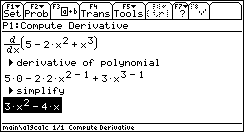
Once again, this process may be extended using CAS tools, capable of algebraically producing the derivative function. On the TI-83Plus, the combination of Symbolic and PrettyPrint Apps will support this process readily, as shown.
Of course, the powerful symbolic algebra capabilities of the TI-89 and Voyage™ 200 easily support students in their investigation of even the most difficult functions. Re-discovering the rules for differentiation using such tools is a significant and valuable mathematical activity in this context.
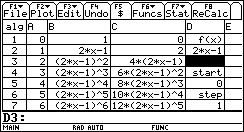
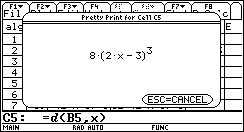
Possibly the ultimate calculus investigative tool, however, may well be the CellSheet™ App for the TI-89 and Voyage™ 200, since it actually supports the algebraic manipulation of these calculators. This is the world’s first algebraic spreadsheet, and the possibilities for teaching and learning are yet to be explored!
In the example shown, the sheet has been set up to allow the user to input a function into cell D2 (in this case, 2x – 3). In column B, this function is raised to powers from 0 to 10, while in column C, these functions are differentiated. If desired, individual cells may be displayed correctly (using a “pretty print” option), and may easily be expanded.
Of course, using the TI-89 or Voyage™ 200, students and teachers are offered a range of powerful and appropriate tools for algebra and calculus. The Symbolic Math Guide App offers step-by-step options which may be used to lead students through most types of algebraic problem situations: when confronted with a particular mathematical object, what are my choices?
The excellent Calculus Tools App, too, provides much to support learners in their early stages of calculus, as well as beyond.
As a tool for systematic investigation of functions, it would be difficult to find a more powerful or appropriate one to support students in their exploration of algebraic and calculus concepts.
Learning Activity 4: Areas and Funny Shapes
Top of Page
Historically, the integral calculus preceded the differential. Problems associated with finding areas and volumes of irregular shapes go back to the earliest days of calculation, and there are arguments that, intuitively, there may be value in students encountering this branch of calculus prior to the more usual introduction using derivatives. Once again, the visual and computational aids provided by the graphic calculator may be well-utilised here.
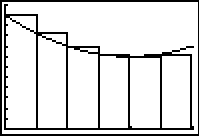
Suppose my block of land is bounded by fences and roads on three sides, but by a river (as shown) on the fourth. Using some sample points along the river boundary, I have used my graphic calculator to compute the regression line for that side:
The side opposite the river is 60 metres long, and the two other sides are 110 and 80 metres respectively.
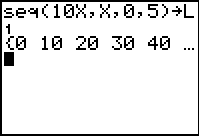
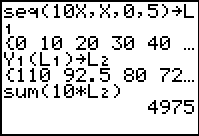
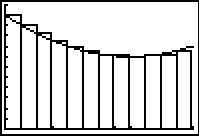
In order to find an approximate value for the area of my block, I will divide it into a series of rectangles, each of equal width, say 10 metres, and sum their areas. Once again, I will use my StatLists to assist in this process, beginning with the base values for each of my rectangles in L1. Using the Sequence command from the LIST menu (2nd-STAT) on the home screen, I can automate this process, as shown, and store these values into L1. Again, I may then define L2 using Y1(L1) to generate the function values for each of these x-values.
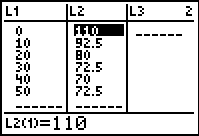
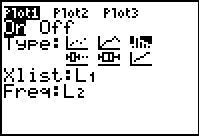
Turning on StatPlot1 (2nd-Y=) and setting the plot-style to Histogram for L1 and L2 then generates the plot shown, clearly illustrating the effect of the rectangles as an approximation for the area required.
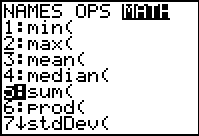
The area of each rectangle will be the width of each (10 metres) multiplied by the height of each – which are each of the values in L2. Using the SUM command (LIST -> MATH -> 5.sum() we may add these areas to produce the total area enclosed by the rectangles. This gives a value of 4 975 square metres, which we would estimate to be probably larger than the actual area of the land.
Clearly, we would improve our estimate by using narrower rectangles, and this is not difficult now, using the tools we have created.
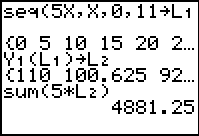
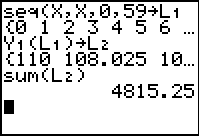
If we wish to use rectangles 5 metres wide, then we may follow the same three-step process as shown above, with one additional step: go to the WINDOW menu and change the Xscl from 10 to 5. This changes the width of the rectangles as shown. Note, too, that in the sequence command, the number of steps will change from 0 to 11 – 60 divided by 5 gives 12 rectangles.
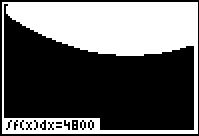
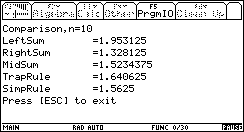
Reducing the rectangle width continues to produce better approximations to the required area: rectangles of width 1 metre, as shown, give a total area of 4 815.25 square metres. Using the function integral option from the CALC menu produces an area of 4800 square metres (as shown).
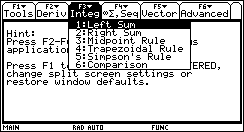
As we would expect, the Calculus Tools App on the TI-89 and Voyage™ 200 has some nice features to offer in this regard. Each of the usual approximation methods is supported, algebraically and graphically, as well as a nice comparison feature, through which students might begin to investigate which rules may be more appropriate than others for different functions.
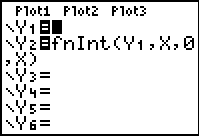
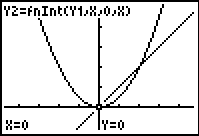
Once again, the option exists for students to discover the rule for integration using the calculator tools available. On the TI-83 Plus, this involves the FnInt command from the MATH menu, which can be graphed using the format shown.
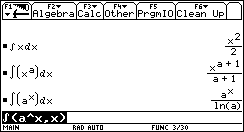
Alternatively, the power of computer algebra may once again be harnessed as a tool for exploration. In fact, as shown, it may even be used to short-cut the process and go straight to the rule, if desired!
Learning Activity 5: Some Useful Things…
Top of Page
Having introduced and consolidated the basic skills of both differential and integral calculus, we turn our attention to a couple of the applications of calculus which may prove of interest, and will certainly prove useful for our students in their mathematical endeavours. The graphic calculator is an ideal tool for learning about and using numerical methods as applied to equation solving.
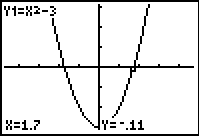
Consider, for example, the positive solution to the quadratic, y = x2 – 3. Three different numerical methods will be utilized here, and their efficiencies compared. Each uses the table of values as the primary tool for investigation of the roots. The two traditional methods used for such a task are the method of bisection of the interval, and the Newton-Raphson method. First, however, we will use the method of “zooming”, made popular by access to such tools as spreadsheets and graphic calculators.
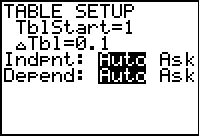
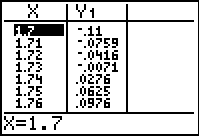
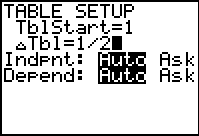
First, note from the graph that a “zero” is readily defined by a change of sign in the y-value of the function, as it crosses the x-axis. In the table of values, then, we simply observe where such a sign-change occurs – in the first instance, this may be seen to occur between x = 1 and x = 2. This suggests that we change the Table Setup (2nd-WINDOW) to start at x = 1 and to go up by smaller steps: 0.1 instead of 1.
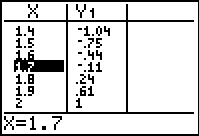
It is easily seen that the sign change now occurs between 1.7 and 1.8, and so another change of Table Settings (start at 1.7, go up by steps of 0.01) reveals a better solution at 1.73.
This process may be continued indefinitely – or at least until the visible decimal accuracy of the tool gives out. Students will readily appreciate the logic and power of this method for closing in on roots.
Prior to the use of technological tools, of course, such precise and repetitive calculations would have been difficult and time-consuming. Methods such as Bisection were adopted, not because they were particularly elegant or efficient, but they were practical and relatively easy.
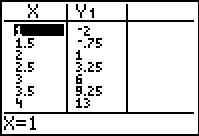
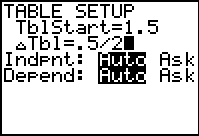
The method of bisection utilizes exactly the same process as was just observed, but instead of decreasing the step size by one tenth at each stage, the step size is halved. Of course, on the calculator, this is very easy.
After observing the sign change between x = 1 and 2, the step size is simply divided by 2 each time. Observe the sign change now between 1.5 and 2, and so the starting value becomes 1.5, and the step size becomes 0.5/2.
As noted, this method is not used for its efficiency. Even after 5 applications, the value is still only 1.7188, whereas 3 applications of the first method (which might be called “tithing” since it involves taking one tenth at each step) produce a value correct to the nearest one hundredth. Bisection, then is retained only for historical interest as an approximation method for solving equations.
The Newton-Raphson method, however, retains its ability to impress, even after some four hundred years. It is an iterative method, beginning with an estimated value and, if applied correctly, producing at each application a better approximation to the required solution.
Before examining the justification for this formula, we will apply it using the graphing calculator and observe its effect. Since it uses the derivative of the given function, we might once again set up our Y= editor with a given function in Y1, and the derivative of this function calculated in Y2, as shown (Remember: nDeriv may be found in the MATH menu).
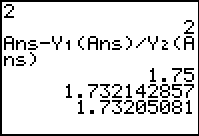
A simple application of this method uses the Home Screen, and begins with an estimate (use the graph to judge a reasonable value – one which has no turning points between it and the actual zero value!). In this case, we may begin with 2: type it and press ENTER.
Using the ANS value (2nd-(-)) we enter the formula as shown, using Y1 and Y2 drawn from VARS -> Y-VARS -> Function…
Simply pressing ENTER repeatedly then applies the previous answer and iteratively applies the formula to produce better and better approximations. In fact, it takes only four applications to reach the 9-decimal place accuracy of the calculator!
Students should now try this procedure with other functions, and other starting values, testing the limits of the method.
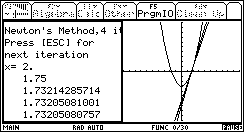
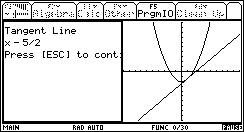
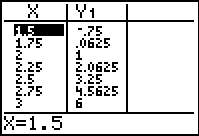
In order for students to understand how and why this method works, it is useful once again to refer to the Calculus Tools App on our Voyage200 (or TI-89). The Newton’s Method option here visually demonstrates the application of tangent lines at each new x-value. A tangent drawn at our first guess (x = 2) will cross the x-axis closer to the zero value than this guess (in this case, at x = 1.75).
A tangent drawn at x = 1.75 will cut the x-axis again, closer to the true value than previously, and so on.
These marvelous tools for calculus learning offer means, not only to build understanding of the concepts involved, but also provide practical and powerful ways for students to consolidate the skills which will be needed for future work in this field. Far from degrading their algebraic and mathematical skills, such tools, if used wisely, encourage and support students in their practise and subsequent acquisition, within a meaningful and active context.
And herein lies the true power of such tools: they encourage our students to be active participants in their own learning, rather than passive recipients of other people’s knowledge.


![[image]](./CalcStart_files/image071.gif)