Home ← STEM HQ ← TI-Nspire Authoring ← TI-Nspire Scripting HQ ← Scripting Tutorial - Lesson 48
Scripting Tutorial - Lesson 48: Lua Scripting and the TI Innovator™ Hub:
8. Create a general Innovator™ Hub Document
TI Innovator™ Hub Lesson 0: Using Lua to store and edit TI-BASIC programs for the Innovator™ Hub (Lua Scripting Lesson 40)
TI Innovator™ Hub Lesson 1: SENDING to the Hub: Controlling the Action (Lua Scripting Lesson 41)
TI Innovator™ Hub Lesson 2: READING from the Hub: Real world interaction and data (Lua Scripting Lesson 42)
TI Innovator™ Hub Lesson 3: Exploring the OneShotTimer: Learning to Wait! (Lua Scripting Lesson 43)
TI Innovator™ Hub Lesson 4: Making Music with the Innovator™ Hub (Lua Scripting Lesson 44)
TI Innovator™ Hub Lesson 5: Lua Script for the TI Innovator™ Hub Rover (Lua Scripting Lesson 45)
TI Innovator™ Hub Lesson 6: Lua Script for the Norland Research/TI Innovator™ Hub Robot (Lua Scripting Lesson 46)
TI Innovator™ Hub Lesson 7: Build your own Innovator™ Hub Robot (Lua Scripting Lesson 47)
TI Innovator™ Hub Lesson 8: Create a general Innovator™ Hub Document (Lua Scripting Lesson 48)
TI Innovator™ Hub Lesson 9: Create a general Innovator™ Hub and BLE Document (Lua Scripting Lesson 49)
Download supporting file for this tutorial
Texas Instruments TI-Nspire Scripting Support Page
Scripting for the Innovator Hub: Lesson 8: Create a general Innovator™ Hub Document
The previous example documents have been deliberately simplified in terms of user interface - just a point and click interaction, to make it easier to focus on the new Innovator Hub code.
Now it is time to generalise that interface and to allow the user to make changes and explore and experiment with the Innovator coding commands. This is easily achieved by simply using an interactive text box.
Define the textbox and a short help text to initially go into it.
Add text to the inBox for the various sample actions in the menu.
- Here we set up our inBox.
The heavy lifting in this script lies in the tabKey function. We need to allow for those occasions when the user might want to include multiple send statements, and have these dealt with individually.
Pay particular attention to the application of the little known Lua command loadstring. If a line in the inBox begins with SET, or READ or CONNECT, then it will be sent more or less directly to the Innovator for processing.
If not, then if that command is a valid Lua function defined in your script (such as blink, or wait, etc) then it will attempt to carry out that command. This is very powerful and opens to the doors to many interesting applications.
No changes from that previously defined.
- As previously defined.
-- TI Innovator Init Values
platform.apilevel = '2.7' local screen = platform.window local date = "021517"
require 'color' pcall(function() require 'asi' end)
local isASIavailable = false local hubStrOn, hubStrOff, msgStr, rxValue, timeStr, delay, repeats, drive local tempo, key, I local list1, list2 = {}, {} local index, dataList = {}, {} var.store("index", index) var.store("dataList", dataList) local inBox = D2Editor.newRichText() local help = "Connect your Hub, and use the samples menu to enter different Hub commands. Press 'tabKey' to try these out: edit them and try your own."
function addMsg(input)
msgStr = input print(msgStr) screen:invalidate()end
function on.construction()
end--the next three lines are required for Hub connection TI_Innovator.init(TI_InnovatorStateCallback) TI_Innovator.setReadListener(TI_InnovatorReadCallback) TI_Innovator.connect()
Menu={
{"About",} toolpalette.register(Menu) screen:invalidate(){" ©2017 Compass Learning Technologies", function() end}, {" Version "..date, function() end}, {" Contact: steve@compasstech.com.au ", function() end},}, {"Controls",{"Scan and Connect", function() TI_Innovator.connect() end}, {"Disconnect", function() TI_Innovator.disconnect() on.resize() end}, {"RESET", function() on.resize() end},}, {"SET Samples", {"SET LIGHT ON/OFF (default)", function() hubStrOn = "SET LIGHT ON" inBox:setText(hubStrOn) hubStrOff = "SET LIGHT OFF" on.tabKey() end}, {"SET COLOR.RED ON/OFF", function() hubStrOn = "SET COLOR.RED ON" inBox:setText(hubStrOn) hubStrOff = "SET COLOR.RED OFF" on.tabKey() end}, {"SET COLOR.GREEN ON/OFF", function() hubStrOn = "SET COLOR.GREEN ON" inBox:setText(hubStrOn) hubStrOff = "SET COLOR.GREEN OFF" on.tabKey() end}, {"SET COLOR.BLUE ON/OFF", function() hubStrOn = "SET COLOR.BLUE ON" inBox:setText(hubStrOn) hubStrOff = "SET COLOR.BLUE OFF" on.tabKey() end}, {"SET SOUND 220 5", function() hubStrOn = "SET SOUND 220 5" inBox:setText(hubStrOn) hubStrOff = "SET SOUND 0 1" on.tabKey() end}, {"SET SPEAKER 1 220 5", function() hubStrOn = "SET SPEAKER 1 220 5" TI_Innovator.Send("CONNECT SPEAKER 1 OUT1") TI_Innovator.Send(hubStrOn) hubStrOff = "SET SPEAKER 1 0 1" end}, {"SET LED 1 ON", function() hubStrOn = "SET LED 1 ON" inBox:setText(hubStrOn) TI_Innovator.Send("CONNECT LED 1 OUT1") TI_Innovator.Send(hubStrOn) hubStrOff = "SET LED 1 0FF" end}, {"SET SERVO 1 CW 50 5 (BB9)", function() TI_Innovator.Send("CONNECT SERVO 1 BB9") hubStrOn = "SET SERVO 1 CW 50 5" inBox:setText(hubStrOn) hubStrOff = "SET SERVO 1 CW 50 0" on.tabKey() end}, {"SET ANALOG.OUT 1 100", function() hubStrOn = "SET ANALOG.OUT 1 100" inBox:setText(hubStrOn) TI_Innovator.Send("CONNECT ANALOG.OUT 1 OUT1") TI_Innovator.Send(hubStrOn) hubStrOff = "SET ANALOG.OUT 1 0" end}, {"SET DIGITAL.OUT 1 ON", function() hubStrOn = "SET DIGITAL.OUT 1 ON" inBox:setText(hubStrOn) TI_Innovator.Send("CONNECT DIGITAL.OUT 1 OUT1") TI_Innovator.Send(hubStrOn) hubStrOff = "SET DIGITAL.OUT 1 0FF" end}, }, {"READ Samples",{"READ BRIGHTNESS (default)", function() hubStrOn = "READ BRIGHTNESS" inBox:setText(hubStrOn) TI_Innovator.Send(hubStrOn) TI_Innovator.Read() msgStr = rxValue or hubStrOn on.tabKey() end}, {"READ RANGER 1", function() hubStrOn = "READ RANGER 1" inBox:setText(hubStrOn) TI_Innovator.Send("CONNECT RANGER 1 IN1") TI_Innovator.Send(hubStrOn) TI_Innovator.Read() msgStr = rxValue or hubStrOn end}, {"READ DHT 1", function() hubStrOn = "READ DHT 1" inBox:setText(hubStrOn) TI_Innovator.Send("CONNECT DHT 1 IN1") TI_Innovator.Send(hubStrOn) TI_Innovator.Read() msgStr = rxValue or hubStrOn end}, {"READ ACCEL 1", function() hubStrOn = "READ ACCEL 1" inBox:setText(hubStrOn) TI_Innovator.Send("CONNECT ACCEL 1 I2C") TI_Innovator.Send(hubStrOn) TI_Innovator.Read() msgStr = rxValue or hubStrOn end}, {"READ BAROMETER", function() hubStrOn = "READ BAROMETER" inBox:setText(hubStrOn) TI_Innovator.Send("CONNECT BAROMETER I2C") TI_Innovator.Send(hubStrOn) TI_Innovator.Read() msgStr = rxValue or hubStrOn end}, {"READ ANALOG.IN 1", function() hubStrOn = "READ ANALOG.IN 1" inBox:setText(hubStrOn) TI_Innovator.Send("CONNECT ANALOG.IN 1 IN1") TI_Innovator.Send(hubStrOn) TI_Innovator.Read() hubStrOff = hubStrOn end}, {"READ DIGITAL.IN 1", function() hubStrOn = "READ DIGITAL.IN 1" inBox:setText(hubStrOn) TI_Innovator.Send("CONNECT DIGITAL.IN 1 IN1") TI_Innovator.Send(hubStrOn) TI_Innovator.Read() hubStrOff = hubStrOn end},}, {"Select Sound",{"C4", function() hubStrOn = "SET SOUND 262 TIME 1" inBox:setText(hubStrOn) TI_Innovator.Send(hubStrOn) hubStrOff = "SET SOUND 0 1" msgStr = hubStrOff end}, {"A4", function() hubStrOn = "SET SOUND 440 TIME 1" inBox:setText(hubStrOn) TI_Innovator.Send(hubStrOn) hubStrOff = "SET SOUND 0 1" msgStr = hubStrOff end}, {"C5", function() hubStrOn = "SET SOUND 523 TIME 1" inBox:setText(hubStrOn) TI_Innovator.Send(hubStrOn) hubStrOff = "SET SOUND 0 1" msgStr = hubStrOff end}, {"No tone", function() hubStrOn = "SET SOUND 0 TIME 1" inBox:setText(hubStrOn) TI_Innovator.Send(hubStrOn) hubStrOff = "SET SOUND 0 1" msgStr = hubStrOff end}, {"Aliens", function() inBox:setText('Aliens') tempo = 1000 I=1 list1 = notes_aliens list2 = times_aliens playTone(list1,list2) hubStrOff = "Aliens" msgStr = hubStrOff end}, {"BallGame", function() inBox:setText('BallGame') tempo = 1000 I=1 list1 = notes_bgame list2 = times_bgame playTone(list1,list2) hubStrOff = "Take me out to the Ball Game" msgStr = hubStrOff end}, {"Happy Birthday", function() inBox:setText('Happy Birthday') tempo = 1000 I=1 list1 = notes_bday list2 = times_bday playTone(list1,list2) hubStrOff = "Happy Birthday" msgStr = hubStrOff end}, {"If I Only Had a Brain", function() inBox:setText('If I Only Had a Brain') tempo = 4000 I=1 list1 = notes_brain list2 = times_brain playTone(list1,list2) hubStrOff = "If I only had a brain" msgStr = hubStrOff end}, {"Fur Elise", function() inBox:setText('Fur Elise') tempo = 1000 I=1 list1 = notes_elise list2 = times_elise playTone(list1,list2) hubStrOff = "Fur Elise" msgStr = hubStrOff end}, {"Home on the Range", function() inBox:setText('Home on the Range') tempo = 1000 I=1 list1 = notes_home list2 = times_home playTone(list1,list2) hubStrOff = "Home on the Range" msgStr = hubStrOff end}, {"Well-tempered Scale", function() inBox:setText('Well-tempered Scale') tempo = 1000 I=1 list1 = notes_welltemp list2 = times_scale playTone(list1,list2) hubStrOff = "Well tempered scale" msgStr = hubStrOff end}, {"Harmonic Scale", function() inBox:setText('Harmonic Scale') tempo = 1000 I=1 list1 = notes_harmonic list2 = times_scale playTone(list1,list2) hubStrOff = "Harmonic scale" msgStr = hubStrOff end},}, {"TIMER Samples",{"wait(5)", function() wait(5) end}, {"blink(5,1)", function() blink(5,1) end}, {"alarm(5,0.5)", function() alarm(5,0.5) end},}, {"Robot Samples",{"CONNECT ROBOT SERVOS (BB9/BB10)", function() showKeyBoard = false TI_Innovator.Send("CONNECT SERVO 1 BB9") TI_Innovator.Send("CONNECT SERVO 2 BB10") end}, {"ROBOT FD 1 secs", function() fd(1) end}, {"ROBOT BK 1 secs", function() bk(1) end}, {"ROBOT LT 1 secs", function() lt(1) end}, {"ROBOT RT 1 secs", function() rt(1) end}, {"AUTO drive (BRIGHTNESS)", function() drive = "BRIGHTNESS" lightSeeker() end}, {"AUTO drive (DISTANCE)", function() TI_Innovator.Send("CONNECT RANGER 1 IN1") drive = "RANGER" auto() end},},-- Layout Functions
function on.resize(width, height)
w = screen:width() h = screen:height() hubStrOn, hubStrOff, msgStr, rxValue = "SET LIGHT ON", "SET LIGHT OFF", "SET LIGHT OFF", "" timeStr, delay, repeats, drive = "", 0, 1, "" tempo = 1000 -- the times are relative values of note duration. This constant changes those into mSec. Change this value to alter the tempo of the song. key = 0 -- Since the musical scale is a base 2 logrithmic function. The key of the song can be tansposed by raising each note to a power of two. There are 12 piano keys in an octave. An octave is a frequency factor of two. I=1-- this is the array index that is changed in the wait callback function list1, list2 = {}, {} index, dataList = {}, {} var.store("index", index) var.store("dataList", dataList)endboxX, boxY, boxWidth, boxHeight = 0.025*w, 0.05*h, 0.95*w, 0.45*h fontSize = math.floor(h/20 + 0.5) if hh then
fontSize = fontSize <= 24 and fontSize or 24 fontSize = fontSize > 6 and fontSize or 7end inBox:move(boxX, boxY) inBox:resize(boxWidth, boxHeight) inBox:setFontSize(fontSize) inBox:setTextColor(color.black) inBox:setBorder(1) inBox:setVisible(true) inBox:setFocus(true) inBox:setText(help)if TI_Innovator.isConnected() then TI_Innovator.Send('BEGIN') addMsg("TI Innovator Hub ready") end screen:invalidate()
function on.paint (gc)
gc:drawString(timeStr, 0.05*w, 0.75*h, "middle") gc:drawString(msgStr, 0.05*w, 0.85*h, "middle")local myColor = {255,0,0}
if TI_Innovator.isConnected() then
myColor = {0,255,0}elsemyColor = {255,0,0}end gc:setColorRGB (unpack(myColor)) gc:fillRect (0, 0, w, 0.025*h)gc:setColorRGB (color.lightgray) gc:fillRect (boxX, boxY + boxHeight, boxWidth, 0.1*h) gc:setColorRGB (unpack(myColor)) gc:drawRect(boxX, boxY + boxHeight, boxWidth, 0.1*h)
gc:setFont("sansserif","r",fontSize) local str = "SUBMIT" local sw = gc:getStringWidth(str) gc:drawString(str, boxX + (boxWidth-sw)/2, boxY + boxHeight + 0.05*h, "middle")
gc:setColorRGB (color.lightgray) gc:fillRect (boxX, boxY + boxHeight + 0.1*h, boxWidth, 0.1*h) gc:setColorRGB (unpack(myColor)) gc:drawRect(boxX, boxY + boxHeight + 0.1*h, boxWidth, 0.1*h)
gc:setFont("sansserif","r",fontSize) local str = "RESET" local sw = gc:getStringWidth(str) gc:drawString(str, boxX + (boxWidth-sw)/2, boxY + boxHeight + 0.15*h, "middle")
gc:drawString(rxValue, 0.05*w, 0.95*h, "middle")
-- TI Innovator User set up
function on.escapeKey()
on.resize() inBox:setText('') inBox:setFocus(true) screen:invalidate()endfunction on.tabKey()
if inBox:getText() thenendlocal input = string.upper(inBox:getText()) input = input:gsub('%"','') local list = {input} if input:find(string.char(10)) thenend screen:invalidate()list = input:split(string.char(10)) or {input:gsub(string.char(10),'')}end input = list[1] if input:find("SEND%(") theninput = input:gsub('SEND%(','') input = input:gsub('%)','') hubStrOn = input TI_Innovator.Send(input) TI_Innovator.Read()elseif input:find("SET") thenTI_Innovator.Send(input) if input:find("ON") thenelseif input:find("READ") thenhubStrOn = input hubStrOff = input:gsub("ON","OFF")elseif input:find("OFF") thenhubStrOff = input hubStrOn = input:gsub("OFF","ON")endTI_Innovator.Send(input) TI_Innovator.Read() hubStrOn = input hubStrOff = inputelseif input:find("CONNECT") thenTI_Innovator.Send(input)elselocal testfunction = loadstring(string.lower(input)) pcall(function() testfunction() screen:invalidate() end)endif #list > 1 then
for k = 2, #list doendinput = list[k] if input:find("SEND%(") thenendinput = input:gsub('SEND%(','') input =input:gsub('%)','') TI_Innovator.Send(input) TI_Innovator.Read()elseif input:find("SET") thenTI_Innovator.Send(input) if input:find("ON") thenelseif input:find("READ") thenhubStrOn = input hubStrOff = input:gsub("ON","OFF")elseif input:find("OFF") thenhubStrOff = input hubStrOn = input:gsub("OFF","ON")endTI_Innovator.Send(input) TI_Innovator.Read() hubStrOn = input hubStrOff = inputelseif input:find("CONNECT") thenTI_Innovator.Send(input)elselocal testfunction = loadstring(string.lower(input)) pcall(function() testfunction() screen:invalidate() end)endfunction on.mouseDown(x, y)
if hubStrOn:find("ROBOT") thenendif drive:find("BRIGHT") thenelselightSeeker()elseif drive:find("RANGER") thenauto()elseTI_Innovator.Send("SET SERVO 1 CCW 50 5") TI_Innovator.Send("SET SERVO 2 CW 50 5") TI_Innovator.Read()endTI_Innovator.Send(hubStrOn) -- This is an example of sending a SET command to the Hub TI_Innovator.Read() -- This is an example of sending a READ command to the Hubendif x > boxX and x <= boxX + boxWidth then
if y > boxY + boxHeight and y <= boxY + boxHeight + 0.1*h thenendon.tabKey()elseif y > boxY + boxHeight + 0.1*h and y <= boxY + boxHeight + 0.2*h thenon.escapeKey()endscreen:invalidate()
function on.mouseUp (x,y)
if hubStrOn:find("ROBOT") thenif drive == '' thenendTI_Innovator.Send("SET SERVO 1 CCW 0 0") TI_Innovator.Send("SET SERVO 2 CW 0 0") TI_Innovator.Read() endelsetimeStr = '' TI_Innovator.Send(hubStrOff) TI_Innovator.Read() screen:invalidate()endfunction str2list(input, def) local list = {} if input:find(def) then
list = input:split(def) table.foreachi(list,print)elselist = {input}end return list endfunction TI_InnovatorReadCallback(port, error_msg) -- this is the callback function that is defined above and catches the result of a READ command send to the Hub.
rxValue = port:getValue() or '' -- this gets the actual return value from the hub and puts it in the variable rxValue. The user may choose any variable name and also may do any calibration or ranging of the value here. Note that rxValue may be numeric, list or string (hence the utility function list2str) if tonumber(rxValue) then rxValue = math.floor(100*rxValue+0.5)/100 else rxValue = tostring(rxValue) rxValue = str2list(rxValue,string.char(10))[1] end addMsg(hubStrOn) if tonumber(rxValue) then voltage = (rxValue/2^14)*3.3 end -- an example of converting a raw 14 bit ADC value into voltage. screen:invalidate()endfunction TI_InnovatorStateCallback(event)
endaddMsg("TI_InnovatorStateCallback") if 'ready' == event then TI_InnovatorConfig() elseif "disconnected" == event then -- user may choose to do some clean up or display a msg when the Hub is disconnected. addMsg("TI_Innovator Hub disconnected") end screen:invalidate()
function TI_InnovatorConfig() -- this function is called from TI_InnovatorStateCallback() when a ready connection is succesful.
-- place CONNECT and other Hub startup commands here addMsg("TI_Innovator Hub connected") TI_Innovator.Send(hubStrOff)endfunction wait(input)
endif input then delay = input end time_step = 0.1 if delay >= 0 then
timeStr = "Wait Time: "..delay.." seconds" delay = math.floor((1/time_step)*(delay - time_step)+0.5)*time_step TI_Innovator.Send(hubStrOn) if hubStrOn:find("READ") then TI_Innovator.Read() end if tonumber(rxValue) then -- This allows our wait function to serve as a timed data collection toolelsedataList[#dataList+1] = tonumber(rxValue) index[#index+1]=#dataList var.store("index", index) var.store("dataList", dataList)else rxValue = tostring(rxValue) rxValue = str2list(rxValue,string.char(10))[1] end oneShotTimer(1000*time_step,wait)TI_Innovator.Send(hubStrOff) delay = 0end screen:invalidate()function blink(rep,waitValue)
endlocal lightState = "OFF" if waitValue then delay = waitValue end if rep then repeats = rep end if repeats > 0 then
timeStr = "blink("..(math.floor(repeats+0.5))..", "..delay..")" if math.floor(repeats) == repeats then lightState = "ON" else lightState = "OFF" end TI_Innovator.Send("SET LIGHT "..lightState) oneShotTimer(1000*delay,blink) repeats = repeats - 0.5end screen:invalidate()function alarm(rep,waitValue)
local tone = 220 if waitValue then delay = waitValue end if rep then repeats = rep end if repeats > 0 thenendtimeStr = "alarm("..(math.floor(repeats+0.5))..", "..delay..")" if math.floor(repeats) == repeats then tone = 440 else tone = 220 end TI_Innovator.Send("SET SOUND "..tone) oneShotTimer(1000*delay,alarm) repeats = repeats - 0.5end screen:invalidate()function waitTone()
if not list1 then list1 = var.recall("list1") end if not list2 then list2 = var.recall("list2") end if list1 and #list1 > 0 and list2 and #list2 > 0 thenendif I <= #list1 and list1[I] and list2[I] then -- don't go past the lenght of the arrayend screen:invalidate()if list1[I] and list2[I] thenelselocal str = "SET SOUND "..list1[I]*2^(key/12).." TIME "..math.floor(100/(list2[I])+0.5)/100 hubStrOn = str TI_Innovator.Send(str) oneShotTimer((tempo/list2[I])+20, waitTone) I = I + 1endhubStrOn = "SET LIGHT ON" hubStrOff = "SET LIGHT OFF" addMsg(hubStrOff)endfunction playTone(list1, list2)
waitTone() screen:invalidate()endfunction fd(input)
if input thenendinBox:setText("SET SERVO 1 CCW 100 "..input ..string.char(10).."SET SERVO 2 CW 100 "..input) hubStrOn = "ROBOT FORWARD" addMsg(hubStrOn) oneShotTimer(1000,fd) on.tabKey()end hubStrOff = "ROBOT OFF" addMsg(hubStrOff) screen:invalidate()function bk(input)
if input thenendinBox:setText("SET SERVO 1 CW 100 "..input ..string.char(10).."SET SERVO 2 CCW 100 "..input) hubStrOn = "ROBOT BACK" addMsg(hubStrOn) oneShotTimer(1000,bk) on.tabKey()end hubStrOff = "ROBOT OFF" addMsg(hubStrOff) screen:invalidate()function lt(input)
if input thenendinBox:setText("SET SERVO 1 CW 100 "..input ..string.char(10).."SET SERVO 2 CW 100 "..input) hubStrOn = "ROBOT LEFT" addMsg(hubStrOn) oneShotTimer(1000,lt) on.tabKey()end hubStrOff = "ROBOT OFF" addMsg(hubStrOff) screen:invalidate()function rt(input)
if input thenendinBox:setText("SET SERVO 1 CCW 100 "..input ..string.char(10).."SET SERVO 2 CCW 100 "..input) hubStrOn = "ROBOT RIGHT" addMsg(hubStrOn) oneShotTimer(1000,rt) on.tabKey()end hubStrOff = "ROBOT OFF" addMsg(hubStrOff) screen:invalidate()function lightSeeker()
if drive:find("BRIGHT") thenendTI_Innovator.Send("READ BRIGHTNESS ") TI_Innovator.Read() if tonumber(rxValue) and tonumber(rxValue) > 0 thenend oneShotTimer(1000,lightSeeker) screen:invalidate()if tonumber(rxValue) > 0.5 thenendif tonumber(rxValue) > 10 thenelsefd(1)elsebk(1) rt(1)endfd(0) hubStrOff = "ROBOT AUTO OFF" addMsg(hubStrOff) play = falseendfunction auto()
if drive:find("RANGER") thenendTI_Innovator.Send("READ RANGER 1 ") TI_Innovator.Read() if tonumber(rxValue) and tonumber(rxValue) > 0 thenend oneShotTimer(1000,auto) screen:invalidate()TI_Innovator.Send("SET SOUND "..1000*tonumber(rxValue).." 0.1") if tonumber(rxValue) > 0.1 thenendif tonumber(rxValue) > 0.4 thenelsefd(1)elsebk(0.5) rt(0.5)endfd(0) hubStrOff = "ROBOT AUTO OFF" addMsg(hubStrOff) play = falseend--End of user code do not modify below this line
-- TI Innovator Code Do not modify any code below this line
-- oneShotTimer BEGINS
local timerstart = timer.start local timerstop = timer.stop timer.start = nil timer.stop = nil local currentTimer = nil
local function timerStart(t)
endcurrentTimer = t timerstart(t.period/1000)
local function timerStop()
endcurrentTimer = nil timerstop()
local function setTimer(t)
endif t.period==nil or type(t.period)~='number' or t.period < 10 then error('period in milliseconds >= 10') end timerStart(t) return t
function oneShotTimer(period, listenerHandler, ...)
endif type(listenerHandler) ~= 'function' then
error('createTimerOneShot: function expected')end setTimer {period = period, oneShot = true, listenerHandler = listenerHandler, params = { ... },}function on.timer()
endlocal ct = currentTimer if currentTimer == nil then
timerStop()end if currentTimer.oneShot thencurrentTimer = nil timerStop()end ct.listenerHandler(unpack(ct.params)) screen:invalidate()-- oneShotTimer ENDS
-- TI Innovator BEGINS
TI_Innovator = { }
function TI_Innovator.init(theStateCallback)
endif not pcall(function() require 'asi' end) then
addMsg('Hub NOT available') returnendaddMsg('Hub available')
isASIavailable = true
local HANDSHAKE_GREETING = 'ISTI\n' local HANDSHAKE_ANSWER = 'TISTEM' local portFoundList = { } local state local handshakeState local notifyEvent local asiStateListener local startScanning local stopScanning local portFoundListener local portStateListener local handshake_SendListener local handshake_readListener local handshake_port local TI_Innovator_port local baudRate = asi.BAUD_RATE_DEFAULT local readTimeout = asi.READ_TIMEOUT_DEFAULT
-- User callbacks local stateCallback = theStateCallback local SendCallback local readCallback
function notifyEvent(event)
addMsg('notifying '.. event) if stateCallback thenendstateCallback(event)elseaddMsg('no callback registered')endfunction startScanning()
if isASIavailable thenendasi.startScanning(portFoundListener) notifyEvent('scanning')endfunction stopScanning()
handshake_port = nil portFoundList = { } asi.stopScanning()endfunction asiStateListener(asiState)
if asi.ON == asiState thenendif state == 'active' thenelseif asi.UNSUPPORTED == asiState thenstartScanning()endnotifyEvent(asi.UNSUPPORTED)endfunction portFoundListener(portFound)
addMsg('portFoundListener '.. portFound:getName()) table.insert(portFoundList, portFound) if not TI_Innovator_port and not handshake_port thenendhandshake_port = portFoundList[1] oneShotTimer(100, handshake_port.connect, handshake_port, portStateListener)endfunction portStateListener(reportedPort, event, error_msg)
addMsg('portStateListener '..reportedPort:getName()..' '..event) if asi.CONNECTED == event thenend-- configure port for handshake reportedPort:setWriteListener(handshake_writeListener) reportedPort:setReadListener(handshake_readListener) reportedPort:setReadTimeout(500) handshakeState = 'handshake' -- write handshake greeting addMsg("HANDSHAKE_GREETING: "..HANDSHAKE_GREETING) oneShotTimer(200, reportedPort.write, reportedPort, HANDSHAKE_GREETING)elseif asi.CONNECTING_FAILED == event thenif reportedPort == handshake_port thenelseif asi.DISCONNECTED == event thentable.remove(portFoundList, 1) if #portFoundList>0 thenelseif reportedPort == TI_Innovator_port thenhandshake_port = portFoundList[1] handshake_port:connect(portStateListener)elsehandshake_port = nilendTI_Innovator_port = nil asi.startScanning(portFoundListener)endif reportedPort == TI_Innovator_port thenendif state == 'active' thenendif reportedPort:getState() == asi.DISCONNECTED thennotifyEvent('disconnected')reportedPort:connect(portStateListener)elseTI_Innovator_port = nil asi.startScanning(portFoundListener)endfunction handshake_writeListener(reportedPort, error_msg)
if error_msg thenendaddMsg('handshake_writeListener '..error_msg) returnend if 'handshake' == handshakeState thenreportedPort:read(#HANDSHAKE_ANSWER+2)endfunction handshake_readListener(reportedPort, error_msg)
if error_msg thenendaddMsg('handshake_writeListener '..error_msg) returnend local answer = reportedPort:getValue() if 'handshake' == handshakeState then-- Validate answer if answer and answer:find(HANDSHAKE_ANSWER) thenelseif 'ready' == handshakeState thenaddMsg("HANDSHAKE_ANSWER: "..HANDSHAKE_ANSWER) stopScanning() handshakeState = 'ready' reportedPort:write('BEGIN\n') reportedPort:read(7)elsereportedPort:disconnect() table.remove(portFoundList, 1) if #portFoundList>0 thenendhandshake_port = portFoundList[1] handshake_port:connect(portStateListener)elsehandshake_port = nilendif answer and answer:find('READY') thenend-- Configure port for normal use TI_Innovator_port = reportedPort TI_Innovator_port:setReadTimeout(readTimeout) TI_Innovator.setWriteListener(SendCallback) TI_Innovator.setReadListener(readCallback) -- Notify launchpad is ready notifyEvent('ready')end-- INTERFACE -- BEGINS --
function TI_Innovator.connect()
state = 'active' startScanning()endfunction TI_Innovator.disconnect()
state = 'inactive' if isASIavailable thenendif TI_Innovator_port thenendTI_Innovator_port:disconnect() TI_Innovator_port = nilend stopScanning()function TI_Innovator.setWriteListener(newWriteCallback)
writeCallback = newWriteCallback if TI_Innovator_port thenendTI_Innovator_port:setWriteListener(writeCallback)endfunction TI_Innovator.setReadListener(newReadCallback, newReadObject)
readCallback = newReadCallback if TI_Innovator_port thenendTI_Innovator_port:setReadListener(readCallback)endfunction TI_Innovator.setBaudRate(newBaudRate)
baudRate = newBaudRate if TI_Innovator_port thenendTI_Innovator_port:setBaudRate(baudRate)endfunction TI_Innovator.setReadTimeout(newReadTimeout)
readTimeout = newReadTimeout if TI_Innovator_port thenendTI_Innovator_port:setReadTimeout(readTimeout)endfunction TI_Innovator.Send(data)
if not TI_Innovator_port thenendaddMsg('No Hub attached') return 'No Hub attached'end local result = TI_Innovator_port:write(data .. '\n') if result then addMsg(tostring(data)..': '.. tostring(result)) else addMsg(tostring(data)) end return resultfunction TI_Innovator.Read(bytes_to_read)
if not TI_Innovator_port thenendreturn "No TI Hub attached"end return TI_Innovator_port:read(bytes_to_read)function TI_Innovator.request(request)
if not TI_Innovator_port thenendreturn "No TI Hub attached"end local result = TI_Innovator_port:write(request .. '\n') if result then addMsg(tostring(request) .. ': '.. tostring(result)) else addMsg(tostring(request)) end result = TI_Innovator_port:read() addMsg('read() '.. tostring(result)) if result thenaddMsg('Error sending request: ' .. tostring(request))end return resultfunction TI_Innovator.isConnected()
if not TI_Innovator_port thenendreturn falseend return TI_Innovator_port:getState() == asi.CONNECTEDfunction TI_Innovator.getName()
if not TI_Innovator_port thenendreturn "No TI Hub attached"end return TI_Innovator_port:getName()function TI_Innovator.getIdentifier()
if not TI_Innovator_port thenendreturn "No TI Hub attached"end return TI_Innovator_port:getIdentifier()-- INTERFACE -- ENDS --
-- Wait for the ASI to be up and running
asi.addStateListener(asiStateListener)
end
------------------------------------------------------------------------
notes_aliens = {392,440,349,175,261} times_aliens = {1,1,1,1,1} notes_bgame = {262,523,440,392,330,392,294,262,523,440,392,330,392,415,440,415,440,330,349,392,440,349,294,440,440,440,494,523,587,494,440,392,349,294,262,523,440,392,330,392,294,262,294,330,349,392,440,440,494,523,523,523,494,440,392,370,392,440,494,523} times_bgame = {2,4,4,4,4,1.333333333,1.333333333,2,4,4,4,4,1,4,4,4,4,4,4,4,2,4,1.333333333,2,4,4,4,4,4,4,4,4,4,4,2,4,4,4,4,1.333333333,1.333333333,2,4,4,4,4,1,4,4,1.333333333,1.333333333,4,4,4,4,4,4,1.333333333,1.333333333,1} notes_bday = {260,262,294,262,349,330,260,262,294,262,392,349,260,262,523,440,349,348,330,294,466,465,440,349,392,349} times_bday = {4,4,2,2,2,1,4,4,2,2,2,1,4,4,2,2,4,4,2,1,4,4,2,2,2,1} notes_brain = {440,466,523,440,349,392,440,349,0,392,440,349,294,330,349,294,0,294,262,261,262,261,262,0,349,330,294,294,587,523,466,440,392,349,330,331,660,587,523,466,440,392,349,348,349,348,349} times_brain = {16,48,16,48,16,48,24,16,48,24,16,48,16,48,24,16,48,24,16,48,16,48,6,1.5,16,48,16,48,16,48,16,48,16,48,16,48,16,48,16,48,16,48,16,48,16,48,6} notes_elise = {330,660,622,660,622,660,494,587,523,440,262,330,440,494,330,415,494,523,330,660,622,660,622,660,494,587,523,440,262,330,440,494,262,523,494,440,440} times_elise = {4,4,4,4,4,4,4,4,4,1,4,4,4,1,4,4,4,1,4,4,4,4,4,4,4,4,4,1,4,4,4,1,4,4,4,1,1} notes_home = {262,294,330,349,440,392,330,392,349,330,349,294,262,262} times_home = {4,4,2,4,4,2,4,4,4,4,4,4,1,1} notes_harmonic = {440.,495,550.,586.67,660.,733.33,806.67,880.} notes_welltemp = {440.,493.883,554.365,587.33,659.255,739.99,830.61,880.} times_scale = {2,2,2,2,2,2,2,2}
-- TI Innovator Init Values
platform.apilevel = '2.7' local screen = platform.window local date = "021517"
require 'color' pcall(function() require 'asi' end)
local isASIavailable = false local hubStrOn, hubStrOff, msgStr, rxValue, timeStr, delay, repeats, drive local tempo, key, I local list1, list2 = {}, {} local index, dataList = {}, {} var.store("index", index) var.store("dataList", dataList) local inBox = D2Editor.newRichText() local help = "Connect your Hub, and use the samples menu to enter different Hub commands. Press 'tabKey' to try these out: edit them and try your own."
function addMsg(input)
msgStr = input print(msgStr) screen:invalidate()end
function on.construction()
--the next three lines are required for Hub connection TI_Innovator.init(TI_InnovatorStateCallback) TI_Innovator.setReadListener(TI_InnovatorReadCallback) TI_Innovator.connect()
Menu={
{"About",end{" ©2017 Compass Learning Technologies", function() end}, {" Version "..date, function() end}, {" Contact: steve@compasstech.com.au ", function() end},}, {"Controls",{"Scan and Connect", function() TI_Innovator.connect() end}, {"Disconnect", function() TI_Innovator.disconnect() on.resize() end}, {"RESET", function() on.resize() end},}, {"SET Samples", {"SET LIGHT ON/OFF (default)", function() hubStrOn = "SET LIGHT ON" inBox:setText(hubStrOn) hubStrOff = "SET LIGHT OFF" on.tabKey() end}, {"SET COLOR.RED ON/OFF", function() hubStrOn = "SET COLOR.RED ON" inBox:setText(hubStrOn) hubStrOff = "SET COLOR.RED OFF" on.tabKey() end}, {"SET COLOR.GREEN ON/OFF", function() hubStrOn = "SET COLOR.GREEN ON" inBox:setText(hubStrOn) hubStrOff = "SET COLOR.GREEN OFF" on.tabKey() end}, {"SET COLOR.BLUE ON/OFF", function() hubStrOn = "SET COLOR.BLUE ON" inBox:setText(hubStrOn) hubStrOff = "SET COLOR.BLUE OFF" on.tabKey() end}, {"SET SOUND 220 5", function() hubStrOn = "SET SOUND 220 5" inBox:setText(hubStrOn) hubStrOff = "SET SOUND 0 1" on.tabKey() end}, {"SET SPEAKER 1 220 5", function() hubStrOn = "SET SPEAKER 1 220 5" TI_Innovator.Send("CONNECT SPEAKER 1 OUT1") TI_Innovator.Send(hubStrOn) hubStrOff = "SET SPEAKER 1 0 1" end}, {"SET LED 1 ON", function() hubStrOn = "SET LED 1 ON" inBox:setText(hubStrOn) TI_Innovator.Send("CONNECT LED 1 OUT1") TI_Innovator.Send(hubStrOn) hubStrOff = "SET LED 1 0FF" end}, {"SET SERVO 1 CW 50 5", function() TI_Innovator.Send("CONNECT SERVO 1 BB9") hubStrOn = "SET SERVO 1 CW 50 5" inBox:setText(hubStrOn) hubStrOff = "SET SERVO 1 CW 50 0" on.tabKey() end}, {"SET ANALOG.OUT 1 100", function() hubStrOn = "SET ANALOG.OUT 1 100" inBox:setText(hubStrOn) TI_Innovator.Send("CONNECT ANALOG.OUT 1 OUT1") TI_Innovator.Send(hubStrOn) hubStrOff = "SET ANALOG.OUT 1 0" end}, {"SET DIGITAL.OUT 1 ON", function() hubStrOn = "SET DIGITAL.OUT 1 ON" inBox:setText(hubStrOn) TI_Innovator.Send("CONNECT DIGITAL.OUT 1 OUT1") TI_Innovator.Send(hubStrOn) hubStrOff = "SET DIGITAL.OUT 1 0FF" end}, }, {"READ Samples",{"READ BRIGHTNESS (default)", function() hubStrOn = "READ BRIGHTNESS" inBox:setText(hubStrOn) TI_Innovator.Send(hubStrOn) TI_Innovator.Read() msgStr = rxValue or hubStrOn on.tabKey() end}, {"READ RANGER 1", function() hubStrOn = "READ RANGER 1" inBox:setText(hubStrOn) TI_Innovator.Send("CONNECT RANGER 1 IN1") TI_Innovator.Send(hubStrOn) TI_Innovator.Read() msgStr = rxValue or hubStrOn end}, {"READ DHT 1", function() hubStrOn = "READ DHT 1" inBox:setText(hubStrOn) TI_Innovator.Send("CONNECT DHT 1 IN1") TI_Innovator.Send(hubStrOn) TI_Innovator.Read() msgStr = rxValue or hubStrOn end}, {"READ ACCEL 1", function() hubStrOn = "READ ACCEL 1" inBox:setText(hubStrOn) TI_Innovator.Send("CONNECT ACCEL 1 I2C") TI_Innovator.Send(hubStrOn) TI_Innovator.Read() msgStr = rxValue or hubStrOn end}, {"READ BAROMETER", function() hubStrOn = "READ BAROMETER" inBox:setText(hubStrOn) TI_Innovator.Send("CONNECT BAROMETER I2C") TI_Innovator.Send(hubStrOn) TI_Innovator.Read() msgStr = rxValue or hubStrOn end}, {"READ ANALOG.IN 1", function() hubStrOn = "READ ANALOG.IN 1" inBox:setText(hubStrOn) TI_Innovator.Send("CONNECT ANALOG.IN 1 IN1") TI_Innovator.Send(hubStrOn) TI_Innovator.Read() hubStrOff = hubStrOn end}, {"READ DIGITAL.IN 1", function() hubStrOn = "READ DIGITAL.IN 1" inBox:setText(hubStrOn) TI_Innovator.Send("CONNECT DIGITAL.IN 1 IN1") TI_Innovator.Send(hubStrOn) TI_Innovator.Read() hubStrOff = hubStrOn end}, {"Select Sound",} toolpalette.register(Menu) screen:invalidate(){"C4", function() hubStrOn = "SET SOUND 262 TIME 1" inBox:setText(hubStrOn) TI_Innovator.Send(hubStrOn) hubStrOff = "SET SOUND 0 1" msgStr = hubStrOff end}, {"A4", function() hubStrOn = "SET SOUND 440 TIME 1" inBox:setText(hubStrOn) TI_Innovator.Send(hubStrOn) hubStrOff = "SET SOUND 0 1" msgStr = hubStrOff end}, {"C5", function() hubStrOn = "SET SOUND 523 TIME 1" inBox:setText(hubStrOn) TI_Innovator.Send(hubStrOn) hubStrOff = "SET SOUND 0 1" msgStr = hubStrOff end}, {"No tone", function() hubStrOn = "SET SOUND 0 TIME 1" inBox:setText(hubStrOn) TI_Innovator.Send(hubStrOn) hubStrOff = "SET SOUND 0 1" msgStr = hubStrOff end}, {"Aliens", function() inBox:setText('Aliens') tempo = 1000 I=1 list1 = notes_aliens list2 = times_aliens playTone(list1,list2) hubStrOff = "Aliens" msgStr = hubStrOff end}, {"BallGame", function() inBox:setText('BallGame') tempo = 1000 I=1 list1 = notes_bgame list2 = times_bgame playTone(list1,list2) hubStrOff = "Take me out to the Ball Game" msgStr = hubStrOff end}, {"Happy Birthday", function() inBox:setText('Happy Birthday') tempo = 1000 I=1 list1 = notes_bday list2 = times_bday playTone(list1,list2) hubStrOff = "Happy Birthday" msgStr = hubStrOff end}, {"If I Only Had a Brain", function() inBox:setText('If I Only Had a Brain') tempo = 4000 I=1 list1 = notes_brain list2 = times_brain playTone(list1,list2) hubStrOff = "If I only had a brain" msgStr = hubStrOff end}, {"Fur Elise", function() inBox:setText('Fur Elise') tempo = 1000 I=1 list1 = notes_elise list2 = times_elise playTone(list1,list2) hubStrOff = "Fur Elise" msgStr = hubStrOff end}, {"Home on the Range", function() inBox:setText('Home on the Range') tempo = 1000 I=1 list1 = notes_home list2 = times_home playTone(list1,list2) hubStrOff = "Home on the Range" msgStr = hubStrOff end}, {"Well-tempered Scale", function() inBox:setText('Well-tempered Scale') tempo = 1000 I=1 list1 = notes_welltemp list2 = times_scale playTone(list1,list2) hubStrOff = "Well tempered scale" msgStr = hubStrOff end}, {"Harmonic Scale", function() inBox:setText('Harmonic Scale') tempo = 1000 I=1 list1 = notes_harmonic list2 = times_scale playTone(list1,list2) hubStrOff = "Harmonic scale" msgStr = hubStrOff end},}, {"TIMER Samples",{"wait(5)", function() wait(5) end}, {"blink(5,1)", function() blink(5,1) end}, {"alarm(5,0.5)", function() alarm(5,0.5) end},}, {"Robot Samples",{"CONNECT ROBOT SERVOS (BB9/BB10)", function() showKeyBoard = false TI_Innovator.Send("CONNECT SERVO 1 BB9") TI_Innovator.Send("CONNECT SERVO 2 BB10") end}, {"ROBOT FD 1 secs", function() fd(1) end}, {"ROBOT BK 1 secs", function() bk(1) end}, {"ROBOT LT 1 secs", function() lt(1) end}, {"ROBOT RT 1 secs", function() rt(1) end}, {"AUTO drive (BRIGHTNESS)", function() drive = "BRIGHTNESS" lightSeeker() end}, {"AUTO drive (DISTANCE)", function() TI_Innovator.Send("CONNECT RANGER 1 IN1") drive = "RANGER" auto() end},},end-- Layout Functions
function on.resize(width, height)
w = screen:width() h = screen:height() hubStrOn, hubStrOff, msgStr, rxValue = "SET LIGHT ON", "SET LIGHT OFF", "SET LIGHT OFF", "" timeStr, delay, repeats, drive = "", 0, 1, "" tempo = 1000 -- the times are relative values of note duration. This constant changes those into mSec. Change this value to alter the tempo of the song. key = 0 -- Since the musical scale is a base 2 logrithmic function. The key of the song can be tansposed by raising each note to a power of two. There are 12 piano keys in an octave. An octave is a frequency factor of two. I=1-- this is the array index that is changed in the wait callback function list1, list2 = {}, {} index, dataList = {}, {} var.store("index", index) var.store("dataList", dataList)endboxX, boxY, boxWidth, boxHeight = 0.025*w, 0.05*h, 0.95*w, 0.45*h fontSize = math.floor(h/20 + 0.5) if hh then
fontSize = fontSize <= 24 and fontSize or 24 fontSize = fontSize > 6 and fontSize or 7end inBox:move(boxX, boxY) inBox:resize(boxWidth, boxHeight) inBox:setFontSize(fontSize) inBox:setTextColor(color.black) inBox:setBorder(1) inBox:setVisible(true) inBox:setFocus(true) inBox:setText(help)if TI_Innovator.isConnected() then TI_Innovator.Send('BEGIN') addMsg("TI Innovator Hub ready") end screen:invalidate()
function on.paint (gc)
gc:drawString(timeStr, 0.05*w, 0.75*h, "middle") gc:drawString(msgStr, 0.05*w, 0.85*h, "middle")local myColor = {255,0,0}
if TI_Innovator.isConnected() then
myColor = {0,255,0}elsemyColor = {255,0,0}end gc:setColorRGB (unpack(myColor)) gc:fillRect (0, 0, w, 0.025*h)gc:setColorRGB (color.lightgray) gc:fillRect (boxX, boxY + boxHeight, boxWidth, 0.1*h) gc:setColorRGB (unpack(myColor)) gc:drawRect(boxX, boxY + boxHeight, boxWidth, 0.1*h)
gc:setFont("sansserif","r",fontSize) local str = "SUBMIT" local sw = gc:getStringWidth(str) gc:drawString(str, boxX + (boxWidth-sw)/2, boxY + boxHeight + 0.05*h, "middle")
gc:setColorRGB (color.lightgray) gc:fillRect (boxX, boxY + boxHeight + 0.1*h, boxWidth, 0.1*h) gc:setColorRGB (unpack(myColor)) gc:drawRect(boxX, boxY + boxHeight + 0.1*h, boxWidth, 0.1*h)
gc:setFont("sansserif","r",fontSize) local str = "RESET" local sw = gc:getStringWidth(str) gc:drawString(str, boxX + (boxWidth-sw)/2, boxY + boxHeight + 0.15*h, "middle")
gc:drawString(rxValue, 0.05*w, 0.95*h, "middle")
end-- TI Innovator User set up
function on.escapeKey()
on.resize() inBox:setText('') inBox:setFocus(true) screen:invalidate()endfunction on.tabKey()
if inBox:getText() thenscreen:invalidate()local input = string.upper(inBox:getText()) input = input:gsub('%"','') local list = {input} if input:find(string.char(10)) thenendlist = input:split(string.char(10)) or {input:gsub(string.char(10),'')}end input = list[1] if input:find("SEND%(") theninput = input:gsub('SEND%(','') input = input:gsub('%)','') hubStrOn = input TI_Innovator.Send(input) TI_Innovator.Read()elseif input:find("SET") thenTI_Innovator.Send(input) if input:find("ON") thenelseif input:find("READ") thenhubStrOn = input hubStrOff = input:gsub("ON","OFF")elseif input:find("OFF") thenhubStrOff = input hubStrOn = input:gsub("OFF","ON")endTI_Innovator.Send(input) TI_Innovator.Read() hubStrOn = input hubStrOff = inputelseif input:find("CONNECT") thenTI_Innovator.Send(input)elselocal testfunction = loadstring(string.lower(input)) pcall(function() testfunction() screen:invalidate() end)endif #list > 1 then
for k = 2, #list doendinput = list[k] if input:find("SEND%(") thenendinput = input:gsub('SEND%(','') input =input:gsub('%)','') TI_Innovator.Send(input) TI_Innovator.Read()elseif input:find("SET") thenTI_Innovator.Send(input) if input:find("ON") thenelseif input:find("READ") thenhubStrOn = input hubStrOff = input:gsub("ON","OFF")elseif input:find("OFF") thenhubStrOff = input hubStrOn = input:gsub("OFF","ON")endTI_Innovator.Send(input) TI_Innovator.Read() hubStrOn = input hubStrOff = inputelseif input:find("CONNECT") thenTI_Innovator.Send(input)elselocal testfunction = loadstring(string.lower(input)) pcall(function() testfunction() screen:invalidate() end)endfunction on.mouseDown(x, y)
if hubStrOn:find("ROBOT") thenendif drive:find("BRIGHT") thenelselightSeeker()elseif drive:find("RANGER") thenauto()elseTI_Innovator.Send("SET SERVO 1 CCW 50 5") TI_Innovator.Send("SET SERVO 2 CW 50 5") TI_Innovator.Read()endTI_Innovator.Send(hubStrOn) -- This is an example of sending a SET command to the Hub TI_Innovator.Read() -- This is an example of sending a READ command to the Hubendif x > boxX and x <= boxX + boxWidth then
if y > boxY + boxHeight and y <= boxY + boxHeight + 0.1*h thenendon.tabKey()elseif y > boxY + boxHeight + 0.1*h and y <= boxY + boxHeight + 0.2*h thenon.escapeKey()endscreen:invalidate()
function on.mouseUp (x,y)
if hubStrOn:find("ROBOT") thenif drive == '' thenendTI_Innovator.Send("SET SERVO 1 CCW 0 0") TI_Innovator.Send("SET SERVO 2 CW 0 0") TI_Innovator.Read() endelsetimeStr = '' TI_Innovator.Send(hubStrOff) TI_Innovator.Read() screen:invalidate()endfunction str2list(input, def) local list = {} if input:find(def) then
list = input:split(def) table.foreachi(list,print)elselist = {input}end return list endfunction TI_InnovatorReadCallback(port, error_msg) -- this is the callback function that is defined above and catches the result of a READ command send to the Hub.
rxValue = port:getValue() or '' -- this gets the actual return value from the hub and puts it in the variable rxValue. The user may choose any variable name and also may do any calibration or ranging of the value here. Note that rxValue may be numeric, list or string (hence the utility function list2str) if tonumber(rxValue) then rxValue = math.floor(100*rxValue+0.5)/100 else rxValue = tostring(rxValue) rxValue = str2list(rxValue,string.char(10))[1] end addMsg(hubStrOn) if tonumber(rxValue) then voltage = (rxValue/2^14)*3.3 end -- an example of converting a raw 14 bit ADC value into voltage. screen:invalidate()endfunction TI_InnovatorStateCallback(event)
endaddMsg("TI_InnovatorStateCallback") if 'ready' == event then TI_InnovatorConfig() elseif "disconnected" == event then -- user may choose to do some clean up or display a msg when the Hub is disconnected. addMsg("TI_Innovator Hub disconnected") end screen:invalidate()
function TI_InnovatorConfig() -- this function is called from TI_InnovatorStateCallback() when a ready connection is succesful.
-- place CONNECT and other Hub startup commands here addMsg("TI_Innovator Hub connected") TI_Innovator.Send(hubStrOff)endfunction wait(input)
endif input then delay = input end time_step = 0.1 if delay >= 0 then
timeStr = "Wait Time: "..delay.." seconds" delay = math.floor((1/time_step)*(delay - time_step)+0.5)*time_step TI_Innovator.Send(hubStrOn) if hubStrOn:find("READ") then TI_Innovator.Read() end if tonumber(rxValue) then -- This allows our wait function to serve as a timed data collection toolelsedataList[#dataList+1] = tonumber(rxValue) index[#index+1]=#dataList var.store("index", index) var.store("dataList", dataList)else rxValue = tostring(rxValue) rxValue = str2list(rxValue,string.char(10))[1] end oneShotTimer(1000*time_step,wait)TI_Innovator.Send(hubStrOff) delay = 0end screen:invalidate()function blink(rep,waitValue)
endlocal lightState = "OFF" if waitValue then delay = waitValue end if rep then repeats = rep end if repeats > 0 then
timeStr = "blink("..(math.floor(repeats+0.5))..", "..delay..")" if math.floor(repeats) == repeats then lightState = "ON" else lightState = "OFF" end TI_Innovator.Send("SET LIGHT "..lightState) oneShotTimer(1000*delay,blink) repeats = repeats - 0.5end screen:invalidate()function alarm(rep,waitValue)
local tone = 220 if waitValue then delay = waitValue end if rep then repeats = rep end if repeats > 0 thenendtimeStr = "alarm("..(math.floor(repeats+0.5))..", "..delay..")" if math.floor(repeats) == repeats then tone = 440 else tone = 220 end TI_Innovator.Send("SET SOUND "..tone) oneShotTimer(1000*delay,alarm) repeats = repeats - 0.5end screen:invalidate()function waitTone()
if not list1 then list1 = var.recall("list1") end if not list2 then list2 = var.recall("list2") end if list1 and #list1 > 0 and list2 and #list2 > 0 thenendif I <= #list1 and list1[I] and list2[I] then -- don't go past the lenght of the arrayend screen:invalidate()if list1[I] and list2[I] thenelselocal str = "SET SOUND "..list1[I]*2^(key/12).." TIME "..math.floor(100/(list2[I])+0.5)/100 hubStrOn = str TI_Innovator.Send(str) oneShotTimer((tempo/list2[I])+20, waitTone) I = I + 1endhubStrOn = "SET LIGHT ON" hubStrOff = "SET LIGHT OFF" addMsg(hubStrOff)endfunction playTone(list1, list2)
waitTone() screen:invalidate()end-- Robot Commands BEGIN
function fd(input)
if input thenendinBox:setText("SET SERVO 1 CCW 100 "..input) ..string.char(10).."SET SERVO 2 CW 100 "..input) hubStrOn = "ROBOT FORWARD" addMsg(hubStrOn) oneShotTimer(1000,fd) on.tabKey()end hubStrOff = "ROBOT OFF" addMsg(hubStrOff) screen:invalidate()function bk(input)
if input thenendinBox:setText("SET SERVO 1 CW 100 "..input) ..string.char(10).."SET SERVO 2 CCW 100 "..input) hubStrOn = "ROBOT BACK" addMsg(hubStrOn) oneShotTimer(1000,bk) on.tabKey()end hubStrOff = "ROBOT OFF" addMsg(hubStrOff) screen:invalidate()function lt(input)
if input thenendinBox:setText("SET SERVO 1 CW 100 "..input) ..string.char(10).."SET SERVO 2 CW 100 "..input) hubStrOn = "ROBOT LEFT" addMsg(hubStrOn) oneShotTimer(1000,lt) on.tabKey()end hubStrOff = "ROBOT OFF" addMsg(hubStrOff) screen:invalidate()function rt(input)
if input thenendinBox:setText("SET SERVO 1 CCW 100 "..input) ..string.char(10).."SET SERVO 2 CCW 100 "..input) hubStrOn = "ROBOT RIGHT" addMsg(hubStrOn) oneShotTimer(1000,rt) on.tabKey()end hubStrOff = "ROBOT OFF" addMsg(hubStrOff) screen:invalidate()function lightSeeker()
if drive:find("BRIGHT") thenendTI_Innovator.Send("READ BRIGHTNESS ") TI_Innovator.Read() if tonumber(rxValue) and tonumber(rxValue) > 0 thenend oneShotTimer(1000,lightSeeker) screen:invalidate()if tonumber(rxValue) > 0.5 thenendif tonumber(rxValue) > 10 thenelsefd(1)elsebk(1) rt(1)endfd(0) hubStrOff = "ROBOT AUTO OFF" addMsg(hubStrOff) play = falseendfunction auto()
if drive:find("RANGER") thenendTI_Innovator.Send("READ RANGER 1 ") TI_Innovator.Read() if tonumber(rxValue) and tonumber(rxValue) > 0 thenend oneShotTimer(1000,auto) screen:invalidate()TI_Innovator.Send("SET SOUND "..1000*tonumber(rxValue).." 0.1") if tonumber(rxValue) > 0.1 thenendif tonumber(rxValue) > 0.4 thenelsefd(1)elsebk(0.5) rt(0.5)endfd(0) hubStrOff = "ROBOT AUTO OFF" addMsg(hubStrOff) play = falseend-- TI Innovator BEGINS
local timerstart = timer.start local timerstop = timer.stop timer.start = nil timer.stop = nil local currentTimer = nil
local function timerStart(t)
endcurrentTimer = t timerstart(t.period/1000)
local function timerStop()
endcurrentTimer = nil timerstop()
local function setTimer(t)
endif t.period==nil or type(t.period)~='number' or t.period < 10 then error('period in milliseconds >= 10') end timerStart(t) return t
function oneShotTimer(period, listenerHandler, ...)
endif type(listenerHandler) ~= 'function' then
error('createTimerOneShot: function expected')end setTimer {period = period, oneShot = true, listenerHandler = listenerHandler, params = { ... },}function on.timer()
endlocal ct = currentTimer if currentTimer == nil then
timerStop()end if currentTimer.oneShot thencurrentTimer = nil timerStop()end ct.listenerHandler(unpack(ct.params)) screen:invalidate()-- oneShotTimer ENDS
TI_Innovator = { }
function TI_Innovator.init(theStateCallback)
endif not pcall(function() require 'asi' end) then
addMsg('Hub NOT available') returnendaddMsg('Hub available')
isASIavailable = true
local HANDSHAKE_GREETING = 'ISTI\n' local HANDSHAKE_ANSWER = 'TISTEM' local portFoundList = { } local state local handshakeState local notifyEvent local asiStateListener local startScanning local stopScanning local portFoundListener local portStateListener local handshake_SendListener local handshake_readListener local handshake_port local TI_Innovator_port local baudRate = asi.BAUD_RATE_DEFAULT local readTimeout = asi.READ_TIMEOUT_DEFAULT
-- User callbacks local stateCallback = theStateCallback local SendCallback local readCallback
function notifyEvent(event)
addMsg('notifying '.. event) if stateCallback thenendstateCallback(event)elseaddMsg('no callback registered')endfunction startScanning()
if isASIavailable thenendasi.startScanning(portFoundListener) notifyEvent('scanning')endfunction stopScanning()
handshake_port = nil portFoundList = { } asi.stopScanning()endfunction asiStateListener(asiState)
if asi.ON == asiState thenendif state == 'active' thenelseif asi.UNSUPPORTED == asiState thenstartScanning()endnotifyEvent(asi.UNSUPPORTED)endfunction portFoundListener(portFound)
addMsg('portFoundListener '.. portFound:getName()) table.insert(portFoundList, portFound) if not TI_Innovator_port and not handshake_port thenendhandshake_port = portFoundList[1] oneShotTimer(100, handshake_port.connect, handshake_port, portStateListener)endfunction portStateListener(reportedPort, event, error_msg)
addMsg('portStateListener '..reportedPort:getName()..' '..event) if asi.CONNECTED == event thenend-- configure port for handshake reportedPort:setWriteListener(handshake_writeListener) reportedPort:setReadListener(handshake_readListener) reportedPort:setReadTimeout(500) handshakeState = 'handshake' -- write handshake greeting addMsg("HANDSHAKE_GREETING: "..HANDSHAKE_GREETING) oneShotTimer(200, reportedPort.write, reportedPort, HANDSHAKE_GREETING)elseif asi.CONNECTING_FAILED == event thenif reportedPort == handshake_port thenelseif asi.DISCONNECTED == event thentable.remove(portFoundList, 1) if #portFoundList>0 thenelseif reportedPort == TI_Innovator_port thenhandshake_port = portFoundList[1] handshake_port:connect(portStateListener)elsehandshake_port = nilendTI_Innovator_port = nil asi.startScanning(portFoundListener)endif reportedPort == TI_Innovator_port thenendif state == 'active' thenendif reportedPort:getState() == asi.DISCONNECTED thennotifyEvent('disconnected')reportedPort:connect(portStateListener)elseTI_Innovator_port = nil asi.startScanning(portFoundListener)endfunction handshake_writeListener(reportedPort, error_msg)
if error_msg thenendaddMsg('handshake_writeListener '..error_msg) returnend if 'handshake' == handshakeState thenreportedPort:read(#HANDSHAKE_ANSWER+2)endfunction handshake_readListener(reportedPort, error_msg)
if error_msg thenendaddMsg('handshake_writeListener '..error_msg) returnend local answer = reportedPort:getValue() if 'handshake' == handshakeState then-- Validate answer if answer and answer:find(HANDSHAKE_ANSWER) thenelseif 'ready' == handshakeState thenaddMsg("HANDSHAKE_ANSWER: "..HANDSHAKE_ANSWER) stopScanning() handshakeState = 'ready' reportedPort:write('BEGIN\n') reportedPort:read(7)elsereportedPort:disconnect() table.remove(portFoundList, 1) if #portFoundList>0 thenendhandshake_port = portFoundList[1] handshake_port:connect(portStateListener)elsehandshake_port = nilendif answer and answer:find('READY') thenend-- Configure port for normal use TI_Innovator_port = reportedPort TI_Innovator_port:setReadTimeout(readTimeout) TI_Innovator.setWriteListener(SendCallback) TI_Innovator.setReadListener(readCallback) -- Notify launchpad is ready notifyEvent('ready')end-- INTERFACE -- BEGINS --
function TI_Innovator.connect()
state = 'active' startScanning()endfunction TI_Innovator.disconnect()
state = 'inactive' if isASIavailable thenendif TI_Innovator_port thenendTI_Innovator_port:disconnect() TI_Innovator_port = nilend stopScanning()function TI_Innovator.setWriteListener(newWriteCallback)
writeCallback = newWriteCallback if TI_Innovator_port thenendTI_Innovator_port:setWriteListener(writeCallback)endfunction TI_Innovator.setReadListener(newReadCallback, newReadObject)
readCallback = newReadCallback if TI_Innovator_port thenendTI_Innovator_port:setReadListener(readCallback)endfunction TI_Innovator.setBaudRate(newBaudRate)
baudRate = newBaudRate if TI_Innovator_port thenendTI_Innovator_port:setBaudRate(baudRate)endfunction TI_Innovator.setReadTimeout(newReadTimeout)
readTimeout = newReadTimeout if TI_Innovator_port thenendTI_Innovator_port:setReadTimeout(readTimeout)endfunction TI_Innovator.Send(data)
if not TI_Innovator_port thenendaddMsg('No Hub attached') return 'No Hub attached'end local result = TI_Innovator_port:write(data .. '\n') if result then addMsg(tostring(data)..': '.. tostring(result)) else addMsg(tostring(data)) end return resultfunction TI_Innovator.Read(bytes_to_read)
if not TI_Innovator_port thenendreturn "No TI Hub attached"end return TI_Innovator_port:read(bytes_to_read)function TI_Innovator.request(request)
if not TI_Innovator_port thenendreturn "No TI Hub attached"end local result = TI_Innovator_port:write(request .. '\n') if result then addMsg(tostring(request) .. ': '.. tostring(result)) else addMsg(tostring(request)) end result = TI_Innovator_port:read() addMsg('read() '.. tostring(result)) if result thenaddMsg('Error sending request: ' .. tostring(request))end return resultfunction TI_Innovator.isConnected()
if not TI_Innovator_port thenendreturn falseend return TI_Innovator_port:getState() == asi.CONNECTEDfunction TI_Innovator.getName()
if not TI_Innovator_port thenendreturn "No TI Hub attached"end return TI_Innovator_port:getName()function TI_Innovator.getIdentifier()
if not TI_Innovator_port thenendreturn "No TI Hub attached"end return TI_Innovator_port:getIdentifier()-- INTERFACE -- ENDS --
-- Wait for the ASI to be up and running
asi.addStateListener(asiStateListener)
end
------------------------------------------------------------------------
notes_aliens = {392,440,349,175,261} times_aliens = {1,1,1,1,1} notes_bgame = {262,523,440,392,330,392,294,262,523,440,392,330,392,415,440,415,440,330,349,392,440,349,294,440,440,440,494,523,587,494,440,392,349,294,262,523,440,392,330,392,294,262,294,330,349,392,440,440,494,523,523,523,494,440,392,370,392,440,494,523} times_bgame = {2,4,4,4,4,1.333333333,1.333333333,2,4,4,4,4,1,4,4,4,4,4,4,4,2,4,1.333333333,2,4,4,4,4,4,4,4,4,4,4,2,4,4,4,4,1.333333333,1.333333333,2,4,4,4,4,1,4,4,1.333333333,1.333333333,4,4,4,4,4,4,1.333333333,1.333333333,1} notes_bday = {260,262,294,262,349,330,260,262,294,262,392,349,260,262,523,440,349,348,330,294,466,465,440,349,392,349} times_bday = {4,4,2,2,2,1,4,4,2,2,2,1,4,4,2,2,4,4,2,1,4,4,2,2,2,1} notes_brain = {440,466,523,440,349,392,440,349,0,392,440,349,294,330,349,294,0,294,262,261,262,261,262,0,349,330,294,294,587,523,466,440,392,349,330,331,660,587,523,466,440,392,349,348,349,348,349} times_brain = {16,48,16,48,16,48,24,16,48,24,16,48,16,48,24,16,48,24,16,48,16,48,6,1.5,16,48,16,48,16,48,16,48,16,48,16,48,16,48,16,48,16,48,16,48,16,48,6} notes_elise = {330,660,622,660,622,660,494,587,523,440,262,330,440,494,330,415,494,523,330,660,622,660,622,660,494,587,523,440,262,330,440,494,262,523,494,440,440} times_elise = {4,4,4,4,4,4,4,4,4,1,4,4,4,1,4,4,4,1,4,4,4,4,4,4,4,4,4,1,4,4,4,1,4,4,4,1,1} notes_home = {262,294,330,349,440,392,330,392,349,330,349,294,262,262} times_home = {4,4,2,4,4,2,4,4,4,4,4,4,1,1} notes_harmonic = {440.,495,550.,586.67,660.,733.33,806.67,880.} notes_welltemp = {440.,493.883,554.365,587.33,659.255,739.99,830.61,880.} times_scale = {2,2,2,2,2,2,2,2}
We can put together much that has gone before and offer a glimpse of ways in which the Innovator Hub might prove a valuable tool within traditional lessons for building strong foundations for understanding and concept development.
The practical applications of sensors which measure distance, of course, are well established at all levels of schooling, from very young students (using bodily movement to build shapes and letters) through junior high school (where personal movement can be linked to key concepts such as gradient) and through to seniors (applied to velocity, rates of change and even a deeper understanding of the various functions which are the objects of study for so much of mathematics). The ability to use an ultrasonic motion sensor with our Innovator Hub invites all of these applications and more.
Other sensors prove valuable in building, not only STEM skills and understandings, but deep and rich mathematical and scientific ones. Consider for example, the in-built brightness sensor on the Hub. Practical questions such as Could a light sensor be used as a measure of distance from the light source?.
This is a question about calibration at its heart - but just as much it may be a question about linear relationships (a linear model is actually quite accurate over a distance of 1 - 2 metres), or more interesting functions for older students - What do students know about light intensity and its relationship to distance from the source? (science)
How might their readings be calibrated and converted: changing light intensity to metres?
Can you account for observed differences?
How might the most effective exploration be designed?
How accurate is the data they collect? How might they validate this?
The same questions might be applied to the use of barometric pressure as a measure of altitude - and how might a magnetometer serve as a compass?
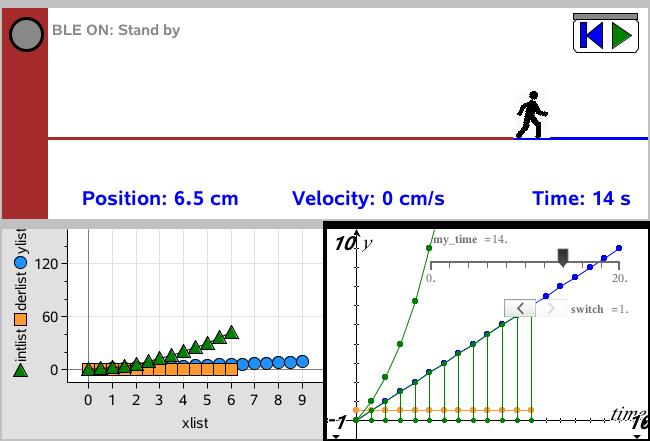
The study of movement in all its forms comes alive when collecting data using an accelerometer - distance, velocity and acceleration become physical to students when their own motion generates immediate responses. Linking this motion to different functions then brings these functions to life, leading to deeper understanding.
Simple, personal applications are readily found: Where is the best place to sit in the classroom?
Like most of the best STEM-active questions, the answer is ... It depends!
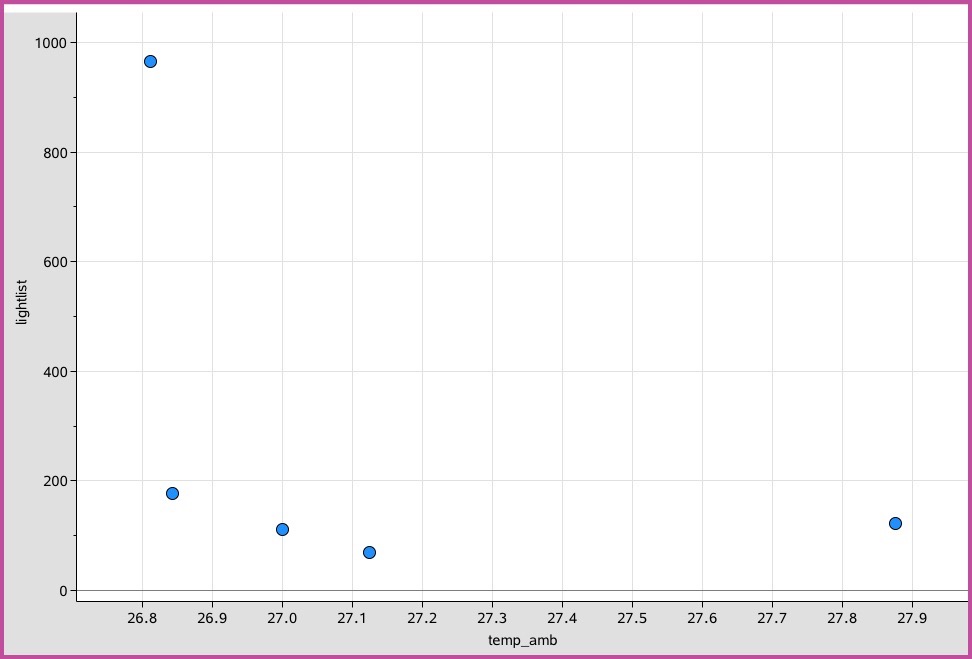
Some people feel the cold more than others, and like to sit near a heater. For others, they want to be as far away from the heat source as possible. Some like to sit where the light is bright. There are numerous factors that determine our preferences, and these can be easily explored using the Innovator Hub to grab the readings at different points around the room.
This can even be set as a game challenge. In the past, I would go into the room before the students and collect temperature and light data from several points, then display the graph to the students and ask them to decide where these spots are located! It offers a fun and worthwhile challenge and is immediately applicable to building graph sense and interpretation skills.
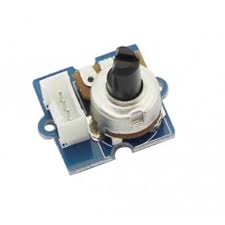
In the final example shown, a rotary angle sensor is connected to OUT1, and read simply as ANALOG.IN 1 (a potentiometer could have been used just as easily). Values for the range of turns vary from 0 to 15864. These values may be eeasily converted to something more accessible - say values from -5 to 5 by grabbing the last value of the dataList list - and used to control the gradient of a straight line as shown (or the y-intercept, or any other relevant variable).
You may also notice the use of the wait function here to give time for the student to move to the graphs page and to explore changing values for the gradient.
Students then may control the gradient by turning the rotary angle sensor and explore the different effects, building a very concrete understanding of the concept under investigation. Even the calculation of the conversion factor required offers a lovely application of linear functions!
Applying the Innovator Hub to the Traditional Curriculum: Bringing Mathematics and Science to Life by Putting It into the Hands of Students
In our next lesson, we combine Innovator Hub scripting with BLE to develop general scripts that will work on all our TI-Nspire platforms.
Home ← STEM HQ ← TI-Nspire Authoring ← TI-Nspire Scripting HQ ← Scripting Tutorial - Lesson 48