Home ← TI-Nspire Authoring ← TI-Nspire Scripting HQ ← Scripting Tutorial - Lesson 25
Scripting Tutorial - Lesson 25: (3.2) Welcome to the Physics Engine Part 3: Juggling Multiple Balls
Download supporting files for this tutorial
Download this page in PDF format
Texas Instruments TI-Nspire Scripting Support Page
The previous lesson set the stage for what will follow - this lesson guides us through controlling the flow of the simulation - starting, stopping and resetting. Most importantly, we learn how to work with multiple objects.
1. Pausing and Resetting
Begin by returning to the question posed previously: how do we stop the show?
The key lies in the timer function, not surprisingly. Currently set at 0.01 (refreshing 100 times per second - the maximum supported by our platform), if this changes to zero, then the motion stops. So create a local variable called "pause". As before, set this up with all the other local variables at the start of the script, and then, in the init function, set the initial value - pause = 1. If we had set this to 0, then on opening the file or on resetting it at any stage, motion would initially be stopped.
Next, change the on.timer function from space:step(0.01) to space:step(0.01*pause). This way, when pause = 1 there is no change to what was happening previously, but when pause = 0, the timer step becomes 0 and all grinds to a halt.
Resetting is even more straightforward - we anticipated this with our resize function at the end. We can either call on.resize() or simply
on.paint = init. This just sets everything back to the start.Now all we need are triggers to make these events happen - initially, I am using the enterKey to stop and start the motion, and the escapeKey to reset everything.
These functions can be placed after everything else - when their events are triggered, they will be found wherever they are placed.
This script will work perfectly well on the handheld and computer, but will not be of any use if we wish to control this document using the Player, since keyboard controls are not supported. For this case, and just for a better and more useful document, we will add buttons to start, stop and reset the motion. I would also like to be able to click anywhere on the screen and have the motion begin again from that point.
We will come back to these features later - first, though, I suspect that, like me, you might be keen to see how we might have more than a single ball in the air?
local pause
function init(gc)
...
pause = 1
...
end
on.timer()function
step(0.01*pause)space:
platform.window:invalidate()
end
on.enterKey()function
platform.window:invalidate()pause = pause == 1 and 0 or 1
end
function
on.escapeKey()on.resize() platform.window:invalidate()end
2. Working with Multiple Objects
It should come as no surprise that multiple objects will involve setting up a table or two.
Study the code fragments opposite. Similar changes are made to both the init and paint functions: the main part of each script is wrapped in a loop, which cycles through for the number of objects that you want. Here, we set our initial value of totalBodies to 10. We also create two empty tables - one for bodies and one for shapes.
Apart from wrapping the for loop around the parts of the code that create and direct our bodies and shapes, a few extra lines are added in the init function - we want all our objects to start in different locations, so adding random initial coordinates is a good idea, and then table.insert is used to add each new body to the bodies table, and each new shape to the shapes table.
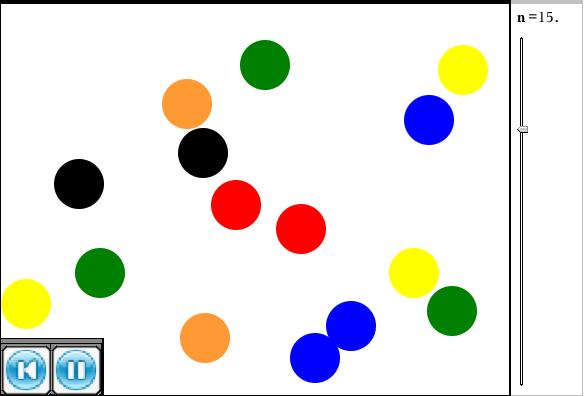
In the paint function, note the simple change when we set the velocity and the position - instead of setting these for a single object called newBody and newShape, this occurs for each member of the tables, bodies[k] and shapes[k]. You should now have 10 blue balls bouncing around!
Clearly, multiple balls of the same color is not all that interesting. We have require "color" in our script, so why not use it?
A simple way to do this is to build a color table, here called Colors and we will need a number to reference our table, colorNum. Finally, the chosen color will be called chooseColor. These are defined in the init function and then called in paint when we actually create our colorful bodies.
As each body is painted, a color is chosen in turn from our table, cycling back when the number of objects exceeds the table length.
Finally, it would be neat to be able to control the number of objects on the fly. I have chosen to use the up and down arrow keys for this purpose - increasing and decreasing the value of totalBodies and then forcing a reset so that the objects are redrawn with the new value. I have also linked to a slider variable ("n") in TI-Nspire.
For this to work, however, I need to have my init function check for the current value of "n" and use that for the totalBodies value. So in this function, add totalBodies = (var.recall("n") or 5). Resetting using escape and using the arrow keys will also check the current value and adjust accordingly.
on.arrowUp()function
var.recall("n") or 5)totalBodies = (
totalBodies = totalBodies + 1
var.store("n", totalBodies)
on.resize()
end
function
on.arrowDown()var.recall("n") or 5)if totalBodies > 1 then
totalBodies = (
totalBodies = totalBodies - 1
var.store("n", totalBodies)
on.resize()
end
end
local totalBodies
local bodies
local shapes
local initX
local initY
local Colors
local colorNum
function init(gc)
...
Colors = {color.gray, color.red, color.orange, color.yellow, color.green, color.blue, color.black}
colorNum = 1
bodies = {}
shapes = {}
totalBodies = (
var.recall("n") or 5)for i=1,totalBodies do
physics.Body(mass, inertia)newBody =
newShape =
physics.CircleShape(newBody, width, physics.Vect(0,width/2))newShape:
setRestitution(elasticity)newShape:
setFriction(friction)newBody:
setVel(physics.Vect(1000,1000))initX = math.random(W)
initY = math.random(H)
newBody:
setPos(physics.Vect(initX, initY))table.insert(bodies, newBody)
table.insert(shapes, newShape)
space:
addBody(newBody)space:
addShape(newShape)end
end
setPos( physics.Vect(posX, posY) )function paint(gc)
for k=1,totalBodies do
...
bodies[k]:
bodies[k]:
setVel( physics.Vect(velX, velY) )chooseColor = Colors[((colorNum + k) % #Colors) + 1]
gc:setColorRGB(chooseColor) gc:fillArc(posX, posY, width, width, 0, 360)end
end
on.resize()function
on.paint = initend
Your challenge? Try adding a mouseUp function that causes the balls to begin again from where you clicked - a reset with a twist!
The buttons for reset and pause involve images, as well as the use of mouse commands. To make these simpler, I defined a rectangle class, and then rectangles for both buttons so that I could simply check if a mouse click is contained in one of these.
I also added another rectangle across the top to serve as a "grabber" and this allows the buttons to be moved around as desired.
Rather than occupy another page detailing these changes, I would direct you to the document which accompanies this lesson, where you may study and play with these variations to your heart's content.
The next lesson in the sequence will look at a new Chipmunk approach for setting the borders for our bouncing balls - defining the edges of the screen as segments. Then, in what will probably be the final lesson, we will learn how to vary from the circle to other shapes, polygons in particular. In this way, the user can vary the number of objects, the type of objects, control their motion - and after that, it is over to you!
Home ← TI-Nspire Authoring ← TI-Nspire Scripting HQ ← Scripting Tutorial - Lesson 25