Home ← TI-Nspire Authoring ← TI-Nspire Scripting HQ ← Scripting Tutorial - Lesson 15
Scripting Tutorial - Lesson 15: (Advanced) Using Mouse Controls with Multiple Classes
Download supporting files for this tutorial
Download this page in PDF format
Texas Instruments TI-Nspire Scripting Support Page
In lesson 14 we saw how to use Keyboard controls to select and work with multiple class objects. In this final lesson, we extend our mouse controls in the same way. Most of what we need has already been put in place using the TrackedObject variable. All that is really needed is to generalize the mouseDown function to work with out Objects table rather than the specific case of the Square previously defined.
We need to study the various parts of the mouseDown function closely in order to understand what is happening here.
The function begins just as tabKey did, with a loop through the objects in the Objects table, allocating a local variable obj to each in turn. As we might expect from previous mouse work, if the mouse down occurs within a particular object (using the contains function) then that becomes our selected object to be Tracked.
As before, first release it if the object was already selected so we know what state we are in. Then we define TrackedObject as obj, and indicate that it is selected.
The next two lines define two new global variables called TrackOffsetx and TrackOffsety. You may have noticed that if we click on an object somewhere other than the center, the object is inclined to jump to place the center under the mouse. These TrackedOffset values serve to avoid this little jump. They should initially be defined as zero in our on.resize function so that they exist when the page is created and changed.
Back to tracking multiple objects. The table.remove and table.insert commands serve to release any previous selected object and replace with the current one - essentially moving it to prime position in the table. This has the effect desired - the object being clicked on becomes the selected (Tracked) object and all is well.
Only one other change is made to mouseMove and that is simply to include the TrackOffset values referred to previously.
Copy this code into script_tut14.lua and you now have completed your mission. Two objects may now be selected and controlled by either mouse or keyboard!
function
contains(x, y) thenfor i = 1, #Objects do
local obj = Objects[i]
if obj:
table.remove(Objects, i)if TrackedObject ~= nil then
TrackedObject.selected = false
end
TrackedObject = obj
obj.selected = true
TrackOffsetx = TrackedObject.x - x
TrackOffsety = TrackedObject.y - y
table.insert(Objects, obj)
platform.window:invalidate()
break
end
end
end
function
on.mouseUp(x,y)if TrackedObject ~= nil then
TrackedObject.selected = false
end
TrackedObject = nil
end
function
on.mouseMove(x,y)platform.window:invalidate()if TrackedObject ~= nil then
TrackedObject.x = x + TrackOffsetx
TrackedObject.y = y + TrackOffsety
end
end
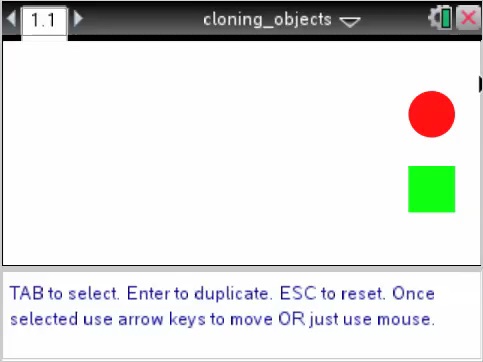
Cloning Selected Objects?
We can now select and move multiple objects - would it not be rather cool if we could produce an endless supply of such objects? Click on a square or circle and, when you drag, leave the original behind and clone a new duplicate? This is the basis for many useful activities, and is surprisingly easy to achieve (Thank you Marc Garneau!)
We know that the class objects that we see in our document are all members of a table we created, called "Objects". So cloning one of these is really just a matter of adding a new member to that table - AND we already know how to achieve this: we use the table.insert command.
Within the mouseDown function, somewhere within the loop that checks that there is actually a selected object we can insert the code shown. This simply checks the colour of the TrackedObject and, if green, adds a square, else adds a circle. Note that these are added at the current mouse position, so the selected object appears to clone itself.
In the example we use here, this is achieved in two ways: either on a mouse down action, or by pressing enter when an object is selected.
The enterKey approach follows the same method, but needs a little more detail since it does not have a mouse position to guide it.
Now we have an endless supply of algebra tiles, or coins, or whatever object you might like.
Click to see what such a document might look like Within the mouseDown function (after defining obj):
table.insert(Objects, Square(x, y, w/10, w/10))if obj.colour == Colour.green then
else
table.insert(Objects, Circle(x, y, w/20, w/20))end
function
on.enterKey()table.insert(Objects, Square(TrackedObject.x, TrackedObject.y, w/10, w/10))if TrackedObject ~= nil then
if TrackedObject.colour == Colour.green then
else
table.insert(Objects, Circle(TrackedObject.x, TrackedObject.y, w/20, w/20))end
end
end

I would suggest that you now extend this script to include other objects. Simply define these and then insert their definition into the Objects table and you will be able to control them just as easily as you control the square and the circle. Multiple images will work just as well.
Time then, perhaps, to go back to the Shape Patterns document featured in lesson 11 and think about how you may now create your own rich and powerful documents which work equally well with both handheld and computer.
Congratulations on completing this series of lessons! Just a few after thoughts to be found in Lesson 16.
Click to see what such a document might look like
Home ← TI-Nspire Authoring ← TI-Nspire Scripting HQ ← Scripting Tutorial - Lesson 15