Home ← TI-Nspire Authoring ← TI-Nspire Scripting HQ ← Scripting Tutorial - Lesson 28
Scripting Tutorial - Lesson 28: (3.4) Scripting for Touch-enabled Devices
Supplement: Working with Scripts on the iPad
Download supporting files for this tutorial
Download this page in PDF format
Texas Instruments TI-Nspire Scripting Support Page
The release in early 2013 of the TI-Nspire apps for iPad brings with it exciting new opportunities for the entire platform. Lua scripted documents are particularly well suited to take advantage of the touch-enabled interface, and there really is nothing like the experience of dragging objects around the screen with finger or stylus!
While most current scripts, if written to take advantage of larger screen size, should run just fine on the new platform, there are a few considerations that can serve to optimize this experience. Some new commands have also been added to the TI-Nspire Lua command set.
1. Touch-enabled? APILevel = 2.2
Touch-enabled functionality has actually existed within our scripting capabilities since the release of TI-Nspire OS 3.2 - we just have not had a platform to try it on until the release of the iPad apps (OS 3.4). A new APILevel is required - to make use of these commands, your script must begin by defining APILevel = 2.2 (Note: the previous APIlevel (2.0) added support for the Physics engine). APILevel 2.2 adds touch support, as well as all previous functionality.
So what is touch support and where is it required?
Existing scripts that involved grabbing and dragging objects around the screen will work well in a touch-enabled environment - mouseUp, mouseDown and mouseMove commands perform pretty much as expected, and so no changes should be required (other than perhaps requiring a double tap where a single mouse press might work elsewhere).
If you have been using the 2DEditor text boxes for capturing and displaying input of text, then these will also work well in this new world: tapping in a text box on a tablet will activate the system keyboard. While this may well take up half of the visible screen, typing will have the desired effect and text will be entered and displayed using the text box.
Recommendation: Since the system keyboard will obscure the bottom half of the viewable window, where possible place text boxes towards the top of the screen so that they remain visible when the keyboard is active. (You will notice on the iPad app that the function entry line in the Graphs app has been moved from the bottom to the top of the screen for exactly this reason!)
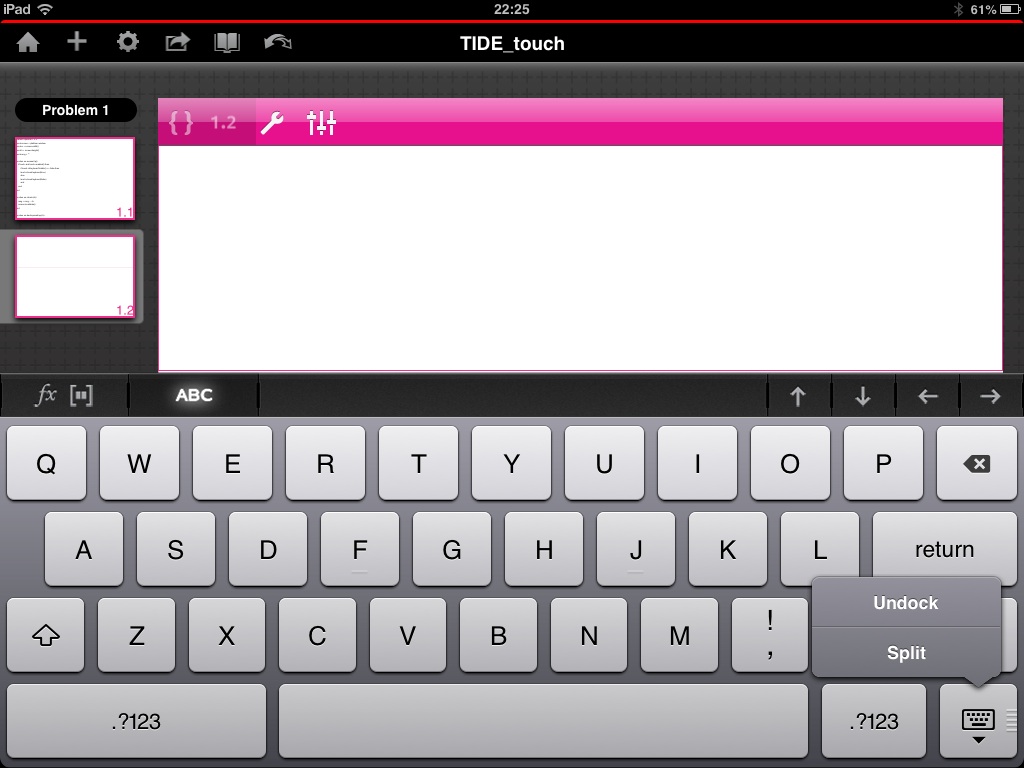
The iPad offers users several options for using the in-built keyboard which may also help here. The key at the bottom right of the keyboard usually serves to dismiss the keyboard. Hold it down, however, and two options apear: "Undock" and "Split". Choose the first and your keyboard is now floating - use the same key to move it up and down. In this way you may position the keyboard to better access screen content.
The "Split" option breaks the keyboard into two halves, reducing its size substantially and optimizing it for "thumb" typing. This split keyboard is also draggable and may easily be repositioned. (NOTE: the TI-Nspire mathematical keyboard is unavailable in this mode, but can be dragged up and down as described above).
2. Adding a Little Touch Magic to your Scripts
Study the script opposite.
Most of this script is a standard text input vehicle - an empty string (msg) is defined, and then as text is typed, each character is added to this string, which is displayed in the center of the screen.
What is different about this script is the on.mouseUp() command (shown in red.)
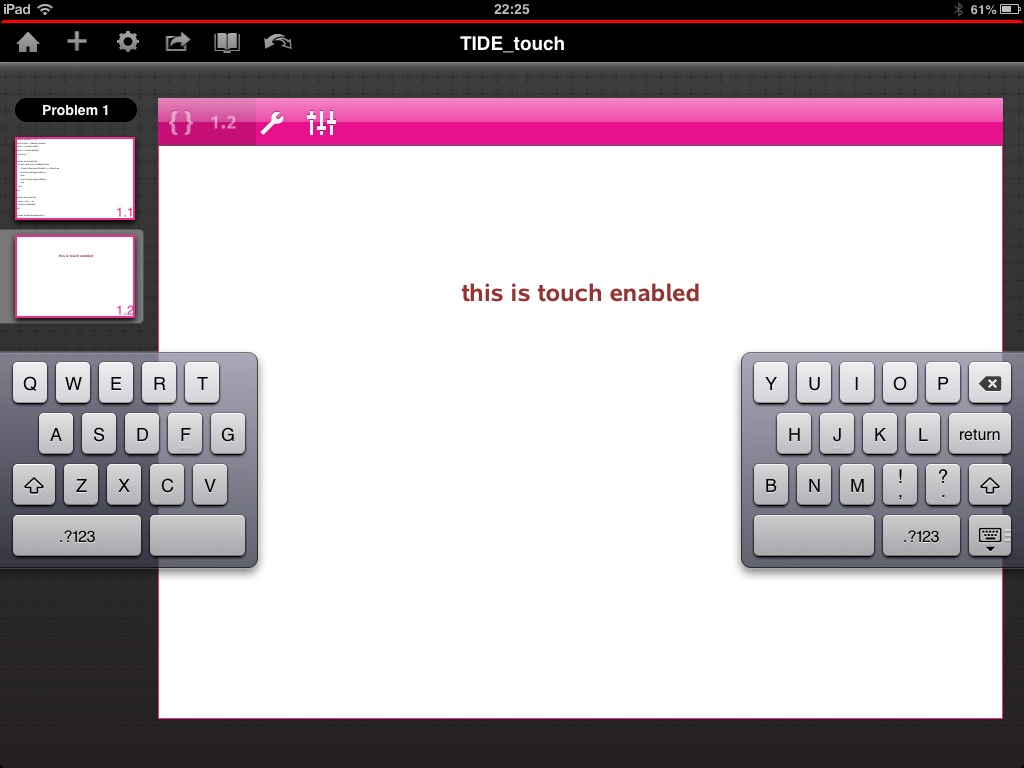
On a non-touch device (computer or handheld) this script will ignore these commands, and will run as expected. On a touch device, this function checks whether touch is enabled when the mouse is clicked anywhere on the screen. If so, then it checks if the keyboard is visible. if not, then it is displayed; if it is visible, then the keyboard is hidden.
This small code snippet is all that is needed to make a script touch-ready. It may be used in a variety of ways. Simplest is probably the example shown, where tapping anywhere on the screen tests for touch and keyboard visibility.
But what if there are other objects that need to respond to such a tap - buttons, sliders...? A simple solution might be to pick a section of the window (eg if y < 0.2*h - tapping at the top of the screen will activate the keyboard).
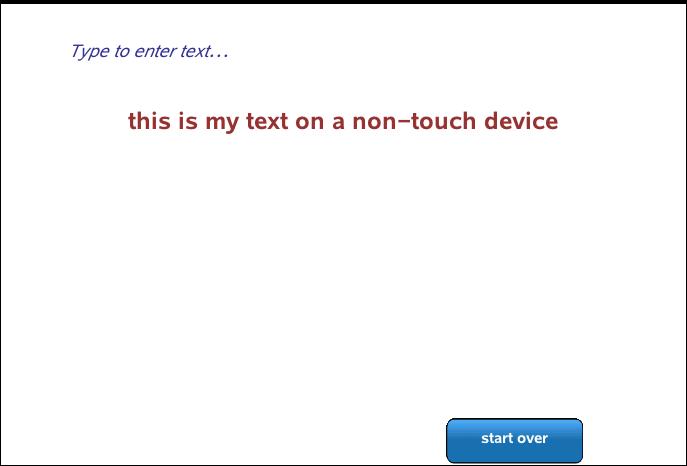
Of course, you could just add a button and label it "keyboard" or "keyPad". In the example shown, the first screenshot is taken on a computer (or handheld), where no keyBoard is required - typing normally displays what is typed. The second shot comes from an iPad - tapping the blue "keyBoard" button here brings up the iOS keyboard.
It is even possible, as shown here, to use the touch and touch.enabled tests to determine whether to display items like buttons: so we see that, on non-touch platforms, the button is not displayed.
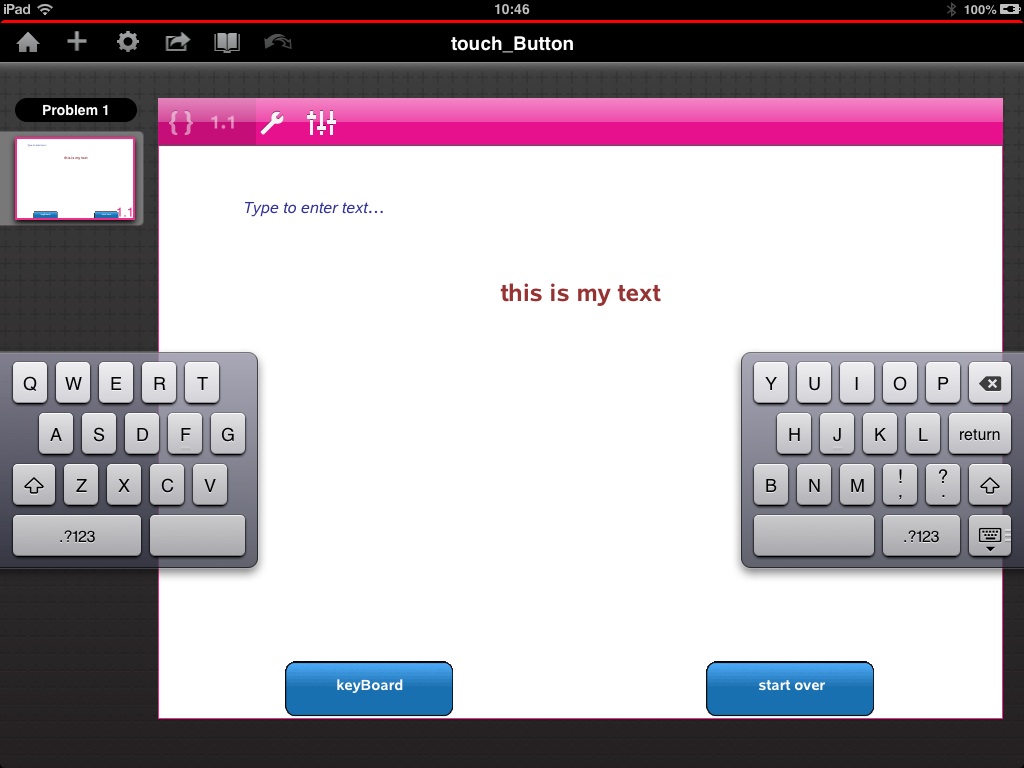

Study these features within the script for the document touch_Button.tns in the supporting documents collection for this tutorial. You may also be interested in the code which adds the buttons.
platform.apilevel = 2.2
local screen = platform.window
local w = screen:width()
local h = screen:height()
local msg = ""
function on.mouseUp()
if touch and touch.enabled() then
if touch.isKeyboardVisible() == false then
touch.showKeyboard(true)
else
touch.showKeyboard(false)
end
end
end
function on.charIn(ch)
msg = msg .. ch
screen:invalidate()
end
function on.backspaceKey(ch)
msg = msg:usub(0, -2)
screen:invalidate()
end
function on.paint(gc)
w = screen:width()
h = screen:height()
gc:setColorRGB(50, 50, 150)
gc:setFont("sansserif", "i", 12)
local str = "Type to enter text..."
gc:drawString(str, 0.1*w, 0.1*h, "middle")
gc:setColorRGB(150, 50, 50)
gc:setFont("sansserif", "b", 18)
local sw = gc:getStringWidth(msg)
gc:drawString(msg, (w - sw)/2, h/4, 'middle')
end
3. Optimizing Scripts for a Touch Platform
While the iPad display shares more with the computer than the handheld (so nice to have the room to move on a larger screen), under the hood there is a key similarity with the handheld: triggering frequent screen refreshes is an important consideration when coding. This may take the form of adding platform.window:invalidate() to any functions that involve changes to the display. It may even involve adding a timer than triggers a screen refresh at regular intervals. But if you want to see changes to the screen when expected, then this must be a part of your code.
Another important difference particular to touch enabled devices is the size of the pointer: the finger or stylus is a much bigger selection tool than mouse on computer or handheld, and this also needs to be factored into your scripts.
This may involve revising the "contains" function for selected classes of objects. Consider a circle used as the driver for a slider. If r is the radius of the circle and d the distance between the center and the current (x, y) point, then we usually define the "contains" property to be true and d <= r. For some scripts, it may be of value to define this as d <= 2*r or even 3*r.
You might also consider having your selection object "grow" upon selection so that it is visible underneath the finger or stylus.
These ideas are exemplified in the links opposite.
At this point, if you plan to work regularly on the iPad, it is recommended that you work through the Supplement: Working with Scripts on the iPad, which offers a nice scripting technique to make editing and debugging your scripts much easier!
Home ← TI-Nspire Authoring ← TI-Nspire Scripting HQ ← Scripting Tutorial - Lesson 28